Search
Help Center
Designs
What brand of thread do you recommend?
We use mostly Floriani Polyester these days. We also love and use Robison Anton Polyester and Madeira. Of course, there are many great threads available on the market.
Are your designs manually digitized?
YES! All of our designs are manually digitized. Great care is taken in state of the art software to precisely digitize each design with accuracy, minimization of unnecessary jump stitches, and proper settings to ensure a delightful stitch out for you.
Are your designs test stitched?
YES! Absolutely. Every single design at Designs by JuJu has been thoroughly tested by our *in house dedicated testers* and stitched repeatedly until they are satisfactory for release.
In the very rare event that you have any issues, it is most likely due to a factor that we can easily assist you with. This is often due to stabilizing, materials, or machine tension. However, please do not hesitate to contact us at support@designsbyjuju.com with any issues and our friendly support staff will assist you.
What thread brand is used on your color charts?
The primary purpose of a color chart is to show you which part of the design is stitched at each color stop. Many of our design files are applique designs or ITH projects, so your thread choice will depend on the fabric you use. The same philosophy holds with our embroidery designs - it is NOT imperative that you use the exact same thread colors on the chart. In fact, when we stitch samples we rarely follow it exactly ourselves! The beauty of custom embroidery is getting to create a unique project with the threads you already own.
Over the years, we have used a few different thread brands when generating color charts. Color charts that contain thread numbers will be for Robison Anton Super Bright Polyester OR Floriani Polyester. We have started using Floriani more consistently recently, so the newer designs are digitized with just Floriani thread charts.
If you have purchased designs that we acquired from other companies (The Itch 2 Stitch, DigiStitches, Milly Melly, Munchkyms, Stitch Away Applique, Sew Embroidable) we do not have record of what thread brand was used when they created their color charts.
My Account
Why do I have to log into an account to add items to my cart?
Our site has a wonderful feature: it will not allow you to purchase the same product twice! In order to prevent you from buying something again, you must be logged into your account prior to shopping.
If it is your first time on our website, click the "Create an Account" link. If you have purchased in the past, click the "Sign In" link. These links will appear in the top right corner of our website.
Once logged into your account, when you view a product (whether in a category or search results) the "Add to Cart" button will say "Purchased" for items in your order history.
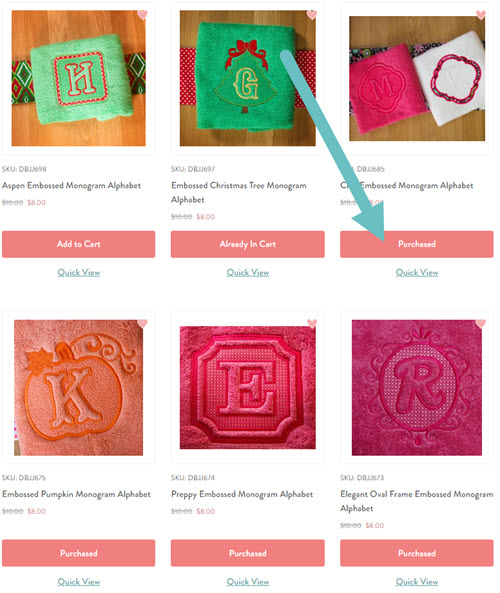
It will also say "Purchased" on the design page:
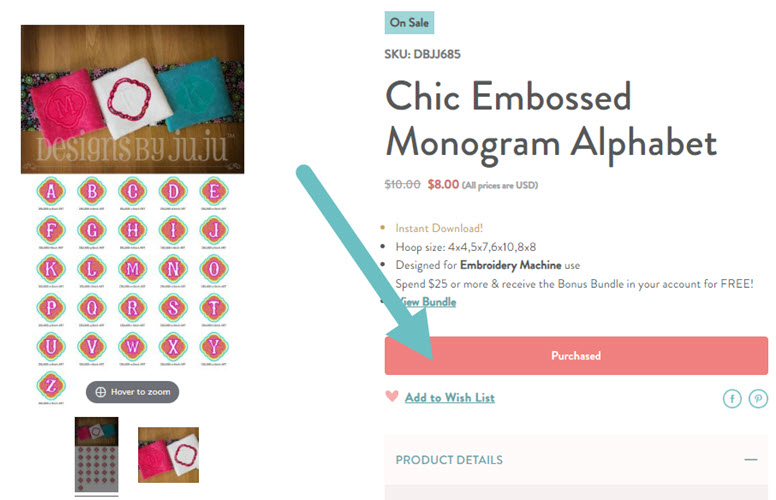
If you click the "Purchased" button, you will be taken directly to the download page for the order where you purchased the design, making it easy to download again if needed!
PLEASE NOTE:
- If you have ordered designs in the past under an additional account created with a different email address, this feature will not work. The "purchased" link only appears for designs ordered on the account you are currently logged into. If you have multiple accounts and would like to combine them into one, please contact support for assistance, providing all relevant email addresses, specifying which one should be use for all future orders.
- This feature will only work for designs purchased on THIS website (designsbyjuju.com). Through the years we have acquired the design inventories of several other companies. If you had purchased designs directly from those websites (The Itch 2 Stitch, Munchkym, Milly Melly, Stitch Away, etc) your customer records from those companies did NOT transfer to your account on Designs by JuJu. You will need to consult your downloads or invoices before purchasing since you will not get an alert.
The Itch 2 Stitch products have an item number/SKU starting with: I2S_
Munchkym Designs have an item number/SKU starting with: DBJJ_MD
Milly Melly Designs have an item number/SKU starting with: DBJJ_MMD
Stitch Away Applique Designs have an item number/SKU starting with: DBJJSA - To assist you with record keeping, we have a check list available for all Itch 2 Stitch designs that you can download and track what you already own. It is available as an Excel file that you can update digitally or a PDF that you can print and manually check off. If you had purchased a set of designs, be sure to check off all of the individual listings associated with that set as well. You can request this by contacting support.
Why can't I log into my account?
When logging in, please make sure you do not type any spaces before or after your email address and password. The log in will not be recognized with spaces. We also recommend typing the information directly and not using autofill.
If you do not remember your password, click the "Forgot Your Password?" link. Once you enter your email address on the next screen, you will receive an autogenerated email from our site with a link to reset your password. (If you do not receive an email in your inbox, please check your spam or promotions folder. Thank you!)
If you are confident you are typing your email address and password correctly, your browser may be reading old history. You can try clearing Designs by JuJu from your browser history and refreshing your page:
1. Exit off www.designsbyjuju.com completely (close tab)
2. Clear Designs by JuJu from your browser history
3. Open new tab and go to www.designsbyjuju.com
4. Click on Sign In
5. Enter email and password
You can also try clearing cookies for that browser or try using a different browser.
If none of that works for you, please contact support for further assistance.
What is the fastest way to redownload one particular product?
Have you purchased hundreds of products and can't remember when you bought something in particular that you need to redownload? There's a fast way to find it! First, log into your account.
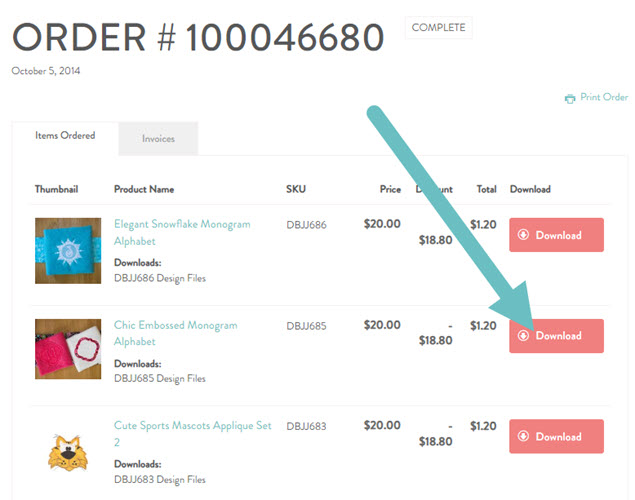
If you know the exact item title for the product you want, go to that product page. The "Add to Cart" button will actually read "Purchased". Clicking that will take you to the exact order on your account!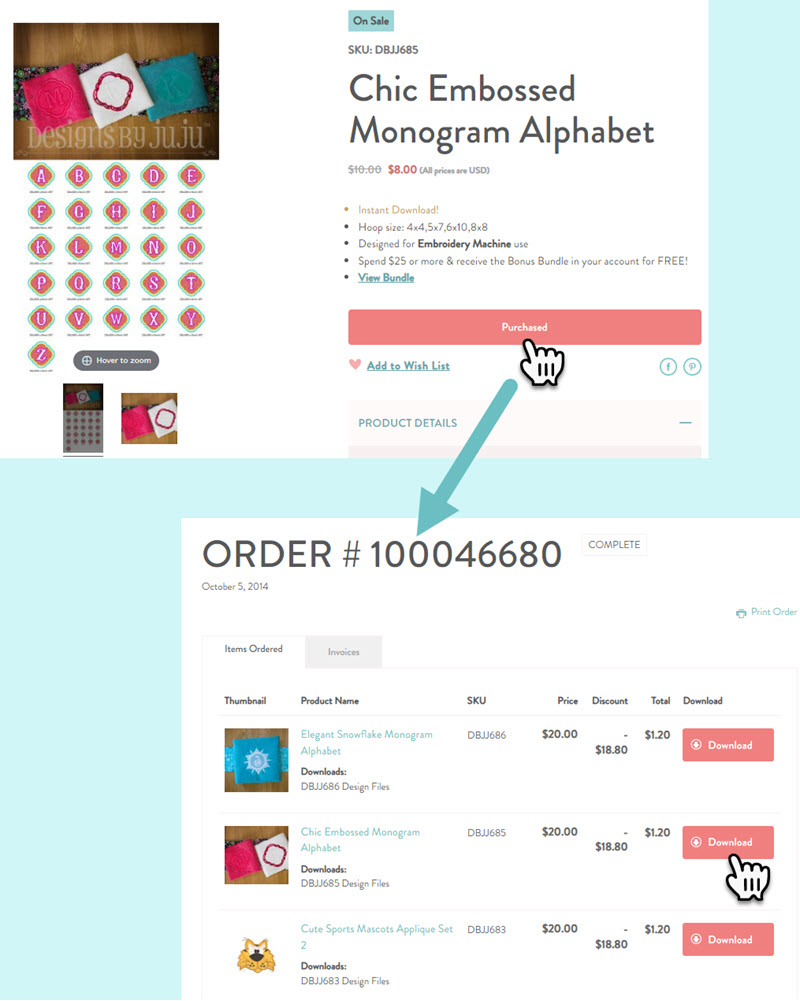
If you don't know the exact item title, you can click "My Downloads" at the top of the screen and use the Filtering bar to search your downloads by product name or SKU. For example, when I type the word "embossed" only items that include "Embossed" in the product title are shown, everything else is filtered out:
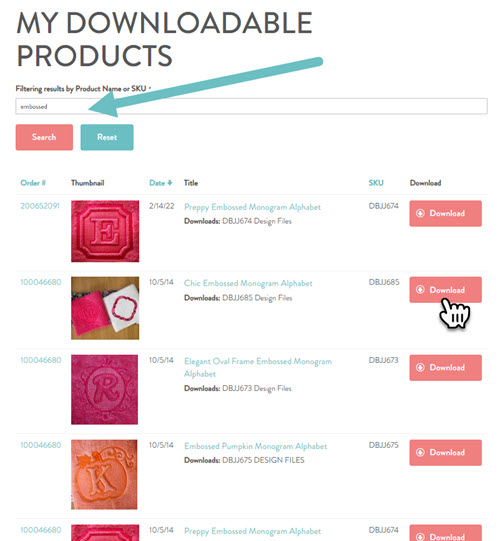
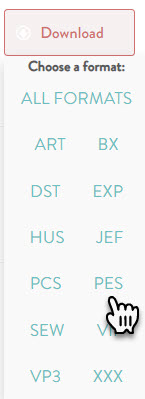
Once you've found the item, click the Pink "Download" button. You can choose the "All Formats" option or just your preferred format for a smaller/quicker download.
Now you are ready to stitch!
How do I download my purchases?
Once you have logged into your account, there are two different ways you can find download links for the items you have purchased.
Method 1:
Click, "My Orders" at the top of the screen.
You will have access to every order you have placed on your account on our website. Initially they will be displayed in order of purchase date with the most recent on top. At the bottom of the screen you can select how many orders you want to have displayed and navigate through the pages of orders.
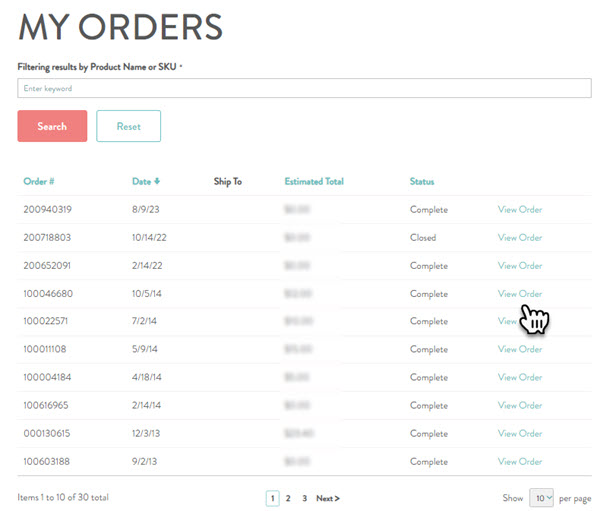
Click "View Order" next to the order you wish to download.
On the next screen you will see itemized list of the designs you purchased on that order.
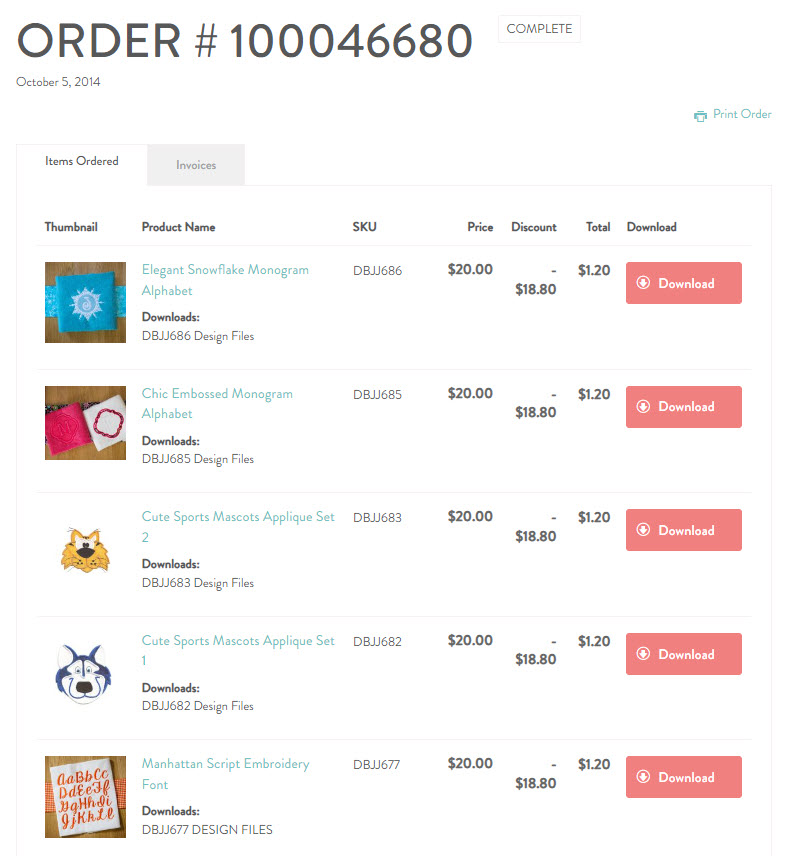
At the top you can click the pink "Download All" button. It will package everything on the order in a single zip. All machine formats will be included. If you placed a large order, you will likely get this warning:
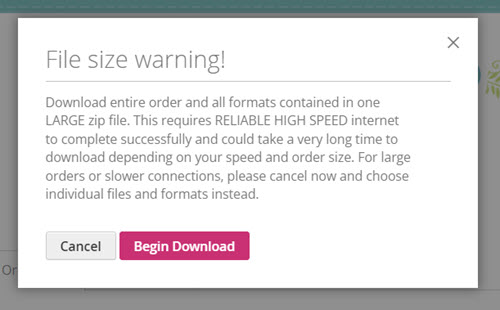
Instead of downloading all at once, you may prefer to download the products individually. When you do so, you have the option to download a smaller zip that contains just the one machine format you need (plus all the documentation files). This can save download time and storage space on your computer.
Method 2:
If you are looking to download one particular product from an old order, instead of clicking on "My Orders" you can click on "My Downloads" and search for that product. Read more about that method here.
Placing an Order
What payment methods do you accept?
We accept PayPal as well as all major credit cards: Mastercard, Visa, American Express and Discover
All payments are securely processed. You have the option to save credit card information in your account, but it is NOT required.
What currency are your prices in?
All prices listed are USD (United States Dollars)
Is there a limit to my downloads?
Great news! We offer unlimited downloads, and your download links will never expire (as long as the www.designsbyjuju.com website exists).
HOWEVER, please do download your designs upon purchase. We offer unlimited downloads as a courtesy, but we are NOT a cloud storage service. It is the customer's responsibility to store and organize their purchased designs. We highly recommend backing up your files on both an external hard drive and cloud storage service.
We are selling machine embroidery designs and not storage.
Do you offer refunds or exchanges?
Due to the electronic nature of our product and its ability to be reproduced, there are NO refunds or exchanges.
We are extremely firm on this policy. PLEASE carefully review your order or ask questions PRIOR to purchase.
It is the customer's responsibility to know and understand their hoop capabilities and maximum sewing field. Thank you!
Shipping
How will I receive my designs?
Your designs are available for instant download immediately upon purchase in your account. You must be logged into your account to download your designs.
You can download "all formats" OR simply choose from the download button which format you'd like to download. Since we offer unlimited downloads, you may come back at a future time to choose another format if you have more than one machine or your format needs change.
Can I get my designs on a DVD or USB?
We are sorry, but due to the prohibitive rising production costs, we no longer offer the option to receive designs on a USB or DVD (effective 3/24/2024). Our designs are only available by download.
Software
What embroidery editing software do you recommend?
We *highly* recommend Embrilliance Essentials Embroidery Software. It is user friendly and you can use our BX format fonts as "typable" fonts! There is a free "Express" version available for JUST typing monograms and fonts. You cannot use the free version to merge, customize or edit. 
We highly recommend purchasing and owning some kind of embroidery editing software for maximum versatility. Please see our YouTube channel for numerous videos on how we use Embrilliance.
What software do you use to create your designs?
We use a variety of quality digitizing software packages to create designs, depending upon the desired effect. All designs are 100% manually digitized and tested as many times as necessary to provide you with the highest quality possible.
Can I resize your designs?
You may resize our designs in your embroidery editing software, but we do not recommend resizing more than 10-20% in either way in order to maintain the integrity of the design. We are UNABLE to do any custom resizing. Please note that if you choose to resize our designs, you do so at your own risk. We only guarantee the quality of the designs in the sizes we provide. We highly recommend doing a test stitch of an altered design before embroidering it on a valuable item.
We do NOT recommend resizing sketch designs at all - most programs do not recalculate the variable density accurately, resulting in gaps and/or thick stitching. Please stitch any design with sketch elements at original size only. We also do NOT recommend resizing In-the-Hoop projects - many elements are sized/spaced in a specific manner.
If you are looking for excellent embroidery editing software that is versatile and affordable, we HIGHLY recommend Embrilliance Essentials Software. You can also use our BX fonts with it!
Why doesn't my embroidery design match the color chart sequence?
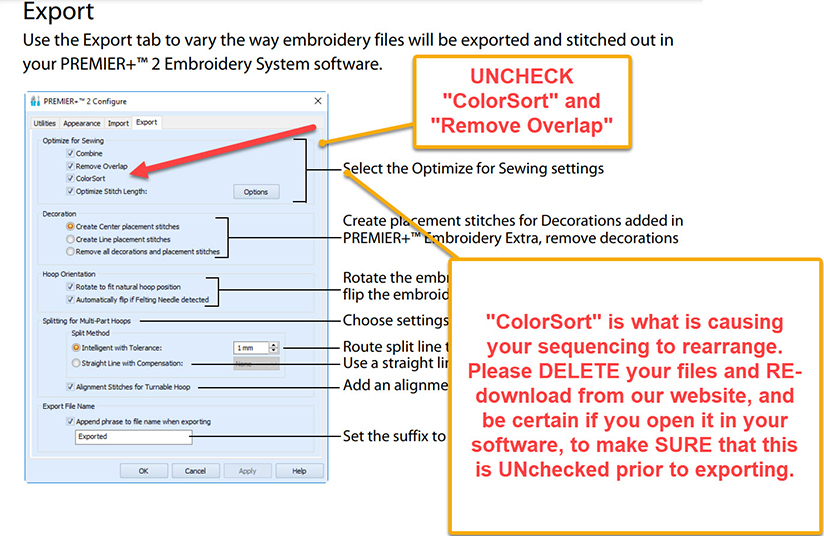
It is very important that you become proficient in the embroidery software that you use. Some embroidery editing programs, such as Premier+, Pfaff Creative and Mysewnet, have an automatic feature checked by default to "color sort" your designs in an effort to be more "efficient". This can come in handy for your work... at times. This is NOT a good idea when you have purchased quality, manually digitized embroidery designs such as ours. Why? We digitize and path our designs in a particular sequence ON PURPOSE for efficiency, stitch count, and sequence.
EXAMPLE: The color "red" may be used more than one time in your design. The color sort feature may group all the reds together in one step. You do NOT want the "reds" grouped together because one part may need to stitch AFTER other parts. "Color sorting" can potentially mess up your sequence of purchased designs. This is especially true with applique designs and In-the-Hoop project files.
If you are scratching your head wondering why the design sequence on your machine does NOT match our instructions, it's likely that it was brought through a software program such as this that had this feature checked.
When you open your design in your software, PRIOR to exporting the design to stitch on your machine, please make sure that any "color sort" feature is UNchecked. You will also want to make sure "remove overlaps" is UNchecked as well because that could break important placement/tackdown lines that are under a satin stitch for instance.
Here is a screenshot for the Premier software:
Please note, as agreed to in our terms and conditions:
All designs are test stitched prior to being listed for sale and are guaranteed in the sizes we have provided. We do not guarantee your stitch out for designs that have been resized, edited, merged or brought through software programs that may alter the settings of the design. (Example: software programs that color sort (change the stitch sequence) by default, remove overlaps, etc.) Our designs are MANUALLY digitized for efficiency, stitch count, and sequence. If you choose to use embroidery editing software to open, edit, merge and export a design, it is YOUR responsibility to know your software. We are unable to provide support for your software should a problem arise due to too many variables in all of the software programs.
Embroidery Machine Formats
Will your designs work on my machine?
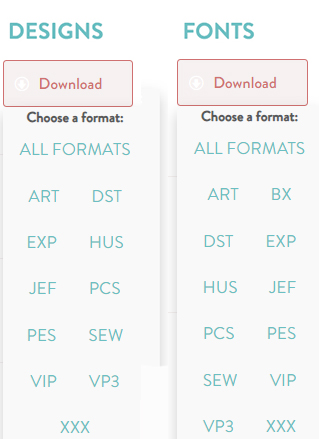
While we are unable to give advice on specific machines and software, your embroidery machine should accept one of the formats that we offer. We provide our designs in all major machine formats including ART, DST, EXP, HUS, JEF, PCS, PES, SEW, VIP, VP3 and XXX.
You will need to know your machine's maximum stitch field. We offer multiple design sizes as often as possible, but some of our large monograms and ITH projects simply will not work in a 4x4 hoop, for example. Be sure to read listings carefully to make sure your machine has the capacity to stitch the design files included. Refer to the "Size and Stitch Counts" information for details.
You will need the appropriate hardware/software to use the designs. After downloading to your computer, you must know how to extract files from the zip and then transfer the designs from your computer to your embroidery machine.
For assistance in transferring designs to your machine, and other operating questions, please refer to your manual or embroidery machine dealer.
Which machine formats are available?
Our design sets are offered in ELEVEN major machine formats: ART, DST, EXP, HUS, JEF, PCS, PES, SEW, VIP, VP3 and XXX. (Please note that SEW and PCS formats are not available for 5x7 or larger designs.)
- If you download directly from your email invoice, you will receive all included formats in one zipped folder. Once unzipped, the formats are neatly separated and labeled in subfolders for your convenience.
- If you download from your account on our website, you may choose to download all formats OR a smaller zip that only contains your preferred format.
We offer the BX format for use in Embrilliance Embroidery Software with all embroidery fonts, unless otherwise specified on the product details page. It is a separate download option among the format choices.
I don't know what format I need… do you?
Here is a handy chart of common machine brands and formats:
- ART - Bernina machines
- DST - Tajima machines
- EXP - Melco machines
- HUS - Viking, Husqvarna machines
- JEF - Janome machines
- PCS - Pfaff machines (not available on 5x7 designs)
- PES - Brother, Baby Lock, Bernina machines
- SEW - Janome, Kenmore, New Home, Elna machines (not available on 5x7 design sets)
- VIP - Husqvarna machines
- VP3 - Husqvarna, Pfaff
- XXX - Singer, Compucon machines
I have two embroidery machines. Can I purchase my designs in two formats?
You do not have to specify a format at the time of purchase. After your order has been placed and you are ready to download from your account, you will have the option to download all included formats, or just the specific format(s) you use. You may return to your order history at a later date to download a different format should the need arise.
Tutorials
How do I make a hooded towel? Is there a tutorial?
YES! We have a fantastic tutorial on our YouTube channel. CLICK HERE FOR THE TUTORIAL Be sure to subscribe to our channel for future tutorials!
How do I stitch out a machine applique design?

Are you new to machine embroidery? Have you been nervous to try an applique design? Well, have no fear! The following is a step-by-step tutorial for stitching a three-fabric applique design from start to finish. A free design is available so you can work alongside us!
Gather your supplies.
In addition to the design file and color chart, you will need:
- embroidery thread and bobbin
- fabric
- scissors
- stabilizer hooped with your base item.

Prepare your fabrics ahead of time with a fusible product.
This step is not required BUT makes trimming easier, prevents fraying along the edge of the fabric, and adheres the applique fabric to the base item to prevent wrinkles.
We use and recommend Heat'n Bond Lite. Follow the manufacturer’s instructions for fusing to the backside of fabric.

Remove the Backing Paper
Once it has cooled down, be sure to remove the backing paper!

Refer to the included color chart for your design.
In general, our applique designs start with all the placement and tack down stitches for the fabric portions of the design:

- The pink steps are single running placement stitches showing where the fabric should go.
- The green steps are double running tack down stitches that attach the fabric to the hooped item.
Please note: often our applique fabric steps are pink/green, but depending on the design it may instead be two shades of pink, or red/black. In any case, it is important that these steps alternate colors in the design file so that your machine stops between steps. However, you do NOT need to use pink and green threads for these steps! Instead pick a neutral color and use it for all placement/tack down stitches. (Once all fabric is tacked down and trimmed, then use different thread colors for the remaining color steps to coordinate with your fabric choices.)

Stitch Design Step 1: A single running stitch to show fabric placement for the outer wings.

Place the First Fabric
Lay your first fabric down, making sure the entire placement stitch is covered. (You may wish to use a spritz of spray adhesive to help hold it in place.)

Stitch Design Step 2: A double running stitch to attach the first fabric to the item.

Trim the First Fabric
Remove the hoop from the machine but do NOT unhoop your item. Lay your hoop on a flat surface to support the hooped fabric so it remains taut.Trim around the tack down stitches as close as you can without snipping them.

Stitch Design Step 3: Return the hoop to the machine and stitch the placement stitches for the inner wings.

Place the Second Fabric
Lay your second fabric down, making sure the entire placement stitch is covered.

Stitch Design Step 4: This tacks down the second fabric. Then carefully trim around the shapes as before.

Stitch Design Step 5: Return hoop to machine and stitch the placement stitches for the body of the butterfly.

Place the Third Fabric
Lay your third fabric down, making sure the entire placement stitch is covered.

Stitch Design Step 6: This tacks down the third fabric.Then carefully trim around the shapes as before.

At this point with all fabric trimmed out, it is good to fuse the fabric in place before moving forward. Depending on the size of your hoop, you may need to use a small travel or craft iron.
NOW thread color matters! Pick threads that coordinate with the fabrics you have chosen and what you want for the remaining details. You may follow our color chart for inspiration or do your own thing.
Please note that our satin stitch steps start with a zig-zag underlay to provide a nice foundation for the satin stitches which follow.
Stitch Design Step 7: Satin stitches for the antenna

Stitch Design Step 8: Satin stitches for the outside wings

Stitch Design Step 9: Satin stitches for the inside wings

Stitch Design Step 10: Satin stitches for the body

Stitch Design Step 11: Face details

Depending on what model embroidery machine you have, you may need to trim the jump stitches between design elements yourself when the design is completed.

All Done! Sit back and admire your work!

Now it is your turn!
 Our FREE Baby Butterfly applique can be found here. It comes in 3 sizes for the following hoops: 4x4, 5x7, 6x10.
The design files are available in 11 machine formats: ART, DST, EXP, HUS, JEF, PCS, PES, VIP, VP3, SEW, XXX (please note that PCS and SEW formats will only include 4x4 files when available for the design).
Also included are the following documents:
- a color chart
- thumbnails, which provides exact dimensions and stitch counts for each size
- PDF version of this tutorial
All of these items are packaged together in an easy-to-download zipped file. You will need to extract the files from the zip first before transferring the file you want to stitch to your embroidery machine. Full directions for downloading from your account and extracting files from the zip can be found here.
We would love to see pictures of your Baby Butterfly applique! Please email them to support@designsbyjuju.com or post in our Facebook Blessings Group!
Special Sales
How does this month's sale work?
Christmas In July 70% Off Everything
EVERYTHING is 70% off until 7/31/25 @ 11:59pm ET.
*$5 minimum cart value required. Discount automatically applied.
Bonus Bundle Offer:
For orders of $30 or more, you will receive July's bonus bundle. This will be automatically added to your order after you check out. Full details can be found here: July Bonus Bundle
Christmas In July ends Thursday 7/31/2025 (11:59PM ET).
First July Bonus Bundle ends Tuesday 7/15/2025 (11:59PM ET).
Second July Bonus Bundle ends Thursday 7/31/2025 (11:59PM ET).
If you have any questions, please fill out the contact form and ask for clarification BEFORE entering payment information. Thank you!
I spent $30 USD, where are my bonus items?
Thank you for your order! If your single order design total was at least $30 USD, the Bonus Bundle of designs will automatically appear in your downloads AFTER the completion of your order. They will NOT appear in your cart nor on your email order confirmation. Once you log into your account on our website, the bonus items will be located at the bottom of your order after the products you purchased. (Please note: you may have more than one page of downloads for your order.) Full details explained here.
Wholesale and Classes
Can I use one of your designs in a class I'm teaching?
Class Licensing Rates: (4 person minimum)
Design Sets, Monograms and Alphabets - $5 each
Single Designs - $2 each
In The Hoop Designs - 50% off the base retail price each
A license is required per item, per person.
Teachers/ instructors who are purchasing the licenses for the class MUST have a DBJJ account. If you advertise the class online or on social media, you must credit Designs by JuJu for the design.
Please send the following information in an email to support@designsbyjuju.com:
1. Name of your company
2. Name and Email of the teacher/ instructor for the class (must match DBJJ account)
3. SKU of the product(s) requested (Please note we will not license some products for classes)
4. Date of the class
NEXT:
5. After we receive the items above, we will request a list of participants. All participants of the class must provide their Name and Email address for licensing purposes. Once we have the list of participants, we will send an invoice to the teacher/instructor. We must receive the completed list of participants and payment for the invoice at least 24 hrs before the date of the class.
6. After we have received payment, we will add the product(s) purchased to the account of the teacher/instructor if not already owned (the teacher/instructor only needs to purchase a new license for a product they don’t already own). The teacher/ instructor will be responsible for distributing the digital design to the class participants.
We will send a printable PDF that will serve as a physical license for participants who do not sign up for a DBJJ account. (Note: We encourage participants of any class to create a DBJJ account, but is not required for class participation. We can only provide customer service to those who have DBJJ accounts.)
Class participants who already have a DBJJ account simply need to email us after the class is complete and we will add the licensed product(s) to their account free of charge. Accounts provide unlimited downloads, customer support and exclusive offers. The participant MUST create the account using the supplied name and email address for this to work. We may ask to provide the PDF license distributed by the teacher/instructor as proof of purchase.
Thank you so much for your interest! We are excited to see what you create with our designs! Email us if you have any questions.
Do you offer wholesale accounts or an affiliate program?
No, at this time we do not offer our designs wholesale, nor do we have an affiliate program.
Machine dealers and quilt shop owners interested in using our design files in embroidery classes can learn more here.
Quilting Backdrops
What are Hoop Fillers?
We have named these files “hoop fillers” based on customer requests for quilting files that fill the entire embroidery hoop. This allows you to quilt your fabric and trim it to your custom size or do allover quilting on yardage, maximizing your embroidery field. These files only have the quilting motif; they do not include batting and fabric tack down lines.
How much fabric do I need for a Quilting Backdrops project?
Since each project is unique, we cannot supply you with fabric information. It is important to do your own math calculations to determine how much fabric you'll need. We recommend cutting the fabric for your blocks a couple inches larger than the stated size to ensure at least a 1/2-inch seam allowance all around.
Will these work with previously released quilt blocks or ITH projects?
No. Quilting Backdrops is a brand new design series with very specific sizing. Products with a SKU starting with DBJJQB can mix-and-match with each other. However we cannot guarantee Quilting Backdrops can be used with previously released quilt blocks (SKU starting with DBJJ) nor In-the-Hoop projects (SKU starting with DBJJITH) because those have custom sizing that varies by project.
Are Quilting Backdrops the same as End-to-End?
No, they are not the same. End-to-End designs are a continuous line single running stitch quilting motif that starts on the left and ends on the right. They are custom designed so that when they are aligned properly in your hoop and stitched repeatedly across a hooped quilt sandwich (quilt top, batting, and backing) you cannot tell where one block ends and the next one begins. E2E designs mimic pantograph quilting. Our file sizes are based on standard machine hoops.
Quilting Backdrops are ITH quilt blocks that have placement and tack down steps for batting and fabric, then the quilting motif comes next. They are designed to make a Quilt-As-You-Go project with a false backing that is added after the blocks are made and pieced together. We offer 38 sizes of In-the-Hoop QAYG files: square blocks, coordinating 2-inch sashing, and rectangles in 3, 4, and 6-inch widths.
That being said... some Quilting Backdrop patterns are closed shapes contained within the block. In these cases we have included BONUS Quilting Only files that do not have the batting/fabric block lines. These Quilting Only files can be used for all over quilting, similar to E2E but not in the same connecting pantograph-like manner. They are smaller scale motifs, so we recommend using them on smaller projects.
(Please note some Quilting Backdrop patterns are geometric and have edge runs that are hidden once blocks are pieced together. Because of these edge runs they are NOT suitable for all over quilting, and bonus files are not included. See product details on each item for more information.)
Do I need any special tools, rulers, or systems to use your Quilting Only files?
Nope! Our Quilting Only files are designed for universal use with standard embroidery hoops and common hooping techniques. You don’t need any specialty rulers, templates, or alignment systems to stitch these designs.
Each file is carefully sized to maximize the stitchable area of your hoop while still fitting industry-standard dimensions. Whether you center with your machine’s built-in tools, eyeball it like a pro, or use a simple printed template from your embroidery software, these designs are ready to roll.
We keep things versatile on purpose—our files aren’t affiliated with or created for any particular system, so you can quilt your way. No fancy tools needed—just your machine and a little creativity.
Oma's Place Acquisition
What is happening with Oma's Place?
Designs by JuJu purchased the catalog of designs and in the hoop projects of Oma's Place (www.omasplace.com). We are currently in the process of transferring all products over to this website. If you are looking for more information or updates about this process, please visit our detailed Q&A page HERE.
DIDN'T FIND WHAT YOU'RE LOOKING FOR?
Contact Designs by JuJu for further assistance
Please allow us 48 hours to reply to your inquiry.
*We are no longer able to provide customer service through Facebook.*