Toggle Nav
 Inspire.
Create.
Stitch.
Inspire.
Create.
Stitch.
Search
You just took the leap and bought an embroidery machine. Or maybe you were lucky enough to have one gifted to you. Either way, you bring your new machine home, set it on the table, and stand back to admire it. Now what?
Don’t worry. In this tutorial I am going to help you get started. We are going to take it one step at a time. You have already taken that first big step—you have an embroidery machine!
As with most hobbies, getting started can be daunting. Your mind is overwhelmed with ideas and what accessories are needed to begin. Where do I find them? How do I get questions answered? How am I going to do this?
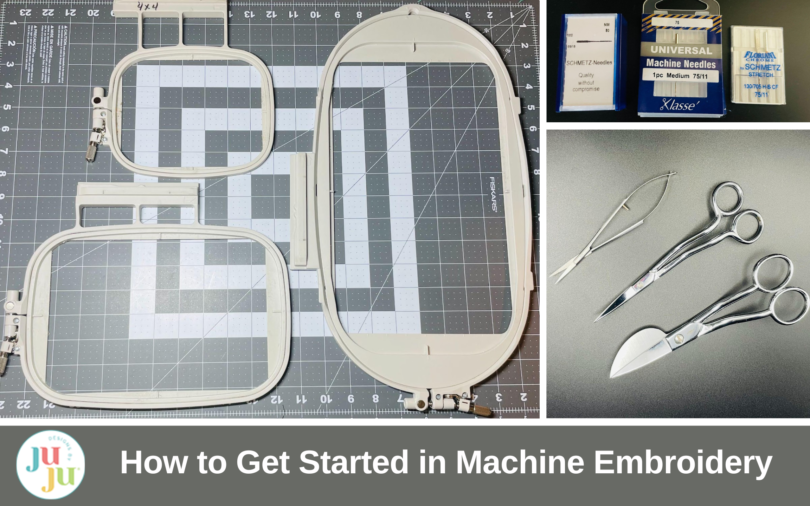
Quiet those thoughts for a moment, and before long you will be asking yourself, What took me so long to jump in? Keep in mind you do not need every type of stabilizer, every color of thread, or all the fancy tools to get started. To begin, keep it simple and start with the basics: embroidery machine, hoops (included with your machine), stabilizer, thread, bobbins, needles, scissors, and a USB thumb drive (if your machine is not wifi enabled). Your choice of fabrics will depend on what you want to embroider.
Check out the DBJJ team’s favorite supplies in Designs by Juju's Amazon Store.
There are a number of different manufacturers and each one carries a variety of embroidery machines. As you go through this tutorial or other tutorials listed below, remember your screen may not look the same, your hoops may be different, or the buttons may be in a different place. Don’t despair. Keep your manual close at hand and refer to it often if you become confused. Until you know your machine (and it won’t take you long), your manual will be your best friend. If you did not receive a manual, Google your make and model and you will most likely find a printable PDF online. If that doesn’t work, contact your local dealer and ask to order one. If your local dealer offers machine user classes, this is also a great place to begin.
Reference the following link for more in-depth information: https://www.designsbyjuju.com/blog/machine-embroidery-101/.

Embroidery machines have a variety of hoop sizes. Your exact machine model will determine the hoop sizes available to you. These can range from 4” x 4” all the way up to 11” x 14” and possibly even larger. New machines come out annually and the hoop sizes continually get larger. But for the most part, 4” x 4”, 5” x 7”, and 6” x 10” are the most common sizes. When purchasing a design, you will want to check hoop-size compatibility.

These hoops provide the strongest tension for the stabilizer and fabric. They have two rings: an inner ring, which is a fixed size, and an adjustable outer ring. This allows you to tighten the hoop more or less, depending on the thickness of your fabric and stabilizer. The outer ring has an attachment that slides onto your machine. This allows the machine to read the size of the hoop. These are the only hoops you will need to get started.
To do any machine embroidery you will need a stabilizer. There are different types for different jobs. We will start with the most popular types of stabilizer: cut-away, tear-away, and wash-away. If you can find a sample kit containing all three, that would be a great place to start. Here are a few available on Amazon: Embroidery Machine Starter Kits.
Cut-Away

Cut-away stabilizer is an all-purpose, medium-weight stabilizer that is soft and flexible. It works well with both medium- and high-density, large and small designs. It also works well with all fabric types. This is a permanent stabilizer that will remain sewn to the project and provide permanent support. When finished with your design, you will simply trim around the entire edge of the design to remove excess stabilizer.
Tear-Away

Like cut-away stabilizer, tear-away stabilizer is also good for both high- and medium-density designs and works well with all fabrics. The difference is that, when finished embroidering the design, instead of cutting around the edges, you simply tear away the excess stabilizer. This will give a clean look to the back of your project. If the back of your project will be seen (e.g., towels, napkins) then I would recommend tear-away or wash-away stabilizer.
Wash-Away

Wash-away stabilizer resembles the cut-away type but works like the tear-away, as it dissolves easily in warm water, leaving only the finished design showing. This is the stabilizer you would use if embroidering on free-standing lace, for example.
For more information on stabilizers, check out DBJJ’s embroidery stabilizer guide.
The most popular and widely used threads are 40wt. polyester. You will find several companies making these threads in every color you can imagine. I have tried a number of these brands and have found that you do not have to have the most expensive thread brands to get good results. My personal favorites are brothread and Simthread. Both are available on Amazon. These threads have worked well for me, are reasonably priced, and are available in kits that will give you a wide range of colors.
You may wonder if you can use your regular sewing machine thread in your embroidery machine. Sewing machine thread is generally 50wt., which makes it thinner than machine embroidery thread. It won’t hurt the machine to use it, but 40wt. machine embroidery thread is smoother and more robust and will withstand the high-speed stitching, break less easily, and give you a nice, clean, professional look.
Your machine will wind bobbins, or you can buy prewound bobbins on Amazon. Prewound bobbins will have more yardage, which means fewer bobbin changes.
Bobbins typically use a lighter, 60wt. thread. You can use your 40wt. thread for bobbins as well, but since machine embroidery designs can have over 20,000 stitches in a small area, the back of your design may be stiff and heavy if a heavy thread is used in the bobbin. This is why a lightweight, 60wt. polyester thread is often preferred.

A 75/11 needle is designed for use on high-speed embroidery machines. These needles can be used with polyester, rayon, and even heavier threads like metallics. If you sew, you probably have sewing machine needles on hand. These can also be used in your embroidery machine. I regularly use an 80/12 needle for most of my cotton projects. If I am doing a project with a stretch fabric, I will use a 75/11 stretch needle.
There are many different brands of needles. I use a variety and would not recommend one over another.
How often you should change the needle? A good rule of thumb is if your thread breaks more than three times, it is most likely time to change the needle.

If you are doing machine applique, you will want a nice pair of applique scissors. I also recommend thread snips, which help when trimming small, hard-to-get-to places.
Your machine is a great place to start if you want to practice before beginning a project. Embroidery machines come with built-in designs. Choose a simple one at first. Allow yourself to become familiar with your machine and the steps needed to complete a design.
Once you feel confident you are ready to move on, find designs that you know you can trust, ones that will set you up for success. Your search can lead you to multiple sites and designs, but not all will give you what you desire. Designs by JuJu | Machine Embroidery Designs has always been a favorite of mine. These designs are professionally digitized and thoroughly tested to ensure you get the quality you expect. There are thousands of designs available and new ones are released each month. DBJJ has a great variety of quality designs to fit your budget.

Once you have purchased your designs, you will want to download them to your computer. Most designs will come in a .zip file. Simply extract (unzip) the file on your computer and save the extracted file to a USB drive (or transfer it to your machine if it's wifi enabled). This is then inserted into your machine. Your machine will read the design and upload it to your screen. I like to label my USB drives to help me keep my designs organized.
Downloading Your Design to a USB
For those who are unfamiliar with how to download a design, I will do my best to explain this process.

After you have made your purchase at the DBJJ website, select My Downloadable Products. Here you will find all the designs you have purchased. These JuJu designs will remain in your account, so if you ever need to download again, they will still be there. Select the design you wish to download by clicking on the download arrow.

The next screen to appear will be all the formats the designs come in. The brand of machine you have will determine which format you need to download. Refer to your machine’s manual for this information. I have a Brother machine and it reads PES, so I am going to right-click on PES as shown. This will download a .zip file to my computer.
Next, the file will need to be “unzipped.” Since computers vary, I am going to refer you to the guide How to Unzip Files from Your Computer or Devices by GreenGeeks. Once your file is unzipped, copy it onto the USB drive, and it is ready to insert into your machine.
Social media sites like Facebook, YouTube, and Pinterest, as well as others, can be a big help to you. Designs by JuJu has multiple Facebook groups: Designs by JuJu, Designs by JuJu Embroidery Blessings Group; as well as a YouTube channel Designs by JuJu - YouTube. And if you are reading this, you have found the Designs by JuJu Embroidery Blog. These are all great resources for learning and asking questions. The blessings group is filled with people who are just starting out like you, and others who are knowledgeable and willing to answer any questions you may have. Many share their projects to inspire you, whether they be successes or mishaps—which we all have no matter how long we’ve been embroidering. If you are looking for inspiration, follow Designs by JuJu Machine Embroidery Designs on Pinterest.
Remember, you are not alone in this journey. You have become a member of a wonderful community filled with wonderful people willing to help.
As you get more acquainted with your machine and new hobby, you will find yourself wanting to expand your box of tools. But remember, fancy tools are not needed to get started. Don’t become overwhelmed. Start with the basics, and most of all, have fun. Be sure to share your projects with us in the Designs by JuJu Embroidery Blessings Group on Facebook, or anywhere on social media using the hashtag #designsbyjuju. We always look forward to seeing what you have created.