Toggle Nav
 Inspire.
Create.
Stitch.
Inspire.
Create.
Stitch.
Search
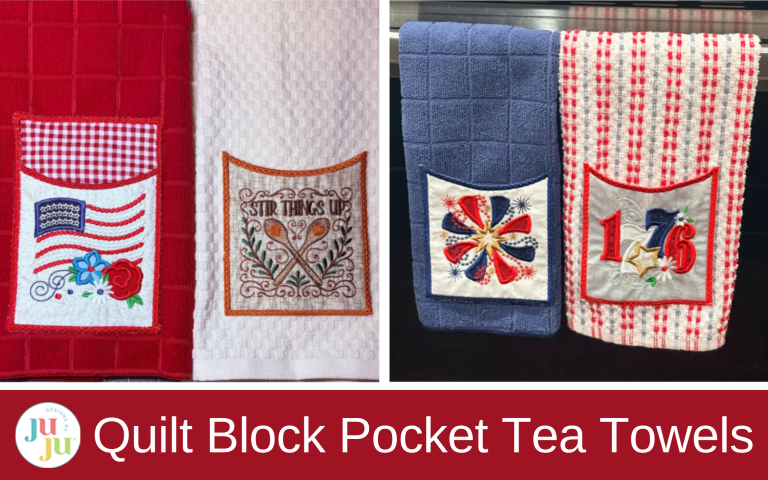
Add charm to your kitchen with tea towel pockets made from the Design by JuJu’s utensil holder designs and Star Spangled Stitches.
Do you enjoy finding new ways to use your Designs by JuJu designs? I do! In this tutorial, I’ll show you how I turned the utensil holder fronts into pockets for my tea towels. Do tea towels really need pockets? Maybe not, but they sure look cute! I’ll walk you through how I made two styles using the In the Hoop Patriotic Utensil Holder Project, plus blocks from the new Star Spangled Stitches sets and the Kitchen Sayings Embroidery Set.
Finished sizes: 5” x 7”, 5¾” x 5”
Check out the DBJJ team’s favorite supplies in the Designs by JuJu Amazon store. And for all your stabilizer and batting needs, Designs by JuJu+ has you covered.

To begin, gather an assortment of tea towels. Wash, dry, and press if needed.

Open the Patriotic Utensil Holder Project. Choose the front section of the utensil holder design.

Load to your screen. I use a Brother Stellaire machine, so your screen may look a little different.

Click Add and look through the Star Spangled Stitches sets. Designs with a fabric frame work well since their main applique fits nicely on the front of the utensil holder. There are four sets to choose from. For each design, use the 5x5 size. This is the Rope Flag from Star Spangled Stitches Set 1.

Add the 5x5 design to your screen.

Use the Move button to position the design so it fits well inside the front pocket. Focus on the embroidery design, not the fabric frame. Try to line up this part over the existing design, as shown in the picture.

Once your design is in place, you can start stitching.
Check the fabric cutting sizes that came with your utensil holder download.
Prepare the front pocket fabric by fusing a 5x5 piece of fuseEZ Fusible Interfacing to the back side of your fabric.

Hoop magicMELT Water-Soluble Stabilizer. Using only wash-away stabilizer will give your project a clean edge when it’s finished.
Start by stitching the placement lines for your front fabric.

Lay your fabric over the placement lines and gently smooth it, ensuring it covers every stitch beneath.

Stitch the fabric in place.

Pause here and advance the stitches to the start of the Star Spangled Stitches applique.

For each applique piece, begin with fabric-placement stitching, then secure the fabric in place with the tack-down stitch.

Position your fabric to cover all the stitches and tack it down.

Then trim it close to the stitch lines for a tidy, polished look.

Repeat these steps for each applique piece, trimming as you go to keep things neat.

Complete your design by adding the decorative stitches and a smooth satin edge.

Now, return to step 22 to add the backing to your pocket front.

Remove the hoop from the machine and place it on a flat surface with the back facing up. Lay the backing fabric over the design so it is fully covered. Tape the fabric in place to keep it secure, or use fabric adhesive spray if you like. Then put the hoop back on the machine.

Stitch the backing fabric to the front piece.
Remove the hoop from the machine (but don’t remove the project from the hoop), then carefully trim only the top section on both the front and back.

Your final step is step 23.

Stitch a smooth satin edge along the top to finish.

Remove your design from the hoop and carefully trim away as much stabilizer as possible, making sure not to cut the satin stitching at the top. Leave the fabric untrimmed on the sides and bottom for now. We will trim it later.

Use a wet cotton swab to gently clean away any leftover stabilizer along the top.

Next, load the 5x7 design size for the back piece.

Hoop magicMELT Water-Soluble Stabilizer, then take the hoop to your machine.
Refer to your fabric cutting guide to cut a piece for the pocket back.

Skip ahead to step 3. We’re only making the front section of the pocket back, so there’s no need for batting or an extra backing.

Lay your fabric on the hoop and stitch it in place.

Trim close to the stitches.

Move on to step 4 and position the pocket front on your pocket back fabric.

Line up the bottom stitching lines of the pocket front with the lines on the pocket back.

Make sure the sides line up as well. Put the hoop back on the machine and stitch the pocket front to the pocket back. Trim the pocket before continuing.

The final step is the decorative satin edge.
Remove the design from the hoop. Trim the stabilizer as close as you can without cutting the satin stitches.

Use a wet cotton swab to remove any extra stabilizer around the edges.

Center the pocket on your towel, and pin it securely in place.

Take your towel to the sewing machine and sew all the way around the edges. Use a thread that matches your satin stitches, and match your bobbin thread to the towel for a seamless look.
Tip: If you want to try having two pockets, sew just the sides and bottom.

Using the same steps, I made a towel with the new Kitchen Sayings Embroidery Set.

This time, we’ll make a pocket without the back section. We’ll still use the utensil holder design and one from Star Spangled Stitches.
Let’s start the same way as before.
To begin, load the In The Hoop Patriotic Utensil Holder Project into your machine.

Select the 5x7 backing and load it to your screen.

Using the Size key, reduce the height of the design to measure 6.33” x 4.88”. Select Add to return to the design file.

Load the 5x7 front pocket design to your screen.

Use the Move key to move the pocket down to the bottom of the backing.

You want the bottom of both designs to line up.

Select Add and load the design of your choice from the Star Spangled Stitches sets. Designs that have a fabric frame work well here because their main applique fits nicely on the front of the pocket. There are four sets to choose from, so you have plenty of options.

Add a 5x5 design onto your screen. I am using the 1776 from Star Spangled Stitches Set 1.
Use the Move button again to place the design so it fits nicely inside the front pocket. Focus just on the embroidery part, not the fabric frame. Try to line up this part over the existing design, like you see in the picture.
Once your design is in place inside the pocket, you can start stitching.

Use the Stitch Forward keys to advance to step 6. Refer to the fabric cutting sizes included with the utensil holder download.

Hoop the wash-away stabilizer into a 5x7 hoop and take it to your machine. Run the placement line for the background fabric.

Place your fabric over the placement line and smooth it out so it covers all the stitches underneath. Tack the fabric down.

Pause at this point and advance to the start of the Star Spangled Stitches applique. For me, that is step 33. This step is a decorative stitch.
Continue with each applique piece, trimming as you go to keep everything tidy.

Finish by adding the decorative stitches and the satin edge.

Now, go back to step 27 to add the backing to the pocket front.

Trim the front and back fabrics close to the stitching on both sides, as well as the top and bottom, as shown in the picture.

Step 28 is the decorative satin edge at the top.

Decorative satin edge at the top.

Return to step 5. This is the satin edge around the entire pocket. Stitch out the zigzag stitches, then pause the machine.
Make sure the bottom stitches cover the bottom of the pocket. If they don’t, now is the time to adjust your design. You can move the backing up or down if needed. If you have to, take out the zigzag stitches at the bottom and sew them again. Once everything lines up, finish the decorative satin edge.

When finished, your pocket should look like this.

Remove the design from the hoop and trim away the stabilizer. Cut the decorative stitches off the top as shown in the picture. Remove any excess stabilizer with a wet cotton swab. Your pocket is now ready to sew to your towel.

Center the pocket on the towel, then pin it in place. Take it to the sewing machine.
Using the same thread color as your satin edge, sew down both sides and the bottom.
Tip: For a nice, clean look, use a bobbin thread that matches the towel's color.
Remember to save the front and back designs together on a USB drive or your machine. That way, you won’t have to line everything up again next time.

Now you have a cute pocket with a beautiful satin edge.
It’s always fun to experiment with embroidery designs and discover new ways to use them. A project that started as a utensil holder can easily become a decorative pocket for a tea towel.

Try experimenting with different applique blocks, sayings, or fabrics to create a whole set of unique towels. They also make wonderful gifts for friends, family, or holiday gatherings. Add a favorite recipe in the pocket and give as a gift along with the baked treat!

Tea towels may not need pockets, but they certainly make them more fun! This project is a great example of how a little thinking outside the box can give new life to designs you already own. By combining the Patriotic Utensil Holder Project with the Star Spangled Stitches sets and Kitchen Sayings Embroidery Set, you can create charming pockets that add personality and a handmade touch to your kitchen.

Most of all, don’t be afraid to play with your embroidery designs and see where your creativity takes you. Sometimes the best projects come from simply trying something new!
Be sure to share your finished tea towel pockets with us in the Designs by JuJu Embroidery Blessings Group on Facebook, or use the hashtag #designsbyjuju anywhere on social media. We love to see what you create!
Happy stitching!
