Toggle Nav
 Inspire.
Create.
Stitch.
Inspire.
Create.
Stitch.
Search
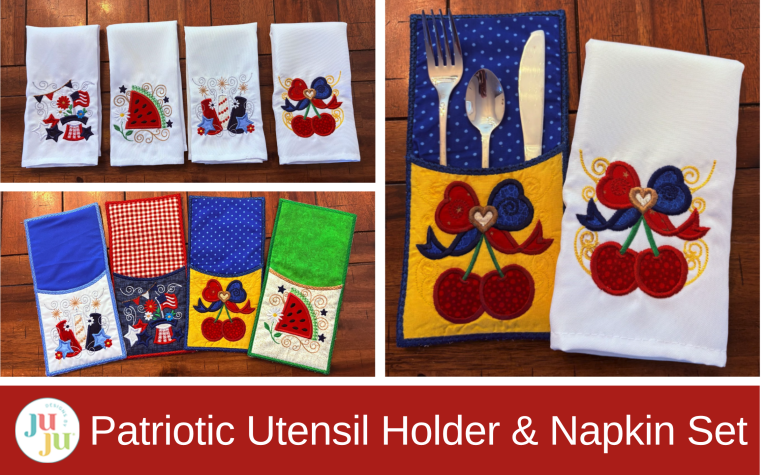
Create a festive in-the-hoop utensil holder and matching embroidered napkin using Star Spangled Stitches designs. This step-by-step tutorial shows you how to add patriotic flair to your table with machine embroidery.
Ready to dress up your table with a little patriotic stitching? In this step-by-step tutorial, you’ll learn how to create a star spangled utensil holder entirely in the hoop, then finish the look with a perfectly matched napkin. From choosing the right Star Spangled Stitches design to lining everything up for clean edges and professional results, this tutorial walks you through each stage while leaving plenty of room to have fun with fabric scraps and personal touches.
Finished sizes:
Check out the DBJJ team’s favorite supplies in the Designs by JuJu Amazon store. And for all your stabilizer and batting needs, be sure to check out Designs by JuJu+.
Begin by loading the Patriotic Utensil Holder Project into your embroidery machine.

Choose the front part of the utensil holder design. My machine is a Brother Stellaire; your screen may look different.

Click the Add button and look through the Star Spangled Stitches sets. Designs with a fabric frame work well here because their main applique size fits nicely on the front of the utensil holder. There are four sets to choose from, so you have lots of options. In all the designs we will be working with the 5x5 size. For my first holder, I chose the Cherries from Set 3.

Add the 5x5 design to your screen.
Use the Move button to position the design so it fits well on the front pocket. We are only concerned with the embroidery design, not the fabric frame. Try to line up this part of the design over the existing design as shown in the picture.
Once your design is in place inside the pocket lines, you can start stitching.

Hoop two layers of wash-away stabilizer. Using only a wash-away stabilizer helps your project have a clean edge when it’s finished.

The first step is always to stitch the placement line for the front fabric. Refer to the fabric cutting chart included with the utensil holder download.

Lay your fabric over the placement lines and smooth it out, making sure it covers all the stitches underneath. Tack the fabric down.

Pause at this point and move the stitches forward to the start of the Star Spangled set applique. For the Cherries design, this starts at step 28.

The first step to every applique piece is the fabric placement stitch.

Place your fabric so it covers all the stitches, tack it down, then trim it close to the stitch lines for a neat look.
Tip: Check your scrap bin. Leftover fabric pieces are perfect for making applique designs.

Repeat these steps for each applique piece, trimming as you go to keep things tidy.

Finish by adding the decorative stitches and the satin edge.

Now, go back to step 22 to add the backing to the front of the pocket.

Remove the hoop from the machine and set it on a flat surface with the back facing up. Place the backing fabric over the design so it’s fully covered.

Tape the fabric in place to keep it secure, or use fabric adhesive spray if you like. Then put the hoop back on the machine.

Stitch the back fabric to the front.

Remove the hoop from the machine (but don’t remove the project from the hoop yet) and carefully trim the top section only on both the front and back.

The last step for this part is to stitch the satin edge along the top. Before you begin, I suggest changing the bobbin thread to match the top thread.

The final step is 23, the top satin edge.

Stitch out the satin edge.

Remove your design from the hoop and carefully trim away as much stabilizer as possible, making sure not to cut the satin stitching at the top. Leave the fabric untrimmed for now; we will trim it up later.
Gently use a cotton swab and water to clean away any leftover stabilizer along the top.

Next, choose the size you want for the back of your utensil holder. I’m using the 6x10.

Hoop two layers of wash-away stabilizer and take it to the machine. Stitch the batting placement line.

Lay the batting down, covering the placement stitches, then run the tack-down stitch. Trim the batting close to the stitches.

To add the front and back fabrics, take the hoop off the machine and lay it flat with the back side facing up. Lay the backing fabric over the placement lines and tape it down securely. Alternatively, you can use fabric adhesive spray.

Turn the hoop right side up and cover the batting with your chosen front fabric. Pin in place, making sure the pins are out of the stitching area.

Put the hoop back on your machine and stitch the tack-down lines. Trim both the front and back fabrics close to the stitches for a neat edge.

To attach the front of the utensil holder to the back, place the front on top of the back, both right side up. Line up the bottom stitching lines of the front pocket with those on the pocket back.

You also want to make sure the sides match up.
Put the hoop back on the machine and stitch the pocket front to the back.
Remove the hoop from the machine (but do not remove the project from the hoop) and trim the front and back fabrics close to the stitching line.

The final step is to add the decorative satin edge around the whole design. Switch the bobbin thread to match the top thread for a clean, professional look.

Remove the design from the hoop. Trim the stabilizer as close as possible without cutting the satin stitches.

Use a cotton swab and a little water to remove any extra stabilizer.

Your utensil holder is now finished!

Want to keep going? Let’s make some matching napkins to finish your festive table.


Wash, dry, and press each napkin before you start embroidering. This helps prevent any future shrinking.

Fold the napkin as you will display it on your table. You can put your design in the corner or at the bottom. I am going to put my design on the bottom.
Tip: If you want to embroider in the corner of your napkin, check out my blog post, Embroidered Thanksgiving Napkins, for more tips.

Fold the napkin and measure how far up from the bottom you want the bottom of the design to be. I measured up 1½” and marked it with a pin. You can finger-press a fold on each side or use more pins to mark the sides of your embroidery area.

Unfold the napkin.
Cut a 5” x 5” piece of fusible interfacing. Place the interfacing on the back of the napkin, lining up the bottom with the pin you placed in the last step. Take out the pins and fuse the interfacing onto the back of the marked area. This will help prevent any puckering.

Hoop wash-away stabilizer and take it to your machine.

Load the same 5x5 design that matches your utensil holder. This is the Fireworks design from Set 2.

Use the Design Placement keys to locate the center of your design, then mark it on the stabilizer.

Next, we need to find the bottom of the design.

Move through the steps until you reach the part of the design that stitches at the bottom. Use the Stitch Forward keys to find the lowest point, as shown in the picture, and mark it on the stabilizer.

You should now have two marks on your stabilizer: the center and the bottom of the design.

These two marks probably won’t line up. Use a ruler to draw a straight line from the center mark down, even with the bottom mark.

Line up the bottom center pin on the napkin with the bottom of the center line you drew. Don’t use the mark made on the machine as this may not accurately center the design. Using your drawn center line ensures the design is properly positioned on the napkin.

Attach the hoop to your machine. We’re only embroidering the applique design, so move forward to the start of the applique steps.

Stitch out the applique, remembering to trim each piece before continuing to the next.

Finish with the decorative stitching and satin edges.

Remove the design from the hoop and trim the stabilizer on the back. I usually trim the interfacing too, but that’s optional. Any leftover stabilizer will wash away with water.

Now you have a matching star spangled napkin to go with your star spangled utensil holder. Pair these with the Star Spangled Placemat, perfect for patriotic gatherings, summer parties, or any festive holiday table.

The star spangled utensil holder and matching napkin add the perfect finishing touch to your festive table, and they’re just as fun to make as they are to use. Try mixing and matching designs from the Star Spangled Stitches sets, use up your fabric scraps, and create a set that’s all your own. Once you make one, it’s hard to stop. Soon, you’ll have a whole stack ready for your next celebration.
Don’t forget to share your finished projects in the Designs by JuJu Embroidery Blessings Group on Facebook, or use the hashtag #designsbyjuju anywhere on social media, and let your creativity shine. We always love to see what you create!
Happy sewing!
