Toggle Nav
 Inspire.
Create.
Stitch.
Inspire.
Create.
Stitch.
Search
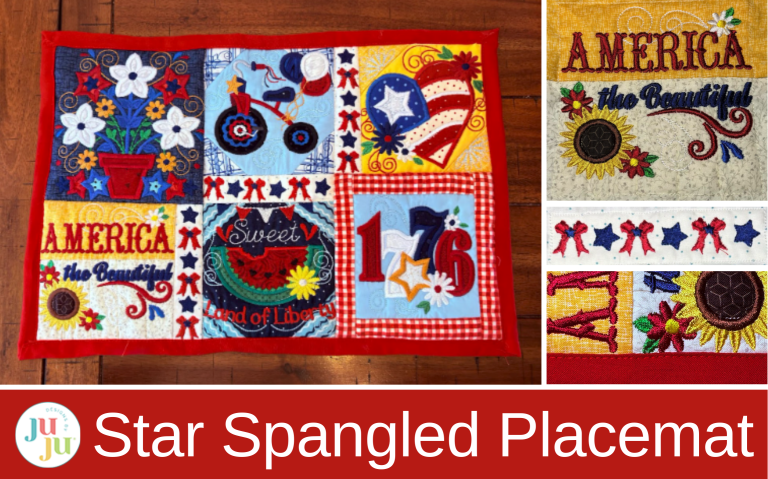
Celebrate 250 years of American independence with a star-spangled placemat featuring embroidery and simple piecing.
Celebrate 250 years of American independence with a project that blends creativity, tradition, and a love of stitching. This star-spangled placemat brings patriotic charm to your table using mix-and-match embroidery designs, simple piecing, and playful sashing. Whether you’re decorating for a holiday gathering or adding a touch of Americana to everyday meals, this project is a fun way to showcase your embroidery skills while creating something both meaningful and functional.
Finished size: 18” x 12”
Check out the DBJJ team’s favorite supplies in the Designs by JuJu Amazon store. For all your stabilizer and batting needs, be sure to check out Designs by JuJu+.
Get ready to celebrate our country’s 250th birthday in style! In this tutorial, I’ll guide you through creating a festive placemat using the new Designs by Juju Star Spangled Stitches designs. With four sets of nine patterns each and sizes from 5” x 5” to 10” x 10”, you can mix and match to design a look that’s uniquely yours.
For this project, we’ll use the 5” x 5” and 6” x 6” sizes. These designs fit together to make an 18” x 12” placemat. We’ll also add three borders, each 1¼” x 5”.
The hardest part is choosing which designs to use. Select four 5” x 5” designs and two 6” x 6” designs.

For my placemat, I mixed and matched designs from all four sets. From Set 1, I chose 1776 in 6” x 6”; from Set 2, Baltimore Album Flower Pot in 6” x 6”; from Set 3, America the Beautiful in 5" x 5" and Big Heart with Daisies in 5” x 5”; and from Set 4, Sweet Land of Liberty Watermelon in 5" x 5" and the Tricycle in 5” x 5”. You can use these or your own favorites.
I am going to start with the America the Beautiful block from Set 3 in the 5” x 5” size. This block uses a technique called flip-and-fold or stitch-and-fold.

Hoop cut-away stabilizer in your 5x7 hoop. Select the design, and gather your fabrics. The instructions included with your download will provide cutting measurements. Remember, scraps work great for applique.
Load the hoop into your machine. Start with the placement stitch for your batting.

Place the batting down so it covers the stitches. Then run the tack-down stitch to hold the batting in place. Remove the hoop from the machine, place it on a flat surface, and trim the batting close to the stitches.

Next, stitch the placement line for the first strip of fabric.

Position the strip over the stitches, ensuring there’s at least ½” extra on the top, bottom, and sides. Sew the next step, which is the tack-down stitch. This piece will be right side up.

Trim the fabric close to the stitches, leaving ½” or more on the left side and bottom.

Sew the next step, which places the line for the second strip of fabric. Position the raw edge of the next fabric strip right side down, about ⅛” to ¼” from the stitch line.

Stitch in place.

Flip the fabric over and smooth it flat. The next step will sew it in place.

Keep repeating these steps until all the strips are attached.

Now you will add the top half of the background fabric. Sew the placement line across the top of the fabric strips, and place the top of the background fabric right side down with the raw edge ⅛” to ¼” over the stitches. Remember to leave at least ½” on the top and sides for trimming later.

Sew the fabric in place.

Flip the top fabric up and smooth flat. Run the tack-down stitch.

Once your background fabric is in place, move on to the applique. The first stitch for applique is always the fabric placement stitch.

Place your fabric over the placement line completely covering all stitches, and then run the tack-down stitch.

Remove the hoop from the machine and trim the applique fabric close to the stitches. Trim each applique piece before moving on to the next.

When you finish all the applique, complete the block with satin edge and decorative stitches. When your block is done, remove it from the hoop, trim away any excess stabilizer, and trim your block ½” from the outer stitches.

After finishing your 5” x 5” block, you can make more 5” x 5” blocks or start your 6” x 6” blocks. I found it easiest to continue to make blocks that would be next to each other, so I made a 5” x 5”, a 6” x 6”, another 5” x 5”, and a 6” x 6” for the corners of my placemat. I made two 5” x 5” blocks for the center, matching fabrics as I went.

My next block is Baltimore Album Flower Pot in the 6” x 6” size from Set 3.

Hoop your stabilizer and run the placement stitch for the batting. Run the tack-down stitch and remove the hoop from the machine. Trim the batting close to the stitches.

Run the placement stitch for the background fabric and place the fabric over the stitches. Remember to leave at least ½” on all sides for trimming later.

Run the fabric tack-down stitch.

Next will be the applique.

Ensure the applique fabric always covers all the stitches.

Trim each applique piece before beginning the next one.

Finish with the satin edge and decorative stitches.

Remove the design from the hoop and trim close to the batting on the back.

Trim all your blocks to ½” from the outer stitch line to keep them even and easy to line up later.

After making your blocks, go to your machine and open the Shapes menu. My machine is a Brother 8500; your screen may look different.

Choose a rectangle.

Select the Size button.

Size the rectangle as close to 5” x 1¼” as your machine will allow.

Press the Add button.

Open the Daisy Doodle Patriotic Bean Stitch Applique Embellishment Set and choose the 2½” size. Several of these designs will fit inside your sashing block. I used the bow and a star. Ensure your designs are under 1”.

Select your design, add it to your rectangle, and select Edit.

Use the Duplicate and Add keys until you have all your designs inside the rectangle.

Use the Move key to arrange them as you like.

I alternated stars and bows to fit perfectly in my 5” rectangle.

When stitching, start with the rectangle for your batting placement line.

Place the batting down, stitch the rectangle again, then remove the hoop, trim the batting, and return the hoop to the machine.

Then place your fabric over the batting and stitch the rectangle one more time.

Next, add your embellishment designs.

After making two vertical borders at 1¼” x 5”, I made a horizontal one by rotating the bows 90° in my machine’s Edit menu. You don’t need to make a new rectangle. Just rotate the designs as needed.

Now stitch the horizontal rectangle using the same steps. Remove the three rectangles and trim them ½” from the outer stitch line on all sides.

Spread out all your pieces and play with the arrangement until it feels just right. Place a 6” and a 5” block in the corners, then nestle two 5” blocks in the center.
In the left column, your sash goes to the right of the 5” block. In the center column, the sash runs horizontally between the two 5” blocks. In the right column, it runs vertically on the left side of the 5” block, as shown in the picture.
We will sew the placemat top together in three columns: left, center, and right.

Begin at the bottom left.

Place the bottom left 5” block and vertical sashing with right sides together, matching raw edges, and clip.

Take to the sewing machine and sew between the batting and fabric stitch lines.

Next sew the 6” top left block to the now 6” bottom piece to form the left column.

For the center column, sew the horizontal rectangle with right sides together to the top and bottom 5” blocks. Make sure the edges are even.

For the right column, sew the vertical rectangle to the left side of the top 5” x 5” block.

Then sew the bottom right 6” block to the now 6” block to create the right column.

Sew the left and center columns together, matching stitch lines and seams.

Remember to keep your raw edges even and use the two seams on the back as your stitching guide.

Remember to match up any corner seams.

Attach the third column. Your placemat should resemble this.

Press your seams open for a crisp finish. If you’d like extra softness, now’s the perfect time to add more batting to the back. I prefer a light batting for a smooth, seamless look. Cut it to size, spray the back of your fabric with basting adhesive, lay the batting down, and press with a hot iron and pressing cloth. Trim any excess so your edges are neat and even.
You can finish this step in whatever way suits your style. For smaller projects like table toppers, runners, or placemats, I love using a single piece of fabric for both the backing and the binding.

Measure your placemat, then cut a backing piece 1½” to 2” larger than the placemat. Fold the raw edge in ¼” on all sides.

Center your placemat onto the backing fabric, then fold the edges up and over to the front.


Match the fold to the seam on the front so it just covers it, and clip in place.

Working on one side at a time, stitch with a 3 mm stitch length close to the edge of the fold.

To make the corners, unfold the pressed edge.

At the corners, pull the fabric out, turn one side in, then fold the other side over.

Bring the other end up and over, then clip it in place.
Tip: Work on one side at a time. Sew slowly and keep your stitching close to the folded edge. You may need to adjust the fold as you sew along the other sides. I usually start with a ¼” fold, but sometimes adjust to ⅜” or ½”. It’s best to start small. You can always make the fold bigger if needed.

Sew close to the fold using a 3 mm stitch length.

Once you’ve sewn all four sides, you’ll have a faux binding.

If you added extra batting, stitch in the ditch at the sides of the blocks to keep the batting from bunching.

With your star-spangled placemat complete, you now have a piece that’s ready to shine at every patriotic celebration—or any day you want to show a little extra love for handmade decor. The large variety offered in these four sets makes it easy to customize colors, fabrics, and designs, so no two placemats ever look the same. I hope this project inspires you to experiment, mix designs, and enjoy the process as much as the finished piece.
Be sure to share your version in the Designs by JuJu Embroidery Blessings Group on Facebook, or use the hashtag #designsbyjuju anywhere on social media, and let your creativity sparkle! We love to see what you create!
Happy sewing!
