Toggle Nav
 Inspire.
Create.
Stitch.
Inspire.
Create.
Stitch.
Inspire.
Create.
Stitch.
Search
Inspire.
Create.
Stitch.
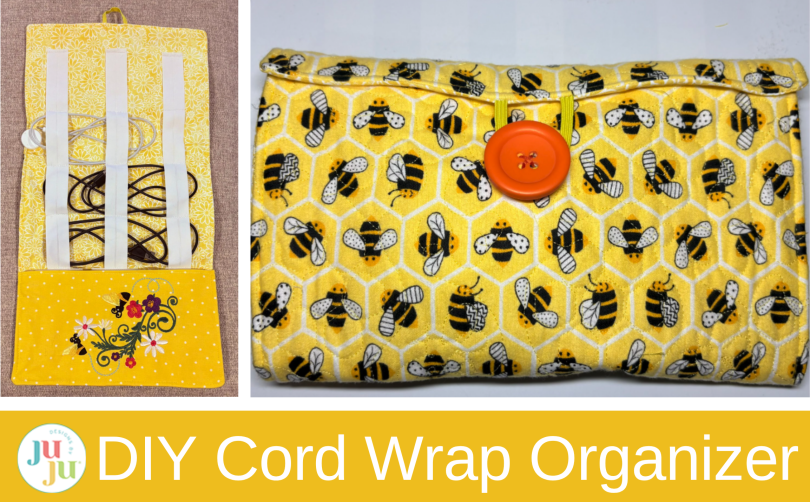
Keep chargers, earbuds, and cables organized with this DIY embroidered charging cord wrap. This easy machine embroidery project features a handy pocket, elastic loops, and customizable quilting designs—perfect for travel or everyday organization.
Get rid of tangled cords and make something stylish at the same time. This cord wrap organizer combines function and creativity, giving your chargers, earbuds, and small accessories a tidy place to stay. It has a roomy pocket and a simple elastic closure, so it’s quick to make and easy to personalize with your favorite fabrics. Whether you’re organizing your sewing area or packing for a trip, this organizer will keep everything in order.
Finished size: 20” x 10” unfolded, 10” x 7” folded
Check out the DBJJ team’s favorite supplies in the Designs by JuJu Amazon store. And for all your stabilizer and batting needs, be sure to check out Designs by JuJu+.
Choose your quilting background and load the size you want to use. You’ll be quilting fabric that will later be cut down to 11” x 20½”.
If you need additional help using the end-to-end quilting designs, my blog post "How to Align End-to-End Quilting Embroidery Designs” can walk you through it.

Cut the outside fabric and the batting according to the dimensions in the supplies list. The batting will replace the need for a stabilizer in this step.

Hoop the batting and fabric together. Pin the edges of the fabric to the batting. This will allow you to start at the very edge of the fabric.

Position the design as far to the left corner of your hoop as your machine allows. Begin stitching the background quilting design. Once a section is complete, reposition the fabric and batting, then continue stitching until the entire piece is fully quilted.

When finished, cut the quilted fabric down to 11” x 20½”. Set aside.

Cut the pocket fabric 12” x 12”.

Fuse the 12” x 12” prepared interfacing to the back of the pocket fabric.

Fold the pocket in half, and finger press along the fold. This will be the top of the pocket.

Fold in half again. Finger press along the fold to find the center of the pocket.
For the next steps, I recommend using the new magicMESH+ Fusible Cut-Away Stabilizer.

You will love this stabilizer!

Cut the magicMESH+ a little larger than your hoop.

Fuse the stabilizer to the back of the 12” x 12” piece of pocket fabric.
Refold the fabric if you lost the fold markings. You can also use pins to mark the top and center of the pocket.

Hoop the stabilizer with the fabric so that the bottom of the fabric edge is showing inside the hoop frame as shown in the picture below. magicMESH+ makes it easy to “float” fabric without the risk of it shifting during stitching. It’s especially helpful when you want your design to be within ½” of the fabric edge.
Take it to the machine.

Select the design and size you wish to use. The design needs to fit between the center of the pocket and the bottom, leaving room for a ¼” seam allowance at the bottom.

Use the Placement keys to find the top center of the design.

Does it fit below the fold line? Is the design centered on the fabric?

If needed, use the Move and Placement keys together to position the design inside the lower pocket area.

Now check the bottom of the design. Is the design at least ½” from the bottom? Remember to leave enough space for a ¼” seam allowance.

If everything lines up correctly inside the front pocket, stitch out the design. If not, you can change to a smaller size of the same design or continue to use the Move keys to achieve the desired placement.

When finished, remove the design from the hoop and trim the stabilizer.

Fold the 12” x 12” pocket piece in half and press it. Trim the sides only so the piece measures 11” wide.

Topstitch along the top folded edge ⅛” to ¼” in from the fold. Set the pocket aside.

Cut a piece of lining fabric 11” x 20½”. Fold in half lengthwise to find the center and finger press.

Cut the wide, double-fold elastic into three 19” strips. Center the first strip down the fold line.

Arrange the strips into three columns, placing them 1 inch down from the top.

Pin the strips 2 inches apart.

Lay the pocket down on the lower end of the lining, matching the raw ends on the bottom and sides. Pin the elastic to the lining fabric just above the pocket.

Measure 3 inches up on the elastic and mark it with a pin. Repeat this three more times, marking each spot. You should have five pins in total. Do the same for the other two strips of elastic.

Take the project to the sewing machine and stitch across each pin mark. For added security, stitch and backstitch several times.

Trim the elastic at the top close to the stitches. I recommend ⅛” to ¼”. Trim the elastic under the pocket.

Cut three strips of hook-and-loop tape, 2½” each.
Lay the pocket even with the bottom of the fabric. Position the fuzzy side of the tape onto the back of the pocket. You will use the elastic pieces as a guide, as shown in the pictures below.

Clip the three pieces in place, and take it to the sewing machine.
Sew each piece around all four sides.

Tip: Choose a thread color that matches your fabric for a neat finish.

Lay the pocket back down onto the lining fabric and position the hook side of hook-and-loop tape pieces, as shown in the picture. It’s easier to sew these pieces one at a time rather than pinning them all in place.

Lay the pocket down again and ensure the tape’s two sides line up.

Gather your ¼” elastic (cut to 4”) and large button.

Fold your elastic in half to form a loop. Position the raw ends at the center of the top edge of the lining, with the loop facing inward. Clip or pin in place to hold.

Sew the ends ⅛” from the edge.

Layer the quilted outer fabric, right side down, on top of the inner fabric and pocket. Align all the raw edges and clip everything together. Leave a 3” to 4” opening on one long side.
Tip: Make sure all the sides and the pocket are lined up and even before you sew.

Sew a ¼” seam allowance all the way around, remembering to leave the opening. Clip the corners.

Turn the project right side out. Push out the corners. Do not stitch the opening closed yet.

Add some cords and chargers to the holder.

Put the chargers inside the pocket.

Using the pocket as a guide, fold the bottom up approximately 5½”.

Fold up again.

We will now find the placement for our button. Fold the top down and place the button onto the fabric where the elastic can loop around it.

Pin or mark the placement for the button. Unfold and remove the contents.

Using the opening on the side, sew the button securely in place.

Fold up the cord holder and wrap the elastic loop around the button to check for a snug fit.

Turn the raw edges in at the opening, and clip to hold.

Topstitch ⅛” all around the wrap, closing the opening as you sew.


Your cord charger wrap is now complete!
Just like that, you’ve made a practical organizer from a few simple materials. Try mixing and matching fabrics to make it your own, or create a few extras as thoughtful, handmade gifts. Once you start using this cord wrap organizer, tangled cords might be a thing of the past! Please share your version of this cord organizer in the Designs by JuJu Embroidery Blessings Group on Facebook, or use the hashtag #designsbyjuju anywhere on social media. We love to see what you create!
Happy sewing!