Toggle Nav
 Inspire.
Create.
Stitch.
Inspire.
Create.
Stitch.
Inspire.
Create.
Stitch.
Search
Inspire.
Create.
Stitch.
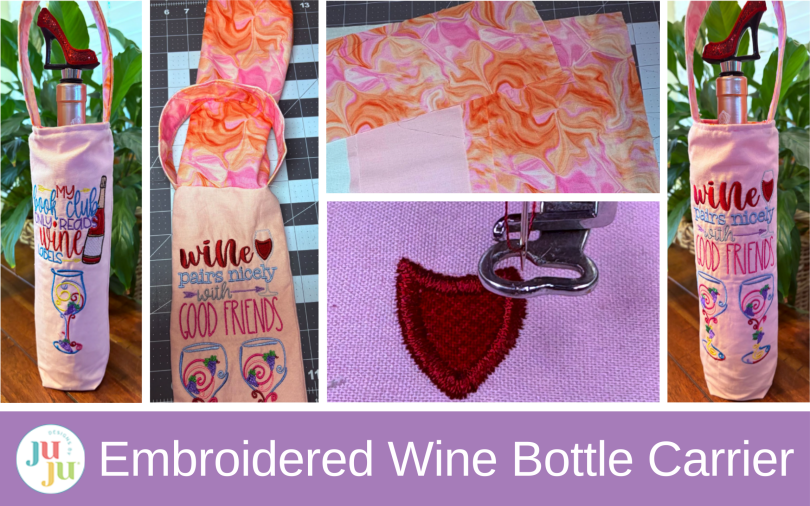
Make a reusable embroidered wine bottle carrier with this step-by-step tutorial. Create a sturdy wine gift bag with machine embroidery for hostess gifts, dinners, and special occasions.
This DIY wine bottle bag is a simple way to turn an everyday bottle into something extra special. With just a little fabric and embroidery, you can create a reusable bag that’s perfect for gifts, dinners, or keeping on hand for last-minute occasions. Mix and match fabrics, personalize it with your favorite designs, and have fun making it your own.
Finished size: 16½” tall (including the strap) x 11” deep x 4¾” wide
Check out the DBJJ team’s favorite supplies in the Designs by JuJu Amazon store.
For all your stabilizer and batting needs, be sure to check out Designs by JuJu+.


If you are using a fusible interfacing on the strap fabric, cut it to 4¼” x 12”. Center it on the back of the fabric and press with a hot iron.
Tip: If turning the strap is difficult, you can skip the interfacing to make it easier, or use store-bought strapping instead.

Fuse the fuseEZ onto the back of the outside bag pieces with a hot iron.

With a fabric marker draw a 1¼” square at the bottom corners of the outside and lining fabrics.

Cut the squares from each bottom corner.

To determine the size of my embroidery area, I cut out a paper pattern. My side and top lines are my seam allowance. My cut-out squares tell me where the bottom of my bag will be. I wanted my design to fit within these measurements but not be too close to the top or bottom. Ultimately, I decided on a design no larger than 8” x 4”.

Choose a design for the front of your bag. I used Wine Word Art 2 and then added Whimsical Wine Glasses underneath. Set up your design on your machine or in your software. These designs paired up well and fit into my designated area.

Hoop the cut-away stabilizer and take it to your machine.

Using the Design Placement keys, find the center of your entire design.

Mark the center of your design with a fabric pen. Remove the hoop from the machine and place it on a flat surface.

Fold the fabric in half so the top edge meets the bottom edge at the cutout, as shown in the picture. Press the fold with your fingers.

Next, fold the fabric in half lengthwise and mark the center with a pin.

Spray the stabilizer with fabric adhesive and place your fabric on top, lining up the centers. Smooth out any wrinkles and pin the fabric to the stabilizer, keeping pins away from where you’ll stitch. Take the hoop to your machine.

Use the Placement keys again to check the design’s position.

If it looks good, start embroidering. If not, adjust and check again.

If your design has applique, run the placement stitch for the applique fabric.

Place the applique fabric over the stitches, making sure they are completely covered.

Sew the tack-down stitch.

Trim the fabric close to the stitches.

Continue stitching the rest of the design.

When you’re finished, remove the stabilizer and fabric from the hoop.

Trim away any extra stabilizer.

If you want a design on the back, select a second design and repeat these steps.

Lay the outside bag fabric flat and measure ½” in from the sides for your seam allowance. If your design is close to the edge, you can use a smaller seam allowance—¼” to ⅜”. I used ½” for mine.

Pin the right sides of the front and back together and take them to your sewing machine.

Sew down both sides and across the bottom, leaving corners unstitched, as shown in the picture.

To make a box bottom, bring the side and bottom seams together, then pin.

Sew across at ½”. Do this on both sides.

Turn the bag right side out and press.

Pin the two lining pieces with right sides together.

Sew down both sides and across the bottom of the lining, using the same seam allowance as the outer bag.

To make a box bottom for the lining, bring the side and bottom seams together, then pin.

Sew across at ½” on both sides.

To create the strap, fold the strap fabric in half lengthwise with the right sides together. Pin or clip in place.

Sew along the side with a ½” seam allowance.

Trim the seam allowance to ¼”.

Turn the strap right side out. A turning tool and a little patience will help.

Topstitch along both sides for a neat finish and extra strength.

Find the center at each end of the strap and mark it with a pin.

Pin the strap to the outside of the bag along the sides, making sure the centers align with the bag's seams.

Sew the strap securely to the bag ¼” from the raw edges. Remember to backstitch. I like to stitch across at least twice for added strength.

Turn the lining inside out and place the bag inside it.

The right sides of the bag and lining should be facing each other, and the strap should be down between the layers.

Line up the side seams and pin or clip the top raw edges together. Sew around the top with a ½” seam allowance, leaving about a 2” opening so you can turn the bag later.


Turn the bag right side out and push the lining down inside the bag.

Press the bag and tuck in the raw edges of the opening.

Topstitch around the entire top of the bag to close the opening and reinforce the strap.

Give the bag another good press.

Your wine bag is finished!
This DIY wine bottle bag is a great reminder that small, handmade details can make a big impact. It’s quick to stitch, easy to customize, and perfect for using fabrics and JuJu designs you love. Whether you’re gifting a bottle to a friend, dressing one up for a gathering, or simply enjoying a relaxing sewing session, this project fits right in.
I hope this tutorial inspires you to create a few of your own and experiment with colors and designs. If you make one, be sure to share your finished wine bottle bag in the Designs by JuJu Embroidery Blessings Group on Facebook, or use the hashtag #designsbyjuju anywhere on social media. As always, we love to see how you make it uniquely yours!