Toggle Nav
 Inspire.
Create.
Stitch.
Inspire.
Create.
Stitch.
Search
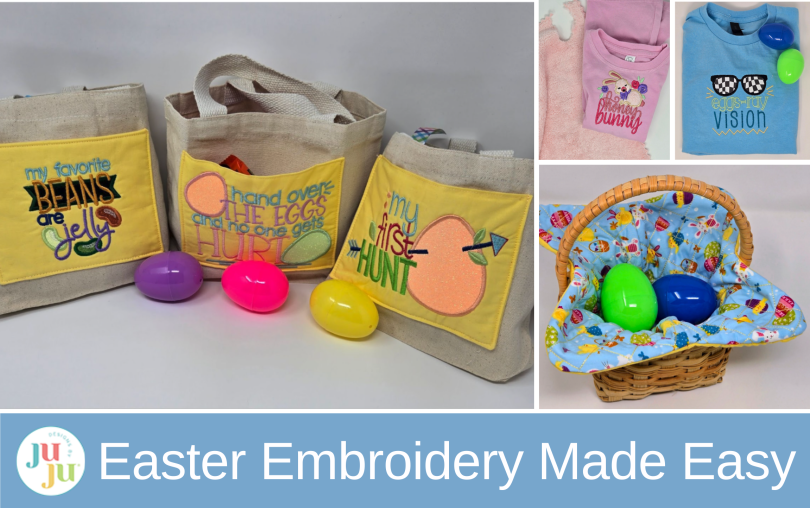
Create a fun family gathering by adding personality to ready-made items and decorating a basket. Let me show you!
You might think I don’t sew clothing because I always turn to ready-made items. In fact, I sew clothing too. In my area there is a huge lack of clothing knits and other fabrics, so turning to ready-made just makes more sense to me. Honestly, by the time you pay shipping and buy the pattern and fabric, you have already made a big investment—and my grandkids grow way too fast! I would much rather purchase clothing in their size and let them have a quick, fun wardrobe at the ready.
Check out the DBJJ team’s favorite supplies in the Designs by JuJu Amazon store. For stabilizers and batting, Designs by JuJu+ has everything you need.
NOTE: I made the bowl cozy as a basket liner, and I did not use all cotton threads. Therefore, do not put it in the microwave!
Machine wash and dry your T-shirts. If they are going to shrink, now is the time for them to do that!
Gather your supplies: stabilizers, hoops, and designs loaded on a flash drive. I only print out full directions when a design is new to me, like the bowl cozy. I print the design cards of the sets so I can see at a glance what the set contains. Sometimes I also print the thumbnails. They all go in a 3-ring binder after I am finished embroidering.

Begin by finding the center of your T-shirt front. This isn’t always easy because most shirts are made without side seams. Lay it out on your pressing surface as best you can. Remember the tag in the back isn’t always in the center! Fold the center front of the tee in half matching the shoulder seams and where you think a side seam would be. (I usually mark this with pins in the hem.) Give the fold a light press.

Hoop the magicMesh Fusible Cut-Away Stabilizer. Then, think about placement and hooping. I want the bulk of the shirt to be on the inside of the embroidery machine. So I placed the hoop inside the shirt with the neck opening on the right side. I can center it using my pressed fold and the little raised nubs on my hoop. Once I have the shirt centered on these two spots, I pin it in place. Then press it down on the magicMESH using no steam.

For young kids’ clothing, I like the design toward the top, maybe 1”–1½” from the neckline ribbing. For my 10-year-old grandson, I placed the design about 3” from the top ribbing. Pin the shirt down to the stabilizer all around the inside of the hoop. Once that is done, gently roll the shirt away from the back of the hoop and to the top and sides of the hoop. Add a few more pins or tape to hold the shirt out of the way.
If you have hooped your shirt like I did, remember to use the edit buttons on your machine to rotate your design. Also, slide a piece of tearEZ Tear-Away Stabilizer between your hoop and machine bed.
I used heat transfer vinyl (HTV) for the egg appliques in this design. Once they have been tacked down, cut (or gently tear) the HTV around the eggs. It does not have to be perfect, since there will be a satin edge stitched around them. Keeping the embroidery in the hoop, go back to your ironing board and press them down. You want the HTV stuck down firmly before you add the satin edge. I use a non-stick press cloth, but there is no transfer, so a regular press cloth would work well too. (I never use steam with mesh stabilizers because I don’t like to take the chance that the stabilizer will change, shrink, melt, etc.)

Now go back and finish embroidering your shirt.

Once the embroidery is finished, turn the shirt inside out. Gently tear away as much of the tearEZ from the design as you can. Trim the long threads. I put my 8” wool mat inside the shirt and warm the magicMESH with a dry iron, gently lifting it up around the embroidery. Keeping my finger between the mesh and the T-shirt, trim the mesh around the embroidery. Trim, rounding the edges and staying about ½” from the embroidery. Then gently press the magicMESH back in place.

At this point you can add an embroidery backing like Tender Touch to make the shirt nice and soft against the skin. Again, cut it so there are no sharp points and all the edges are rounded. I leave about a half inch between my magicMESH and the back of the shirt so it adheres well.

I had too much fun making shirts! The bunny below is the soft fabric from a dust cloth. Fabric is fabric, right? I put a water-soluble topper over the fleece before I embroidered it.

This T-shirt has HTV for the glasses. I did put the design down a little lower.

I wanted to have a “basket liner” without making a whole basket liner. The bowl cozies are great for this! I made this little basket years ago and the medium bowl cozy fits perfectly!
Follow the instructions that come with the bowl cozy files. They are excellent! You have a choice in making the cozy depending on your hoop sizes. I was able to make the two-piece size. If you have smaller hoops, you would make each section individually. And a larger hoop means you can make each side in one hooping.
I used variegated thread and just had fun!
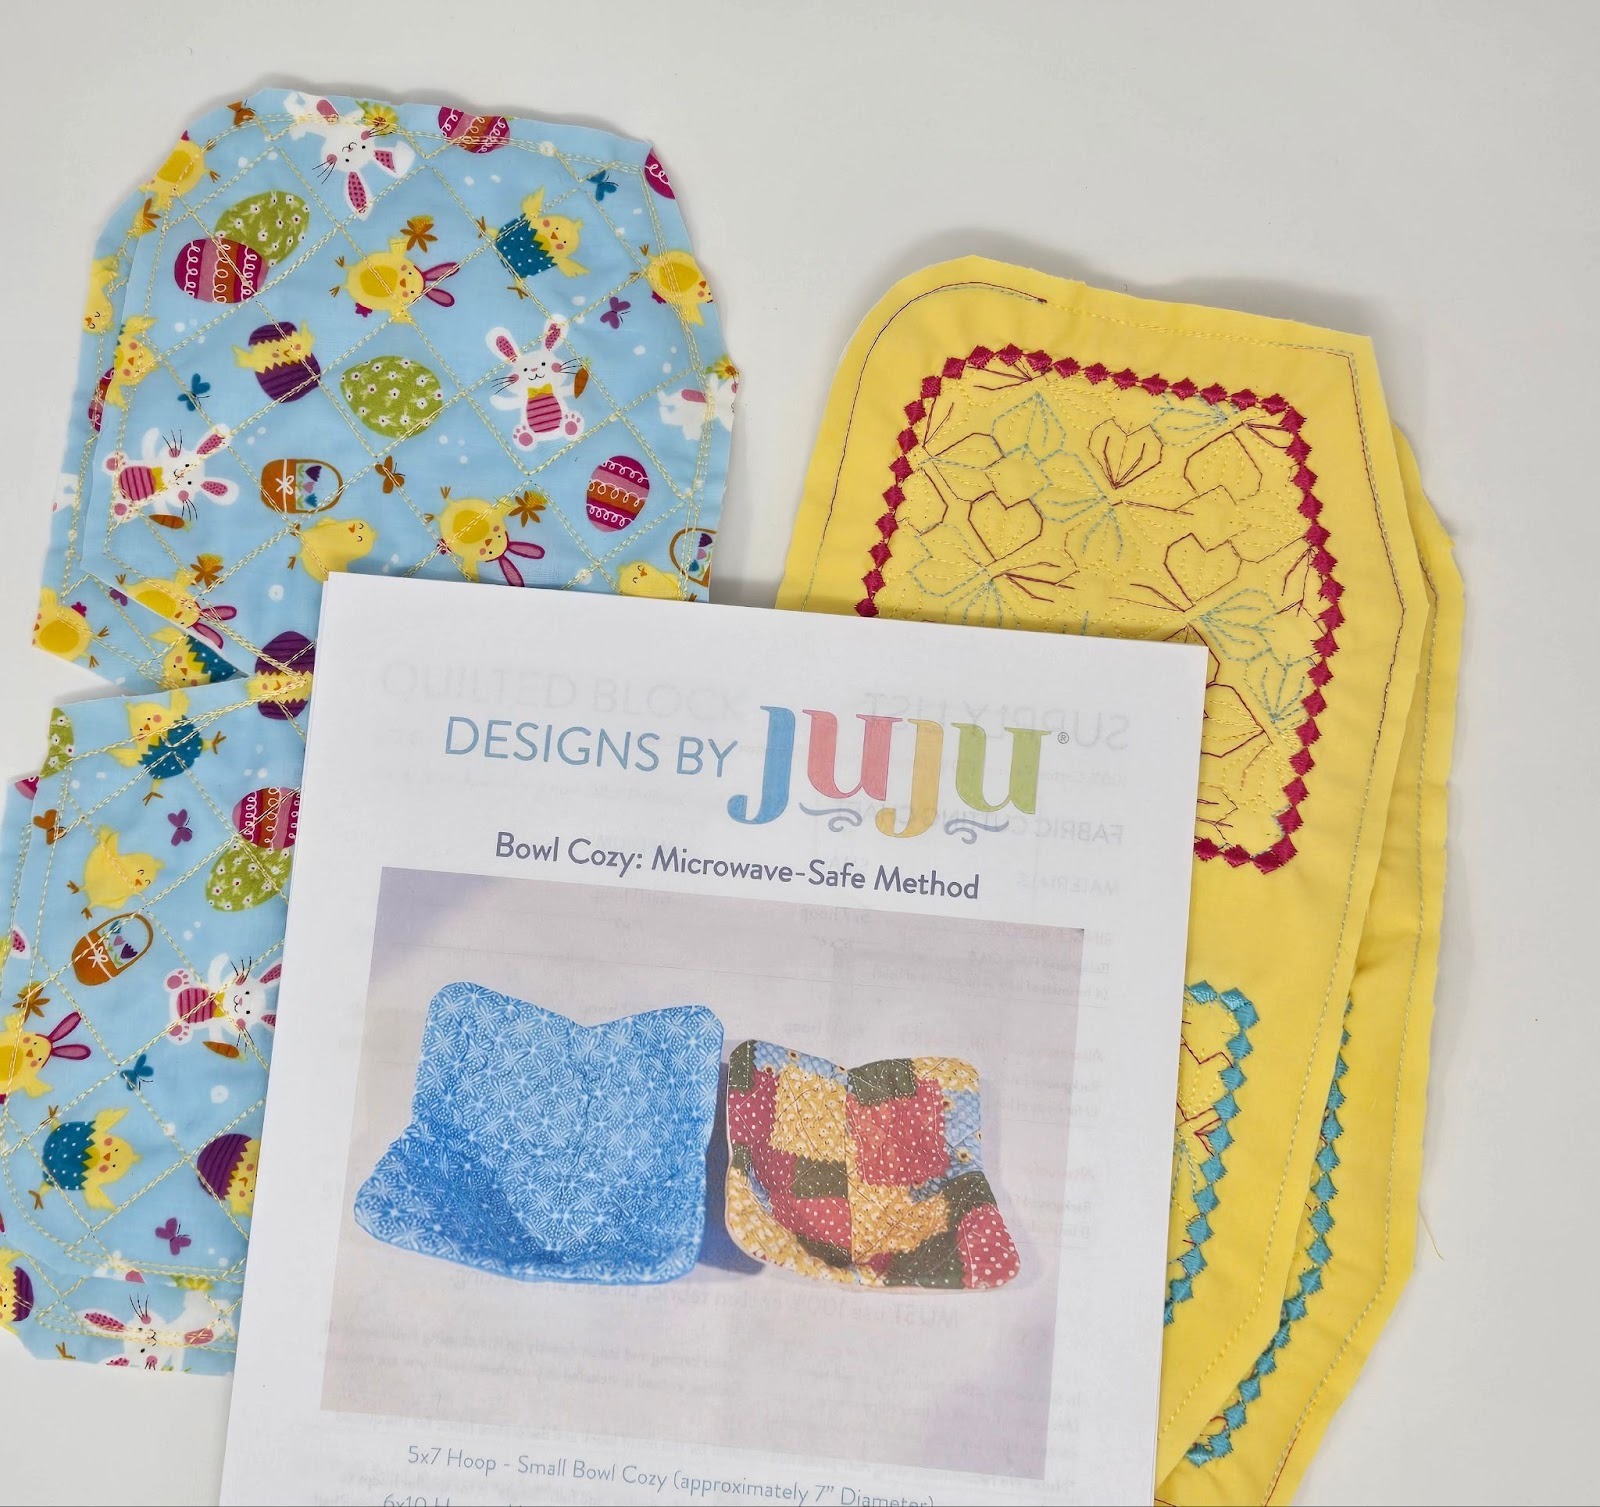
The instructions say to leave an opening for turning, but leave an opening larger than 3”. I had to struggle to turn mine right side out, but in the end it worked.


We always do an egg hunt with the kids, so I picked up a few pre-made canvas bags and added pockets. It is a fun, quick way to add a special spark to the hunt.
For the pocket, cut a rectangle twice the length you want the pocket by the width. (This depends on the size of your canvas bag; mine is cut 12” x 7”.) You can add fuseEZ to the back if you would like a stiffer pocket. I happen to like that, so I did.
Hoop tearEZ stabilizer, then lay down a piece of loftySOFT batting half the length of your pocket by the width, and finally your fabric on top. If you have the ability to add a basting box around your embroidery on your machine, do it—it will hold everything in place nicely. If not, you can pin or tape the edges down.


Once embroidered, remove the tearEZ and trim any long threads. Fold the pocket in half and stitch up the sides with your sewing machine. I did about a ¼” seam allowance. You could also sew partway along the bottom and leave a turning opening 3”–4”.

Press the seams open, trim the corners, and press the bottom to the inside about ¼”–½”. Here is where the ¼” fusible tape comes in handy! I used it to hold the hem in place.
Go back to your sewing machine and sew close to the top edge of the pocket. I like to increase my stitch to 3.0mm.
I also use the fusible tape to hold the pocket in place.

Place your pocket on your bag and fuse or pin in place. Keep it about 2” up from the bottom. Turn the canvas bag wrong side out and sew close to the three sides of the pocket.
Have fun filling your bags with goodies!


I hope you enjoyed my ideas and are ready to make some fun Easter items for the littles in your life. Be sure to share your projects in the Designs by JuJu Embroidery Blessings Facebook Group, or use the hashtag #designsbyjuju anywhere on social media. We all love to see what you create!
