Toggle Nav
 Inspire.
Create.
Stitch.
Inspire.
Create.
Stitch.
Search
Need a stylish and functional way to keep your essentials organized? Clear window pouches are the perfect solution!
These DIY embroidered storage pouches let you easily see what's inside while keeping everything secure and neatly tucked away. Whether you’re storing craft supplies, school essentials, small toys, or travel items, these pouches are as versatile as they are fun to make. In this step-by-step tutorial, you'll learn how to create these pouches using embroidery and quilting techniques for a polished, professional look. Let’s get stitching and make something both practical and beautiful!
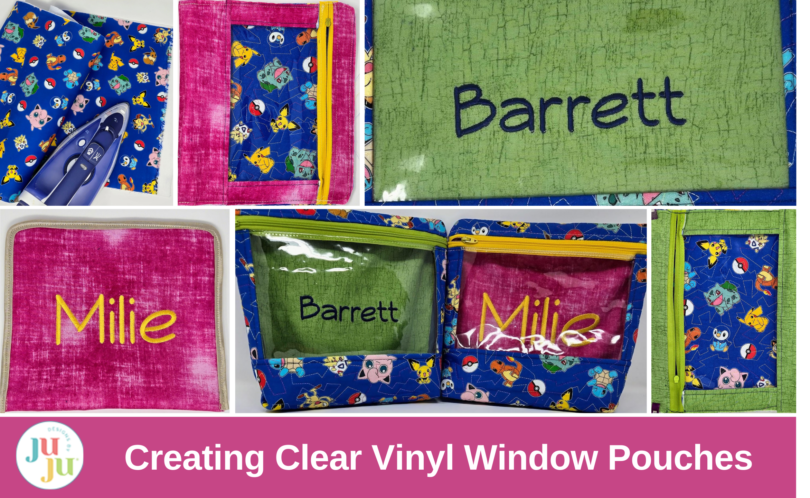
I love to make pouches for projects and supplies, and having a clear window to see what is inside is like icing on the cake! These pouches are perfect for school or art supplies, a few small toys to keep in the car, even make-up or jewelry. Today I made my grandkiddos individual pouches for their Pokemon cards. I added their names inside so they can easily identify them.
The pouches measure approximately 9½” wide x 8½” tall with a 2” depth at the bottom.
Please read all the way through this post before beginning. I think it will help you to visualize where we are headed with each step.
Check out the DBJJ team’s favorite supplies in the Designs by JuJu Amazon Store.
Cut a 14” x width of fabric strip from your outside fabric and a 14” x width of interfacing strip from your 971F. Fuse the two together following the manufacturer's instructions. Your interfacing will be longer than your fabric; cut off the excess. Do not touch your iron to the bumpy side of the 971F!

Cut an 11” square from each of your FQs and two from the SF101. Fuse SF101 to the back of each fabric square, following manufacturer’s instructions.
Did you know that DBJJ Quilting Backdrop files also include hoop-filler files? This is such an awesome addition to the design sets! I started off thinking I would quilt each individual cut of fabric and quickly figured out I could use the hoop-filler files! These files do not have placement lines or tack-down lines. Instead, you can quilt that long piece of fabric with your batting and then cut out your pieces.
Step1: Load your designs onto a thumb drive for your machine. I chose the 6” x 10” size of the Ziggy Stipple for the embroidery. The quilting designs do not need to interlock, because everything will be cut up. I did try to get them close by starting out with my first run moved to the left of my hoop and then lining up the design using my machine’s Move feature. (Ignore my thread hanging down in the photo.) I moved the design as far to the left as I could without it changing to a larger hoop.

Step 2: I used my 8” x 14” magnetic hoop, but your regular hoop works too. Just hoop your fabric fused to your fleece and keep moving your hoop until the piece is quilted. No other stabilizer is needed. I did 6 hoopings and it worked out with a little fabric/fleece left over. If you need more quilted fabric when you cut out your pieces, you can go back and quilt this bit and you should have plenty.

Can you see how it will quilt close to the left side?

In the next hooping, just a few points show on the far left from the previous stitching.

And above, you can see how close the quilt designs line up with each other. It almost looks like continuous line quilting, yet it’s only done with hoop placement. I specifically chose this design because the Ziggy Stipples reminded me of Pikachu’s tail. If you would like another design, DBJJ has a lot of edge-2-edge quilting designs that would work great for this project!
Step 3: Hoop your tear-away stabilizer and your 11” lining square with the SF101 fused to it. I used my 5” x 7” hoop here.

Try to center your fabric in your hoop. I did this by gently pressing my square in half, and then lining the fold up to the notches on my hoop.
I used the 2.5” Eat Your Veggies font for Milie and the 1.5” for Barrett, since his name was so much longer. Embroider the lining squares for both pouches.
Now it is time to cut out the pieces of our pouches. From your long quilted piece, cut the following for 2 pouches:
From vinyl cut:

From each remaining lining FQ (for me, the pink and green) cut:

Step 4: Trim your lining piece with the name embroidered on it to 10½” square. Trim so the name is centered and the bottom of the name is approximately 4” to 4¼” up from the bottom. I ended up just trimming the side and top.
A few notes before we begin:

Step 5: Place your outside side and lining pieces right sides together; slide your vinyl piece in between so you have a “vinyl sandwich.” Sew together; no need to backstitch. When sewing, your vinyl window might want to stick to your machine bed or cabinet. To eliminate this, slide your hand between the cabinet and vinyl and gently lift the vinyl off of the cabinet bed.
Step 6: Finger press the seams away from the vinyl on both sides. Use clips to get the raw, outside edges to meet and sew a scant ⅛” to hold the outside edges together. Then go back and topstitch about ¼” away from the vinyl.
Step 7: Repeat for the bottom lining and outside pieces, sandwiching the above vinyl piece with quilted sides together and lining pieces together.


Above you see the two sides and bottom sewn and topstitched to the vinyl. I laid it over the back to make sure the name was clearly visible through the vinyl.
Step 8: Ok! It is time to sew in the zipper. Switch to a zipper foot if you have one.
Using clips, clip the right side of your zipper to the outside (right side) of your pouch front. The zipper pull should hang off the edge so it is not in the way when sewing. Most people choose to have the zipper pull on the left, because they are right-handed, but it is personal preference. On the other side, the back of the zipper will hang off, so the metal holding the zipper together is out of the way. Place as many or few clips as you are comfortable using.

Step 9: Sew your zipper in place using a ¼” seam allowance. You will need to lift the vinyl from the bed of your machine on the left so it doesn’t stick while sewing. (I did not have enough hands to take the pic and hold up the vinyl.) Keep your stitch length at 3.5 mm.

Step 10: Once you have sewn your zipper to the vinyl, finger press the seam allowance toward the vinyl window. Stitch approx ⅛” from the seam on the top to secure the seam allowance.

Step 11: Stitch your remaining top quilted and lining pieces to the top of the zipper, sandwiching the zipper in between like we did for the vinyl. Make sure the quilted piece is to the front. Finger press the seam away from the zipper and topstitch just like you did for the bottom of the zipper and around the vinyl window.

Swap your zipper foot back to your standard foot now.
Step 12: Next, stitch around your back quilted square and your lining piece with the name embroidered on it, placing them wrong sides together. This is a little ⅛” seam just to hold them together as one piece (see detail in photo below).

Step 13: Place your backing and window pieces with right sides together, matching up the bottom seam. Sew the seam using a ¼” seam allowance.
Step 14: Now you have choices:
For mine, I chose the foldover elastic. I cut a piece and stitched it to fold over the seam allowance. I did press the seam allowance flat before adding the elastic—very carefully. Don’t touch your iron to the vinyl!

I used clips and my stiletto to sew it in place.

Step 15: Take your piece and make a fold in the lining side, so the bottom seam is approx ¾” from the fold. This determines the bottom width of your pouch, so if you want a wider pouch, make the fold a little bigger.
Make a fold in the front bottom that matches the back fold. I have clipped my sides so you can see that the bottom seam is now folded into the pouch.


Step 16: Now lay it out flat with the folds clipped in place. Does your lining peek out a bit above the top? Trim so that both pieces are the same size.
Step 17: Move your zipper pull into your pouch, opening the zipper halfway or more, and baste ⅛” along the edge to hold the zipper tape together. Trim off the excess zipper tape. I always baste the other end too in case I open the zipper a little too hard and slide the pull straight off. Then trim the excess tape on this side.
Step 18: Now sew the two sides and top. Be sure to backstitch over the bottom folds for extra security. On one pouch I rounded the top corners a little and I like that one much better. Just use a thread spool to mark off the little corner, or eyeball it.

Step 19: Once again you have choices! You can finish the seam allowance any way you want! I chose the foldover elastic again.

Step 20: Turn your pouches right side out through the zipper. If the vinyl is stiff, warm it with your blow dryer. Push out your corners and pat yourself on the back! You did it!
Step 21: I very carefully pressed around my outside edges. I pressed “fold lines” for my bottom edges. Your sides will look like this:

If you loved this project, you’ll find plenty more just like it in our Quick Gifts Hub and
Bags Hub—a curated collection of quick, creative, and practical projects perfect for gifting (or keeping!)
Be sure to post your photos to our DBJJ Embroidery Blessings Facebook Group or use the hashtag #designsbyjuju anywhere on social media. We love to see what you create!
