Toggle Nav
 Inspire.
Create.
Stitch.
Inspire.
Create.
Stitch.
Inspire.
Create.
Stitch.
Search
Inspire.
Create.
Stitch.
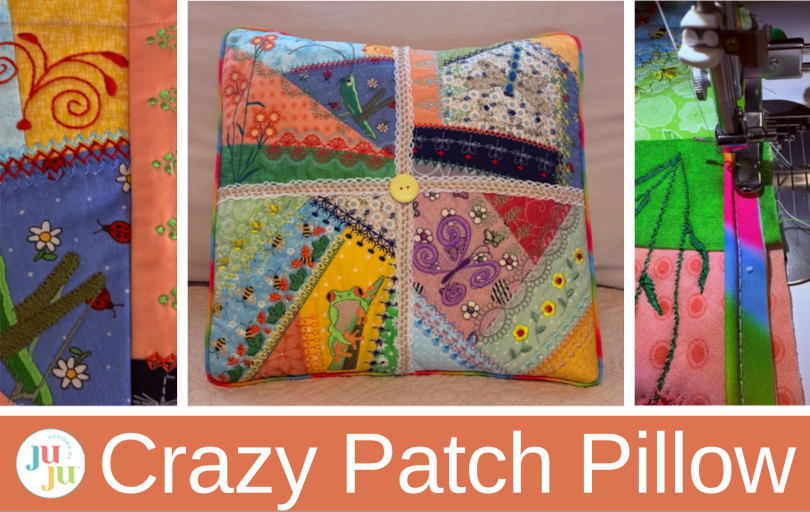
Turn fabric scraps into a colorful crazy patch pillow with machine embroidery, decorative stitches, ribbon, piping, and charming embellishments. This step-by-step tutorial shows how to create a one-of-a-kind pillow full of texture and personality.
Crazy patch quilting is a fun and creative way to use up fabric scraps and make something unique. You don’t need perfect measurements or matching seams. With the flip-and-fold method, you build your patchwork one piece at a time, creating a design full of personality. The seams are often embellished with decorative embroidery stitches, lace, ribbons, buttons, etc., making every piece truly one of a kind.
No two pieces will ever be exactly alike, and that’s what makes each project so special. Gather your fabric scraps, enjoy the process, and let your creativity guide every stitch.
Key features of crazy patch quilting:
Finished size: 14” x 14”
Check out the DBJJ team’s favorite supplies in the Designs by JuJu Amazon store. For all your stabilizer and batting needs, be sure to check out Designs by JuJu+.
Crazy Patch designs are perfect for using up scraps. Most of us have leftover fabric just waiting for a project like this. So gather your scraps and let's get started.

We will be making four squares using designs from Crazy Patch Series 3 in the 7x7 size. I chose blocks from Sets 2 and 5.
Each crazy patch design always begins the same way. I will guide you through the first block. It doesn’t matter which blocks you choose—the process is simple and always follows the same steps.

Download the set you will be working with. I am beginning with the Crazy Patch Series 3, Set 5, Grasshopper block.
Load the 7.07” design to your screen. I chose to rotate my design just for visuals, but it is not necessary.

Hoop magicMESH stabilizer in the appropriate size hoop, then take it to your machine.

The first step is the placement stitch for the batting.

Lay batting down, covering all the stitches, and run the tack-down line. Remove the hoop and set it on a flat surface.

Trim the batting close to the stitches.

Return the hoop to the machine and run the next step. This shows how many scrap pieces you will need and where each fabric piece goes.

Tip: I like to gather the fabrics I need and lay them out to see how the finished square might look. Remember, with a crazy patch, anything goes!

The needle on your machine will line up with the area for the first piece. It is not always the same area for each block. Some may start on the edge, others in the middle. Follow the numbered chart in your download.
Choose a fabric scrap for the start of your design.
Cut the first fabric piece slightly larger than the designated area. Place it flat, right side up. If the first piece is on the side, you will want the fabric to extend at least ½" past the batting on all sides.

Sew the tack-down stitches, then remove the hoop and place it on a flat surface. Trim the fabric close to the inner stitches, leaving at least ½" around the outside of the batting. This step is important. You will trim to ½” all around at the end to square up the block.

Select another fabric scrap and place it right sides together along the edge of your first piece. Make sure it fully covers the edge you’ll be sewing.

Run the tack-down stitch.

Flip the second fabric open, right side now facing up, and finger-press flat. This is the flip-and-stitch technique.

The next step is the tack-down stitch for the second fabric piece.

Trim close to the inside stitches. Leave the top and sides with at least ½” for final trimming later.

Continue along, adding one fabric piece at a time. The machine always shows where to place the next piece.
Place the third piece down with right sides together.

Stitch the tack-down line.

Flip the fabric right side up and smooth flat.

Sew the tack-down stitch.

And trim.

Place the next piece of fabric and stitch across.

Flip and fold down, and finger press in place.

Stitch tack-down and trim.

Continue adding pieces until your batting foundation is fully covered.

Always leave at least ½" fabric past the batting edges for trimming. When finished, your square should resemble the picture.

Finish the block with the decorative stitching, and remove it from the hoop.

When finished, trim the stabilizer away from the back.

Trim each block ½” from the outer seam.
Use the same steps to create three more blocks.

Lay your four blocks out and arrange them how you wish the front of your pillow to look.

Pin or clip the top two blocks with right sides together. Do the same with the bottom two.

Take the blocks to the sewing machine and sew down the sides. Use the stitch lines between the batting and fabric as your guide.

This will hide the outside seam.

Join the top and bottom rows together the same way.

Line up the center seams, pin or clip, and sew across.

Your pillow square should resemble the picture. You can finish the pillow by adding a backing now or continue with some embellishments.

Designs by JuJu has already given us beautiful embroidery stitched along the seams of each block, adding so much charm and detail. To continue the tradition of classic crazy patch quilting, I’m adding decorative ribbon along the center seams—a lovely nod to the vintage embellishments that make crazy patch designs so timeless and unique.

Let’s add some piping to the outside edge of the pillow.

Line up the stitching on your piping with the outside seam of the pillow front. My picture shows the piping without the added ribbon embellishment. If you are adding the ribbon, do it before the piping. Make sure the finished edge of the piping is toward the inside of the pillow.
Tip: Lace can be used in place of piping.

With a zipper foot, baste the piping to the front.

Clip the piping at the corners to make it easier to sew around.
Check the piping. Does it look even? If needed, rebaste any areas that are not straight.

When satisfied, stitch in place. Trim the ends of the piping.

To finish my pillow, I’m adding a button to the center for a charming final touch. One of the best parts of crazy patch quilting is making it your own, so feel free to add as many embellishments as you like—ribbons, lace, buttons, beads, or any special details that bring your pillow to life and make it uniquely yours.
We are now ready to add our backing. Measure the front of the pillow. Mine is 14½” x 14½”. I like my pillow to look full, so once finished, this will nicely fit a 14” pillow form.

Select your backing fabric and cut two pieces 14½” x 11”. If your pillow is larger or smaller, adjust the backing size.

I suggest at least a 3” to 4” overlap on the backing pieces. This will allow for a little pull when the pillow form is inserted.

Fold one 14½” edge of each piece under ½”. Press.

Fold under again ½”, press, and sew across close to the edge.

Do this for both back pieces.

With right sides together, pin or clip the raw edges of the front and back together with the hemmed edges toward the center and overlapping.

Baste the front and back together. Use a zipper foot and the piping as your seam guide. Sew around the corners of the piping. Turn the pillow cover right side out. Check the basting along the piping, and make any needed adjustments. When satisfied, stitch with a 2.5 mm stitch length.

Turn the pillow right side out and press if needed. Put the pillow form inside the pillow cover, and your crazy patch pillow is complete!
Crazy patch quilting became popular in the Victorian era and is still loved today for its creative, scrapbook-like style. It’s a great way to use fabric scraps and make unique projects.
Ready to experiment with another project that goes beyond the basics? Explore our Creative & Unique Embroidery Projects collection for more unexpected ways to work with fabric, embroidery designs, upcycling, and creative techniques to make something truly one of a kind.
Please share your unique versions using the Crazy Patch Series in the Designs by JuJu Embroidery Blessings Group on Facebook, or use the hashtag #designsbyjuju anywhere on social media. As always, we love to be inspired by what you create!
Happy sewing!