Toggle Nav
 Inspire.
Create.
Stitch.
Inspire.
Create.
Stitch.
Inspire.
Create.
Stitch.
Search
Inspire.
Create.
Stitch.
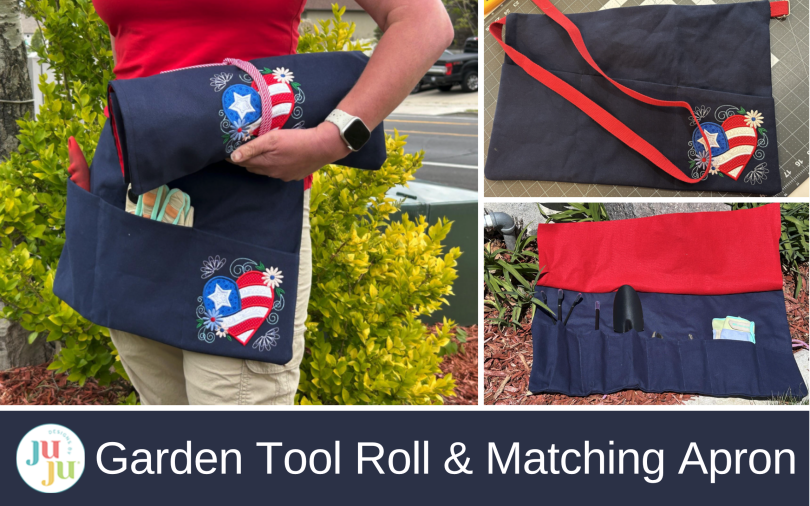
Create a patriotic garden tool roll and matching apron with Star Spangled Stitches embroidery designs. This practical machine embroidery project keeps gardening tools organized in handmade style.
Having a way to keep my garden tools in one place and ready to be used is one of the most helpful things when I start to do some yard work. This tool roll is easy to customize so that it fits your specific tools. I made it very generously sized so that even my mini rake fits in it! Since I seem to struggle finding both of my gloves, I made a slot for them too. The apron makes it easy to change out tools as you use them and keeps them close for easy access.
You can use any design you like on the tool roll and apron to make them uniquely you. Check out Spring Garden 2, Spring Garden Sketch Chair Flowers, or Gardening Word Art 1 for some inspiration. And this is not just for gardening; you can put any kind of tool in this. I was thinking my paint brushes might like a roll of their own.
Don’t forget to check out the Designs by JuJu Amazon store for our design team’s favorite supplies. And for stabilizers, batting, and threads, Designs by JuJu+ has everything you need.

Take one of the pieces of duck cloth for the body. On one of the short ends we are going to mark the center of the fabric and 3” in from the short edge. This mark will be the bottom of where we want our design to be.

To help you visualize where our design is going to be placed I drew a box with an arrow showing where the bottom of the design should go. You don’t need to do this step. It’s just to help you see where we want the design on the backing fabric.

Hoop your fabric with some tear-away stabilizer. I used my guide to make sure everything was lined up.

Load your design into the machine. I’m using the Heart block from In The Hoop Star Spangled Stitches Project Set 3 for my tool roll. The design is a bit smaller than my hoop, so I moved it so it will stitch at the bottom of my hoop instead of centered. Stitch out your applique first, if your design has any.

And then finish with the decorative and satin edge stitches.

Remove from the hoop and tear away your stabilizer. The back of the design will be hidden so you don’t need to trim up the threads unless you want to.

Set aside both of the body pieces. The embroidered piece will be the outside of your roll and the plain piece will be the inside you attach the pockets to.
Let’s make the pockets for the roll next. On your cutting mat, lay out the 10” x 34” pieces. This is longer than the roll so you can add in some pleats at the bottom of the pockets for bulky tools. I stack the two pocket pieces, right sides together, on top of each other so I will end up with two identical cut pieces.

On the right side of the pocket fabrics, measure 3” down from the top and make a mark on the fabric there.

We will now cut a diagonal line from the upper left-hand corner to the mark on the right side of the fabric. I had to line up two rulers to make it long enough!

Here are the two finished cut pocket pieces.

Using a ½” seam allowance, stitch down the diagonal edge of the pockets.

Press the seam open.

Fold in half with the wrong sides together so the seam is at the top of the fabric, and press again. Stitch ¼” away from the folded edge.

Place the plain back piece on your table, right side up, and lay your tools out so that you have them how you want them placed in your roll.

Make a mark on the back piece where each stitch line should go.

Now line your pocket up with the left side of the back fabric. For my big wood-handled tools, I put a small pleat in the bottom of the fabric and hold it in place with a clip.

Mark on the pocket your stitching lines. Draw them perpendicular to the bottom and lining up with your marks on the back piece.

If you have extra pocket fabric on the right end of your tool roll, trim the pocket fabric flush with the back.

Now stitch around the three outside edges of the pocket. You will be stitching through the two pocket layers and the plain (unembroidered) back layer.

Then stitch up the marked dividing lines. I backstitched at the top of the pocket on each one to reinforce the stitches because that’s where there will be the most stress on the seams.

Now measure 7½” up the right side of the back panel with the pockets. Take your cording and fold it in half. Place the fold on the center mark and clip or pin in place. Tie the cord together or tuck it in a pocket so it’s out of the way while we stitch around the edge. (Excuse the wet marks on my fabric—I was removing the chalk marks!)

Place the embroidered body piece right side down with the design on the right side by the cords. Pin or clip around the edges. Stitch around the edges using a ½” seam allowance, starting on the top edge and leaving an opening of about 6” to turn it.

After you have the pieces sewn together, clip your corners.

And then turn the project right side out through the opening in the top. Press your corners out. The duck cloth is thick so it took some patience and determination to get my corners flat.

Press the outer edges of the roll. On the top where the opening is, fold the edges in and press them. We will stitch this closed in the next sewing step.

Now take the piece of felt and cut a diagonal line like you did for the pocket. Measure 3” down from the top on the right side and cut the diagonal from that mark to the upper left corner.

Place the felt on the roll. The short edge goes on the left side this time. Stitch with a ¼” seam allowance across the top edge. This will attach the felt to the roll and close the opening on the body.

Now you can load up your tools. Lift the felt piece so it’s out of the way and slide in your tools.

Fold the felt down over the tools to protect them while they are rolled up.

And roll it up. Secure the roll by wrapping the cord around the roll and tying it. This will keep it nicely rolled up while you store and transport it.


The apron is constructed to match the tool roll and is made in a very similar fashion. Start by taking the 21” x 10” piece and marking 3” down on the right side. Line up your straight edge with that mark and the top left corner. Cut along the edge. The larger piece will be the pocket. We won’t use the smaller piece, so you can set it aside.

Hoop your design with tear-away stabilizer. This time we want the bottom of our design to run along the bottom of the pocket, the opposite of the diagonal line. I hooped it so the right edge of the design is 1” from the right side of the fabric. I like to center the design top to bottom between the diagonal cut edge and the bottom straight edge.

Take it to your machine and stitch out the design.

When your design is finished, remove it from the hoop and remove the excess stabilizer.

Take the other pocket piece and place the two with right sides together. Using a ½” seam allowance, sew along the diagonal line.

Fold in half along the stitched line so the right sides are out and press.

Take one of the 21” x 14” back pieces and place it right side up on your workspace. Place your pocket on top of the apron. Line it up along the bottom and the two sides.

You can choose where you’d like your pockets to be. I decided to make roomy pockets that will hold everything I can think I might need while working out in the yard. I made a mark 7” from each edge for the stitching. This will give me three pockets. Stitch along the lines and backstitch at the top edge of the pocket for extra stability.

From your strap webbing cut a 3” piece from one end.

Thread the small piece of webbing around the center post on your buckle slide. I use a zigzag stitch to hold everything together and to help prevent fraying.

Now we are ready to assemble the straps and backing to our apron. I find it easiest to place the buckle opposite my dominant hand. This helps when I put the apron on. Place it ¾” down from the top of the apron. Take your remaining length of webbing and place it on the opposite side ¾” down from the top. I clip the length so it doesn't get caught in the edge stitches.

Place the final large piece right side down on the apron. Secure it around the edges. Sew around the edges, leaving an 8” or so opening along the top edge.

After you’ve sewn it, clip your corners.

And turn it right side out.

Fold the opening fabric to the inside and press it closed. Press all the edges.

Topstitch ⅛” from the edge along the top of the apron. This closes the opening we had from turning.

Your apron is finished! To secure the apron, just thread the long piece of strap up and down through the slide buckle. You can adjust the length to fit you. I like to finish the long piece of webbing with a tight zigzag stitch to keep it from fraying.


I can’t wait to see how you make your own tool roll and apron. It’s fun to see what designs you choose to use to complement your tools. Share your designs with us in the Designs by JuJu Embroidery Blessings Facebook Group, or use the hashtag #designsbyjuju anywhere on social media, so we can all see how you made yours! We love to see what you create!