Toggle Nav
 Inspire.
Create.
Stitch.
Inspire.
Create.
Stitch.
Search
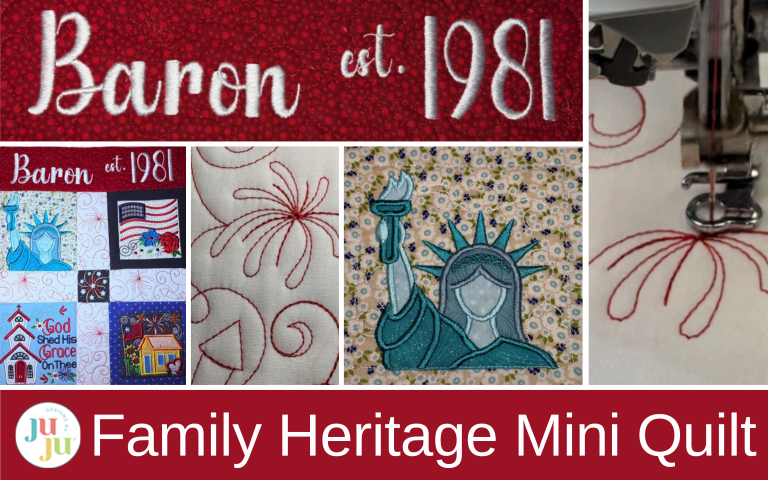
Make a Family Heritage Mini Quilt for your wall with the new Star Spangled Stitches embroidery sets from Designs by JuJu. These small stitches add a lot of patriotic charm.
This mini quilt, full of stars, stripes, and fun stitching, will stand out on your wall. With the Star Spangled Stitches embroidery sets from Designs by JuJu, you can turn bold patriotic designs into a small quilt with lots of personality. It’s quick to make, enjoyable to sew, and just the right size to show your love for handmade decor and tradition.
Finished size: 14” x 17½”
Check out the DBJJ team’s favorite supplies in the Designs by JuJu Amazon store. And for all your stabilizer and batting needs, be sure to check out Designs by JuJu+.

To begin our mini quilt, we need to select four 5x5 designs from the Star Spangled Stitches design sets.
After you have chosen your blocks, load the first block to your screen. I am starting with the Statue of Liberty from Set 4 in a 5x5 size. If you like, you can follow along with me or choose a different block. The instructions in your download include a cutting chart with fabric dimensions.

Hoop cut-away stabilizer and take it to the machine.

The first stitch on every block is the placement stitch for the batting. Lay the batting down, completely covering the stitch lines.

The next step is to tack down the batting. Remove the hoop and trim the batting close to the stitches.

Tack down the background fabric.

My block continues with the applique.

Lay the applique fabric down. Remember to cover all the stitches completely. Scrap fabric is perfect for applique.

Run the tack-down stitches. Trim the fabric close to the stitches.

Finish all the applique pieces. Remember to trim each piece before continuing to the next.

Run the decorative satin edge to finish.

Remove from the hoop, and trim the stabilizer close to the stitches.

Trim each block ½” from the outline stitch on all four sides.


My next block is the Rope Flag from Set 1. This design includes a border as part of the block. If this is new to you, you can follow along with me. Again, fabric cutting sizes are included with the download.

Hoop cut-away stabilizer and take it to the machine.

The first step will be batting.

The next step will be the background fabric.

Then we will complete the applique and decorative stitches.

Last, we will add the border. Run the placement stitch at the top of the block. Remove from the hoop.

Lay the first border piece right side down with the raw edge ⅛” to ¼” from the stitch line.

Now, sew the fabric down.

Remove the hoop and set it on a flat surface. Fold the fabric up and over the stitch line, then smooth it flat.

Return the hoop to the machine and run the final step for the top border, the tack-down stitching.

The next step will be to place the line for the bottom of the border. Continue with each step as before.

Continue with the sides the same way. Always remember to give yourself enough fabric to trim to ½” on all sides. When finished, your block will resemble this. Remove from the hoop and trim the block.
Stitch out two more 5 x 5 blocks.


I like to use sashing between the blocks in my quilts. For the sashing, load the 2.11” x 5.11” rectangle from the Patriotic 1 Quilting Backdrops Design.

Hoop cut-away stabilizer and take it to the machine.

The first step is the batting placement.

The next step is the batting tack-down. Trim the batting.

The next step is the fabric tack-down. The final step is the design.

Make four of these and trim to ½” from the outer stitch line on all sides.

To add the 2” block, open the square blocks from the Patriotic 1 Quilting Backdrops Design.

Select the 2.11” x 2.11” size and load it to your screen.
You can choose to stitch out the block as shown or add a design from the Patriotic Alphabet Embellishment Kit.

To add a design, click Add and open the embellishment kit. Select the 2.5” size.

Select the fireworks design from the Patriotic Alphabet Embellishment Kit and add it to your screen.

Center the design inside the square.

With the size key, reduce the size to the smallest it will go. My machine is a Brother 8500; your screen may look different.

The design will now fit nicely inside the square.

Hoop your stabilizer and start stitching.
Begin by stitching the batting in place, then trim it close to the stitches. Lay the background fabric down and stitch it in place.
When you come to the original firework design, do not stitch it; instead, proceed to the embellishment kit design. Follow the steps to stitch your chosen fireworks design.

Take the piece out of the hoop and trim ½” from each side.
You can add a name and date using software or by working directly on your machine. I'll walk you through how I made mine on my machine.

Open the Quilting Backdrops files and choose the 3.11” sashing that fits your largest hoop. You will need the finished size to be 3” x 12”. I used a 9.5” x 14” hoop for mine. Add the design to your screen.
If your hoop is smaller, try making two 3” x 6½” sashings, sew them together to give one 3” x 12”. You can then arrange the letters onto your screen and float the fabric on top of your hoop to stitch them out.
Next, we'll add a name and, if there's space, a date.

Select the font you want to use. I chose Pie Time Embroidery Font. From the font options, choose the size that best suits your name. My name has five letters, so I went with the 2” size. If your last name contains more than 5 or 6 letters, you may need to size down.

Choose the letters you need and add them to your screen.

Add all the letters of your name.

Click Edit, then rotate each letter 90 degrees to the left.

Use the Move keys to place the letters inside the 3.11” sashing.

If you have enough space, you can add a date and “est.” as well.

I used 1” letters for “est.”

Then I switched back to the 2” letters to add the date. After arranging all your letters and numbers, your screen should look like this.
Tip: You can use smaller letters for a longer name across the 12” and add “est.” and the date underneath.

Select Embroidery, then click the Edit button. This will bring up the Layout button. Use it to move the sashing design only to the far left of the screen.
Now you can use the Move buttons to line up the letters and numbers along the bottom grid line as shown. This helps keep the letters even.

Center the sashing block back over the letters. Shift the whole design as far left as possible. I always do a trial stitch first.

Hoop the stabilizer and take it to your machine. Stitch the first step, the outline for the batting. Then move to the start of the text and stitch it out onto the stabilizer. This will show you if the text is centered properly. Does everything look good? If not, now you can go back and make any changes on the screen if needed.
Once you are satisfied with how your text looks, move the entire design to the far right on your screen. Using the same stabilizer, we can go through the process of batting, background fabric, and stitching the text onto the fabric. If you feel more comfortable, you can use a new piece of stabilizer.

Stitch the placement line for the batting. Place the batting down, run the tack-down stitch, and trim the batting close to the stitches.

Lay the fabric on top, then continue with the tack-down and quilting stitches.

Finish by stitching the text.

Remove the piece from the hoop, and trim away the stabilizer.

Trim the fabric ½” from the outline stitches.

At this point, you should have four 5” x 5” squares, one 3” x 12” rectangle, four 2” x 5” sashings, and one 2” square.

Arrange your blocks however you like.

Start assembling with the top row.

Sew the sashing to the left block with right sides together, matching stitching lines.

Use the tack-down stitches of the batting and the fabric as a seam guide. Sew down the middle of these two stitch lines.

Add the second block to the other side of the sashing.

Sew the center sashings and the 2” block together. Sew the third row just like you did the first.

Join the rows together, matching the center seams.

Finish by adding the name and date block at the top.

Select the fabric for the side sashing.

Measure your quilt top. Mine measures 12” x 15”. Yours may differ slightly, and that’s perfectly fine. Cut each strip 2½” x the length of your quilt top.

Sew the strips to the sides of your top with a ½” seam allowance. Press the sashing outward. We're not adding batting to these strips yet, but don't worry it's coming later.

Now measure the width. Cut two strips 2½” x the width of your top (including the side sashing). Sew the top and bottom strips to your quilt top with a ½” seam allowance.

Create two tabs for hanging. I made two more squares to match the center square in my quilt top, and used the outer sashing fabric for the backs.

With right sides together, stitch down both sides and the top. Trim to ¼” and clip the corners. Turn right side out.

Measure equal distance from the sides of the top. I placed my tabs 3½” in on both sides.

With raw edges even, and right sides together, pin or clip the tabs in place. Baste across the tabs. Check they are where you want them to be. If satisfied, move on to the backing.
An envelope-style backing is one of the easiest ways to finish our mini wall hanging. It gives a clean, professional look. This method creates an overlapping back that keeps everything secure.
Measure the width and height of your finished top. My top measures 14” wide x 17½” tall. Cut two backing panels that overlap in the center.
Cut the width the same as the front. For the height, add 3” for overlap. So my measurements will be 14” x 11” for both pieces. This will give me enough for the overlap.

On each backing piece, finish one 14" edge (this will be the center overlap): Fold ½", press, fold another ½", and stitch. Press the finished edges flat.

Place the quilted front right-side up. Lay the first backing piece right side down, finished edge toward the center, raw edges even at the top and sides. Clip or pin.

Sew across the top and down both sides with a ½” seam allowance.

Lay the second backing piece right-side down, overlapping the first. Stitch down the sides and across the bottom.

Trim corners to reduce bulk.

This step is optional: Press the seams open and spray the mini quilt top with adhesive basting spray.

Add a layer of batting covering the entire project and press with a hot iron and pressing cloth. Trim the edges even. I like to add batting to the back of my small quilt projects. I find it makes the back smoother and you don’t feel any bulk from the seams.

Turn right-side out through the envelope opening. Gently push out the corners and press again.

Stitch in the ditch along the inside of the outer sashing. Use a 3mm to 3.5mm stitch length. This will hold the batting in place.

With its bold designs, thoughtful stitching, and vintage-inspired charm, the Star Spangled Family Heritage Mini Quilt is ready to take its place on the wall.
Small in size but rich in meaning, this project celebrates creativity, craftsmanship, and a love of handmade tradition. Whether displayed for patriotic holidays or enjoyed year round, it’s a joyful reminder that every stitch tells a story, and this one shines bright with red, white, and blue spirit.
Please share your Family Heritage Mini Quilt in the Designs by JuJu Embroidery Blessings Group on Facebook, or anywhere on social media using the hashtag #designsbyjuju. As always, we love to see what you create!
Happy sewing!
