Toggle Nav
 Inspire.
Create.
Stitch.
Inspire.
Create.
Stitch.
Search
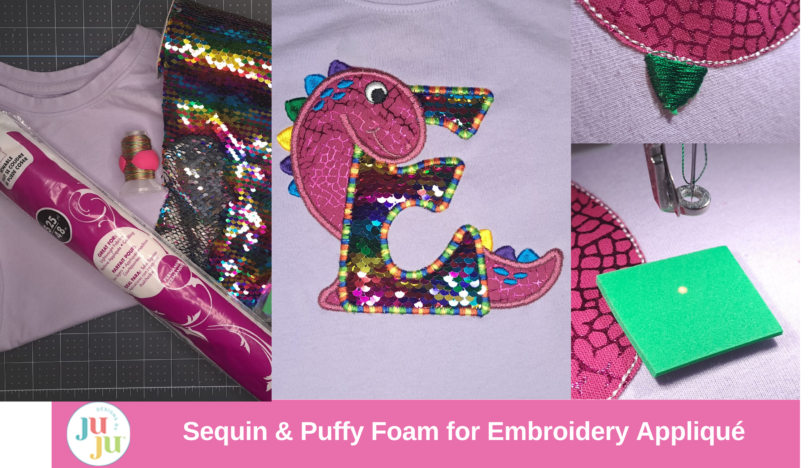
Do you love a little shimmer and shine on your embroidery projects? How about experimenting with unique textures and dimension? Well, then you've come to the right place! In today's blog post, we are going to be learning how to use sequin material and puffy foam together to create vibrant and fun applique projects!
Check out the DBJJ team’s favorite supplies in the Designs by JuJu Amazon Store.


For this tutorial, I am using a two-sided reversible sequins (a.k.a. flip) fabric. I applied Heat-n-Bond Lite to the back of my sequin fabric to provide additional support. This is optional. If your sequin fabric has a supportive backing, Heat-n-Bond Lite may not be necessary.
Step 1: Select your applique design and load it onto your machine. I recommend selecting a design that has a large applique area so you can enjoy the full effect of the sequin material.
Step 2: Hoop a stabilizer appropriate for your project. I am embroidering on a size 5T t-shirt, so I am using a cut-away stabilizer.
Not sure what stabilizer to use? Check out this blog post for helpful tips and tricks.
Looking for tips for embroidering on apparel? Check out this blog post.
Step 3: Run the placement line for your sequin applique fabric.
Note: I already completed the first applique stitches using cotton fabric.

Step 4: Lay your sequin fabric over the placement line, making sure the placement line is completely covered.
Note: If you are using a flip sequin fabric, pay attention to the direction of your sequins before running the tack-down line.

Step 5: Run the tack-down stitch to secure your sequin fabric.

Step 6: Carefully trim around the sequin fabric using sharp scissors. If you plan to use sequin fabric often, you may want to dedicate a pair of sewing scissors specifically for trimming this type of fabric.
Pro Tip: Trimming the sequin fabric gets very messy. I keep my mini vacuum close by for easy cleanup.


Step 7: Repeat steps 3–6 for any remaining applique pieces.
Step 8: Now it is time to run the decorative stitches. I am using Sulky 2 mm Puffy Foam to provide extra dimension to my dinosaur spikes. Lay the puffy foam on top of the project and run the decorative stitches.
Pro Tip: Match your puffy foam to your thread color for best results.


Step 9: Once all the puffy foam decorative stitches are complete, carefully tear away the excess puffy foam. If you have any leftover foam around the edges, you can use a heat gun on LOW to clean up the debris.
The puffy foam should remove easily. Do NOT tug or pull, or you run the risk of shifting your project in the hoop or completely unhooping it. Use scissors to trim, if needed.


Step 10: Finish any remaining decorative and satin stitches. I used KingStar metallic thread and variegated thread to add some extra pizazz to my project.


I hope you have enjoyed today's tutorial on using sequin material and puffy foam with your embroidery projects. Have fun exploring the endless capabilities with these unique supplies.
Make sure to join the Designs by JuJu Embroidery Blessings Facebook Group for more inspiration and to share your own creations, or use the hashtag #designsbyjuju anywhere on social media. We can’t wait to see what you make! Happy stitching!