Toggle Nav
 Inspire.
Create.
Stitch.
Inspire.
Create.
Stitch.
Search
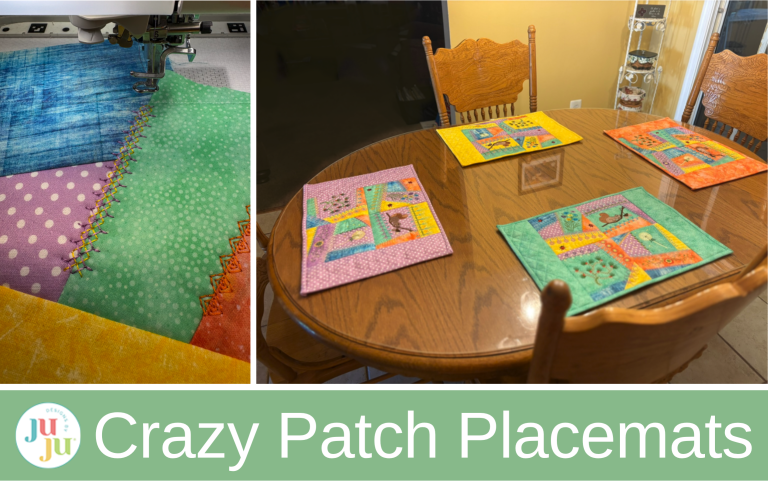
Create colorful crazy patch placemats with machine embroidery and decorative quilting stitches. This step-by-step tutorial shows how to combine Crazy Patch Blocks and Quilting Backdrops to make unique table decor for any season.
Crazy patchwork blocks are so much fun to make and so happy looking. The decorative stitchings are amazing! Follow along with me as I make a set of placemats. I’m using bright colors for my summer table.
Check out the DBJJ team’s favorite supplies in the Designs by JuJu Amazon store. For stabilizers and batting, Designs by JuJu+ has everything you need.

I looked at two purchased placemats and measured them for an idea of the dimensions I wanted for my crazy patch placemats. One placemat was 12” x 17” and the other measured 12.5” x 18”. Because I want to use all four blocks from Set 2 in each placemat, I’m stitching the 6x6 block in my 8x8 hoop. I cut batting squares at 7” for each block.
The first three steps of my first block go quickly: I stitch my batting placement stitch, tack down and trim the batting, then sew the placement lines for all the fabrics.

I lay my first piece of fabric face up, making sure it extends at least ½” beyond the outside placement line.

DBJJ Crazy Patch blocks are made a little differently than the usual applique designs most of us are used to doing. You don’t trim the fabric close to the tack-down stitches. Trim about ⅛” away from inner portions of the tack-down stitches. Trim at least ½” from the outer edges AND angle away, as in the photo.

Below you can see the first fabric piece trimmed.

Since I can be a miser with my fabric when I’m doing applique, the first piece of fabric I cut to use on my block was too small because I didn’t allow enough for the extra ½” of fabric. Not a big deal because I’m sure the too-small piece will be large enough to use on another block!.
The fabrics for these blocks are added in the stitch-and-flip method. The next fabric is laid face down.


Once all the fabrics are stitched in place, it’s time to add the embellishments.


Here I have the first two blocks laid out to check the colors. My take-away is that I need yellow going up and down on one of the next blocks. I also need to add that darker purple.


Once a block is complete, the stabilizer and fabrics need to be trimmed. It is easier for me to use a ruler to hold back all the pieces of fabric and trim the stabilizer to ¼”.

After trimming the stabilizer, the block fabrics are trimmed ½” from the outside stitch line.

As I work my way through the four blocks from Set 2, I choose a different fabric for the four different feature blocks so my colors will be more evenly spread throughout the placemat. Later on in the project, I decided not to mix the background colors, but I’m sharing the photo below so you can see other ways to lay out the blocks.

I make one of each block design from the set when I start this project. But at this point I think it will be more efficient to sew the rest of the blocks in groups. That means I stitch out three more of Block 1, three more of Block 2, and so on. At some point as I was doing all the blocks, moving them around to see what color backgrounds I needed, that’s when I realized that putting four blocks with the same featured background appeals to me. I begin laying the matching blocks together to help me select the fabric layout for the remaining blocks.

If you find videos helpful, check out this great technique demonstration video: How to Make the Crazy Patch Series 1.
Once all 16 blocks are made, it is time to sew them together. I match the top and bottom pairs of each placemat and pin them together with the corners matching at the fabric tack-downs. I stick a pin through at the corners to check alignment.

Once the blocks are pinned I “assembly line” sew them, running each pair one after the other through the sewing machine. I make sure to stitch right in the middle of the two lines of stitches. Afterward, I snip the threads between each pair of blocks.


I press the seams of the top pairs to either the left or right and the seams of the bottom pairs in the opposite direction. This will make it much easier to match the seams up.

I match up and stitch the top and bottom pairs. The seams butt up nicely if you press them in opposite directions.

Now I need to add borders on the sides of the placemats to make them rectangular.
I took several photos to help me decide on the colors of the sides. Did I want them to be all the same color? Which color would work best? I took quite a number of photos, below are just a few of them.

DBJJ makes easy-to-use Quilting Backdrops™ with a lot of size options. All Quilting Backdrops blocks coordinate beautifully with the crazy patch blocks. I’m using the 12” vertical Cross Hatch Quilting Backdrops Design.

For each Quilt As You Go (QAYG) side, I need a 4” x 13” batting piece and a 4½” x 13½” piece of fabric. After tacking down and trimming the batting, the fabric is tacked down.


After trimming away the excess stabilizer, the sides are stitched on in the same manner the blocks were pieced together.

I lightly press the placemat from the back. It’s amazing how quick and easy it is to use the Quilting Backdrops. All eight pieces took no time at all. If I had done them all out of the same fabric it would have been even quicker.

To complete my placemat I spray the back with 505 Temporary Adhesive and lay it on a piece of batting. I prefer using batting on the placemats because otherwise I feel the seams are more bulky. After the placemat is down, I pin the corners and long sides. I then place both of these pieces on top of my backing fabric which is wrong side up. I adjust the pins making sure that the backing is smooth

Next, I baste all the layers together, stitching just on the outside of the tack-down line (between the line and the raw edges).

Once the basting is done, I line up the ¼” mark of my ruler just on the inside of the white tack-down stitching and trim away the excess. Because the ¼” is on the inside of the stitching, when I sew the binding on, the tack-down line will be inside the seam allowance and not visible.

For binding, I cut two strips 2½” wide by the width of the fabric, then cut off the selvage ends. I lay the two ends at right angles and draw a diagonal line from the two corners. I stitch the binding on the line and trim to ¼” seam allowance. Take a look at the two photos below, which will make that easier to understand. After sewing along the line, the seam allowance is trimmed to ¼” and the seam pressed open.


Fold the wrong sides together lengthwise and press well.
To sew the binding to the placemat, I line up the raw edges of the binding with the raw edge of the placemat front, leaving a few inches at the beginning free so I can attach the ends later.

I use my sewing foot as the seam allowance. At a corner, I stop ¼” from the end, lift my presser foot, and pivot the placemat and sew backwards off the placemat.

I then fold the binding at a diagonal and bring it down to make a corner.

Dropping the needle back at the ¼” mark I start sewing again. I do the same for all four corners.
Once I’m near the end, I stop with a few extra inches free, just the way I started.
Here’s a Jenny Doan video I’ve shared before that shows this technique and also how to join the two ends of the binding.

Once the binding is completely attached, I fold it over to the back, clip in place, and then stitch in the ditch.

The first placemat is done! Once the blocks are stitched out, everything comes together very quickly and I have beautiful new decor for my table.


These placemats make a bright, summery table!. You can also make matching coasters with help from this blog post: Star Spangled Stitches Project: Patriotic Mug Rugs and Coasters.

There are so many ways to create a different feel using these blocks. Imagine them in fall colors! Or colors that match your own kitchen. Have fun and make them your own.
Please be sure to share your projects in the Designs by JuJu Embroidery Blessings Facebook Group, or use the hashtag #designsbyjuju anywhere on social media. We all love to see what you create!