Toggle Nav
 Inspire.
Create.
Stitch.
Inspire.
Create.
Stitch.
Search
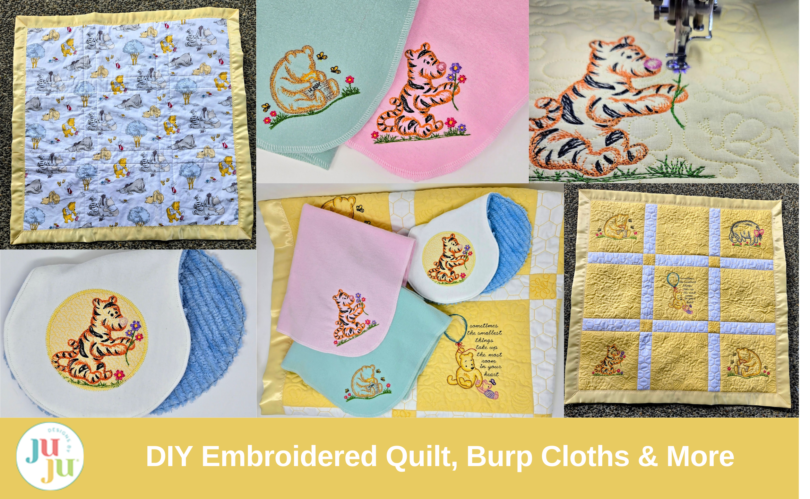
I love Pooh bear and all his friends. Lucky for me, so do my son and dear daughter-in-law. So it was with a lot of excitement that I made this baby ensemble for their impending arrival. I thought a lot about what they would need first. A quilt is not necessarily a need, but it makes a great backdrop for all the baby pictures. Let’s get started!
Please check out the DBJJ team’s favorite supplies in the Designs by JuJu Amazon store.
Check out these wonderful resources for getting your designs to your machine and sewing your quilt together.
Pro-Tip: Pre-wash all your flannel. I serged the raw edges (a zigzag stitch would also work) so it wouldn’t fray in the wash, and I washed all my flannel on a hot cycle and dried it in the dryer. Flannel shrinks and this is a very important step whenever you work with it.


We will start by loading our designs onto our USB drive. If you are not familiar with this process, you can find an excellent tutorial at: How to Get Started in Machine Embroidery.
I did not use any software. I do not download designs to software before putting them on my USB drive. The designs go from my computer to my USB drive, then to my embroidery machine. It is very easy to quilt the Bumblebee Backdrop, leave it in your hoop, and then go on to embroider a character on top of your quilting.
This is what the designs look like on my embroidery machine screen. I chose the 5” x 7” Pooh designs, the 9” Bumblebee Quilting Backdrop, the 2” cornerstone block of just the bee, and the 2” x 9” Chicken Wire Quilting Backdrop for my sashing between my blocks because it reminds me of a honeycomb.

Gather your supplies.

I like to cut all of my fabric, stabilizer, and batting ahead of time so when I go to embroider, I know I have everything I need ready.
Cut your fabric:
Cut identical pieces from batting.

As you can see in the finished quilt photo above, four of the blocks are just the cute bumblebee backdrop, and five have the backdrop plus the character on top. First I embroidered the backdrop, and then with it still in my hoop, I changed to one of the characters and embroidered it on top.

My center is the block with the wording, where I used 100 wt thread. This is a much thinner thread than the 40 wt we normally use. I like it because you can clearly see the little parts of the vowels.

Since there are only four characters in the design file and I needed a fifth block, I did Pooh twice. But I did him as a mirror image. My machine has a little button that flips the design to make it a mirror image.

When it flipped the design, the words on the honey bucket ended up flipped too, so I just skipped the step to embroider the text on the second Pooh block.

Did you notice a difference in the bees in the above two blocks? In the one on the left, the black was done with my 40 wt thread. On the right, I used the 100 wt thread. I think it makes the bees look more delicate.
Once all my units were embroidered, threads trimmed, and units trimmed, leaving a half-inch seam allowance on all sides, it was time to head to the sewing machine.

If you have not sewn units together before, here is a great tutorial on how to get your pieces sewn together nicely: Quilting Backdrops: Make a DIY Stand Mixer Cover. I will not repeat the pinning steps here.

First, I sewed the blocks and sashing into rows. I pressed away from my white sashing using a dry iron at the cotton setting. Then I sewed the rows together into the quilt top.


I cut my backing and white flannel to a 36” square. Then I placed my batting right side down and smoothed the layer of flannel over it. Next I smoothed my quilt top on top. I chose to add the flannel between the quilt and the back so you wouldn’t see through my backing to see the seams and back of the blocks.

By rolling the quilt on either side, I could hold it taut to quilt along the sashing in the ditch. I increased my stitch length to 3.5 mm and used a cotton thread. I quilted in the ditch on either side of the sashing in both directions.

After quilting, I ran a basting stitch (4.5 mm) in the seam allowance all around the quilt.

I trimmed the backing and flannel 1¼” from the edge of my quilt all the way around. This is done so the satin binding has some cloth inside of it, giving it a little “filler.” Notice above that there is a front and a back to the binding. The back of the satin is a bit wider so you are sure to catch it when sewing it to your quilt.

Using clips, add your binding all the way around your quilt. At the corners, fold out into a 45º triangle, and then fold back to the quilt. This makes a diagonal edge.


Tuck the binding into the edge on the back to make another diagonal corner.

Sew a ½” seam allowance to join the binding ends. Finger press it open.

Fold seamed binding back down over the quilt.

Using a decorative stitch to finish.
I chose a decorative stitch on my sewing machine to sew my satin binding down. I straight stitched the folds down.
Your quilt is finished!


Receiving blankets are quick to make and oh so fun! If you look at the ready-made blankets, they are almost always flannel and the hems are finished using a serger, so that is what I did. I cut 32” squares from my flannel. Remember, your flannel has been washed and dried already.
I drew a rounded corner using a small plate, but haven't cut it yet. Cut a piece of fusible cut-away mesh bigger than your hoop. (I am using my 5” x 7” hoop.) Then I pressed my fusible cut-away mesh to the corner of the flannel, using a non-stick pressing sheet to keep the extra fusible off of my ironing board. Use dry heat.


I embroidered the 4” design on my flannel. I slipped a piece of tear-away stabilizer under the hoop while embroidering to help keep everything stable. Once my design was finished embroidering, I gently pulled off the tear-away stabilizer and then warmed the mesh with a dry iron so I could pull it away from the flannel and trim. You want to trim from the top so you don’t risk cutting your flannel.


Now go back and give your design a press with a dry iron and finish the edges of your receiving blanket. I used my serger. I serged the corner by going on top of my drawn line, making all 4 corners rounded. You could use bias tape, or make a small hem.

This is an easy-to-make ITH project (Peanut Shaped Baby Burpies). Download the directions and design and you will have a cute burpie in no time.
I used my largest hoop and just followed the instructions. The only thing I did differently was that I pre-embroidered some 4” designs on a piece of cotton fabric. I also used pre-washed flannel for the top of my burp cloth, skipping the flannel batting in the middle.

Gather your supplies: instructions, flannel, and chenille fabric. Follow hooping instructions in the pattern.

I embroidered 2 (4”) characters on cotton fabric. I hooped a piece of tear-away stabilizer and ran a basting box to make sure I had enough room on my scrap for both.
Then I just followed the instructions to make my burpie. I cut the fabric with characters into circles and embroidered around my circles twice to hold everything in place a little tighter, since I had to trim through some of the flowers. I used my sewing machine around the edges to close the turning space.

I do hope you enjoyed this tutorial. If you make any of the items, please be sure to show us in the Designs by JuJu Embroidery Blessings Facebook Group or use the hashtag #designsbyjuju anywhere on social media. We can’t wait to see what you create!
