Freestanding Applique Heart Wreath: A Step-by-Step Embroidery Tutorial for Stunning Handmade Decor
Posted on January 30 2025 by Tara Sturm
Are you ready to add a heartfelt touch to your home decor or create a personalized gift for Valentine’s Day? This Freestanding Applique Heart Wreath is the perfect project! With step-by-step instructions, you’ll create a beautiful, dimensional wreath that showcases your embroidery skills. Let’s dive in!
Supplies
Embroidery machine (compatible with your hoop size)
Embroidery thread (in your chosen colors)
Stabilizer (we recommend water-soluble stabilizer for freestanding projects)
Fabric scraps (cotton works great)
Scissors or rotary cutter
Hot glue gun or sewing needle for assembly
Foam core or wire wreath base (optional for added stability)
Download the Design: Begin by downloading the applique heart designs from Designs by JuJu.
Gather Your Supplies: Ensure you have all your materials ready. Choose fabrics and threads that complement your color scheme.
Hoop the Stabilizer: Use a water-soluble stabilizer to create sturdy, freestanding pieces. Hoop two layers of stabilizer tightly to prevent shifting during stitching.
Step 2: Embroider the Hearts
Load the Design: Transfer the design files to your embroidery machine and load the specific heart pieces you want to stitch.
Stitch the Applique: Begin with the placement stitch to mark where the fabric will go. Place your fabric over the stitching line, then run the tack-down stitch to secure it. Trim the excess fabric close to the stitching line. To add a back to the applique design, place a felt or cotton fabric on the back side of the hoop and run the tack-down again before you run the final satin stitch. Don’t forget to trim the back fabric.
Depending on your hoop size, you can fill it with designs to save time!
Decorative Stitches: Allow your machine to complete the decorative satin or motif stitches, which will finish the edges beautifully.
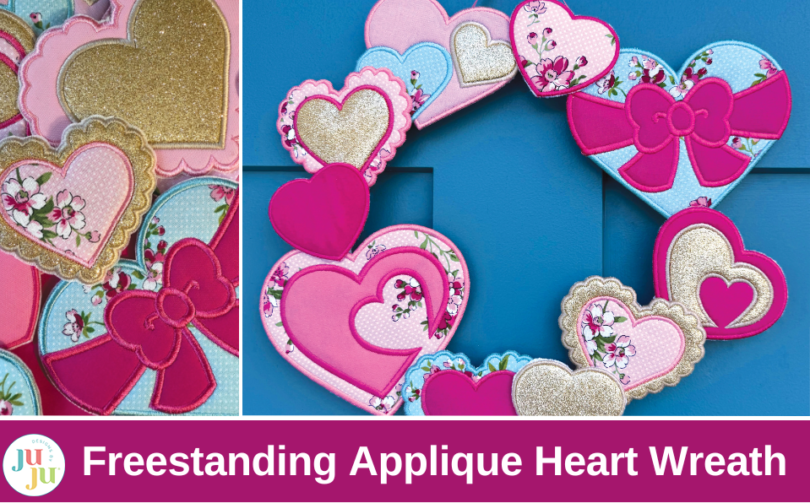
Repeat: Stitch out multiple hearts in various sizes and colors to create a dynamic and visually interesting wreath. For our two wreaths, we made four in the 5” x 7” size, ten in the 4” x 4” size, and also made small single-color hearts that came from our machine design catalog (using a Brother Stellaire2).
Switch up your fabric and thread colors to make tons of combinations.
Step 3: Assemble the Wreath
Rinse the Stabilizer: Once all your hearts are stitched, trim away excess stabilizer and, using a cotton swab dipped in warm water, remove the remaining stabilizer from around the edge. Allow the pieces to dry completely.
Arrange the Design: Lay out your embroidered hearts in a circular pattern to form the wreath shape. Play around with placement until you are satisfied with the layout.
Move your hearts around until you find your favorite layout. Take a photo to help you with assembly.
Step 4: Secure the Wreath
Glue or Sew the Pieces: Use a hot glue gun to attach the hearts to each other, or hand-stitch them together for a more traditional approach.
Attach to a Base: If you are using a foam wreath form or wire base, secure the hearts to it for added stability.
Draw and cut out your foam wreath form according to the size you want.
Add Embellishments: Consider adding bows, beads, or other embellishments for an extra-special touch.
Step 5: Display Your Creation
Your Freestanding Applique Heart Wreath is now complete! Hang it on a door, display it on a wall, or gift it to a loved one. The possibilities are endless with this versatile and charming design.
Tips for Success:
Experiment with Fabrics: Use a mix of patterned and solid fabrics for a unique look.
Color Coordination: Match your thread and fabric colors for a cohesive design or go bold with contrasting colors.
Stabilizer Selection: Ensure you’re using the correct stabilizer for freestanding projects to maintain durability.
Tara Sturm is a lifelong creative with a passion for all things embroidery, crafting, and design. With over 20 years in the industry, she’s spent her career bringing beautiful ideas to life—whether through graphic design, product development, or marketing for craft-loving communities. She loves sharing tips, inspiration, and creative insights to help makers feel confident in their projects. When she’s not designing or stitching, you’ll find her experimenting with new crafting techniques, geeking out over color palettes, or spending time with her husband, two boys, and their two dogs—because creativity is even better when shared with family!
 Inspire.
Create.
Stitch.
Inspire.
Create.
Stitch.