Toggle Nav
 Inspire.
Create.
Stitch.
Inspire.
Create.
Stitch.
Search
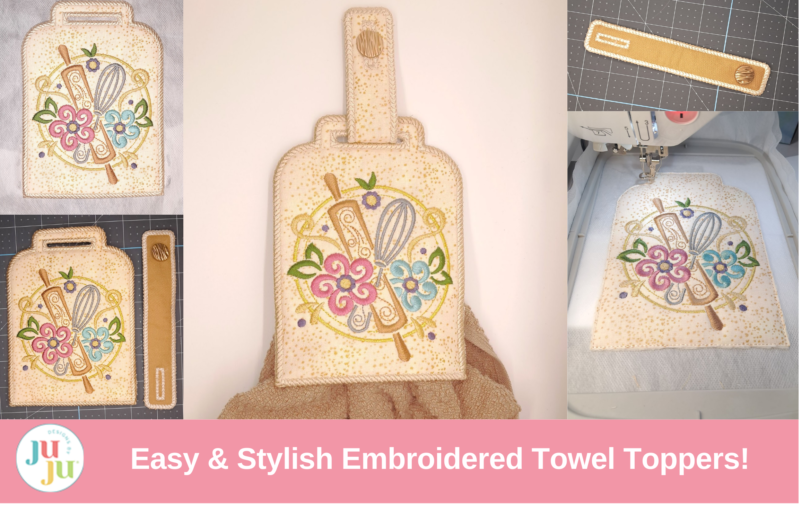
Are you looking to transform your kitchen towels? Try adding an embroidered towel topper! Designs by JuJu has a multitude of towel topper options available in three diverse styles, including a wrap-around hanger and two other variations of towel toppers/hangers. In today’s blog post, we will be stitching the Swirly Kitchen Towel Topper 1 Set 1.
Make sure to check out this YouTube video for a tutorial on making another towel topper variation. We also have another YouTube video for how to make a wrap-around towel topper/hanger. All three styles are made completely in the hoop and can really jazz up a traditional kitchen towel!
Check out the DBJJ team’s favorite supplies in the Designs by JuJu Amazon Store.
The stitch steps for this style of ITH Towel Topper all follow a similar pattern. Depending on the design you purchase, there could be additional applique work or decorative stitches. Make sure to reference the PDF instructions and color charts included with your purchase for specifics.
Step 1: Select the towel topper you want to stitch and load it onto your embroidery machine.

Step 2: Hoop two pieces of water-soluble stabilizer. Two pieces are recommended to prevent your project from ripping through during stitching.

Step 3: Run the placement line for the batting.

Step 4: Lay down your batting, making sure to cover the entire placement line, and run the tack-down stitches to secure the batting in place.

Step 5: Remove the hoop from your machine and trim around the tack-down line, making sure not to cut any of the stitches.

Step 6: Use the batting tack-down stitches as the placement line for the background fabric. Place your fabric over the placement line and run the tack-down line.
Note: SF101 is highly recommended for all fabrics. It provides added support for the towel topper and helps to prevent puckering caused by the decorative and satin stitches.

Step 7: Trim away the excess background fabric, making sure not to cut the tack-down stitches.

Step 8: Complete any decorative stitches; reference the color chart for satin and design stitching sequence.
Step 9: Remove the hoop from your machine and add the backing fabric. I like to apply SF101 to my backing fabric for added support and durability.

Step 10: Run the tack-down line to secure the backing fabric.

Step 11: Remove the hoop from your machine and trim away the excess backing fabric around the tack-down line.

Step 12: Run the placement line for the elastic band. Remove the hoop from your machine, secure the strap on the back of your hoop using tape (I prefer paper medical tape).

Step 13: Place the hoop back on your machine and run the tack-down stitches for the elastic band. Remove the hoop from your machine and trim the band along the tack-down stitches.

Step 14: Stitch the final satin stitch all the way around the towel topper.

Step 15: Remove the design from your hoop. Trim away the excess stabilizer, leaving approximately 1/16” around the outer edges. Be careful not to cut any of the satin stitches.


Step 16: Remove the remaining water-soluble stabilizer using a water-saturated cotton swab.

Step 17: Repeat steps 1–7, 9–11, and 14–16 for the towel topper hanger.
Step 18: Use a sewing needle and thread to attach a button on the towel hanger.


Step 19: Use a seam ripper (or sharp-tipped scissors) to carefully open the buttonhole.


Step 20: Once you have completed the towel topper, simply slide a folded kitchen or hand towel through the elastic/webbing to hang. You can use any material or style towel you would like. You could even embroider a kitchen towel to coordinate with your towel topper!

I loved creating the Swirly Kitchen Towel Topper 1 Set 1 to add to my extensive collection of seasonal towel toppers. This style of towel topper is my favorite from Designs by JuJu because the towel can easily be removed for laundering. Make sure to check out these other fabulous towel toppers from Designs by JuJu!


If you loved this project, you’ll find plenty more just like it in our Home Hub—a curated collection of quick, creative, and practical projects perfect for gifting (or keeping!)
I hope you have enjoyed today’s blog post on how to make an ITH embroidered towel topper. Make sure to join the Designs by JuJu Embroidery Blessings Facebook Group for more inspiration and to share your own creations, or use the hashtag #designsbyjuju anywhere on social media. We can’t wait to see what you make! Happy stitching!