Toggle Nav
 Inspire.
Create.
Stitch.
Inspire.
Create.
Stitch.
Search
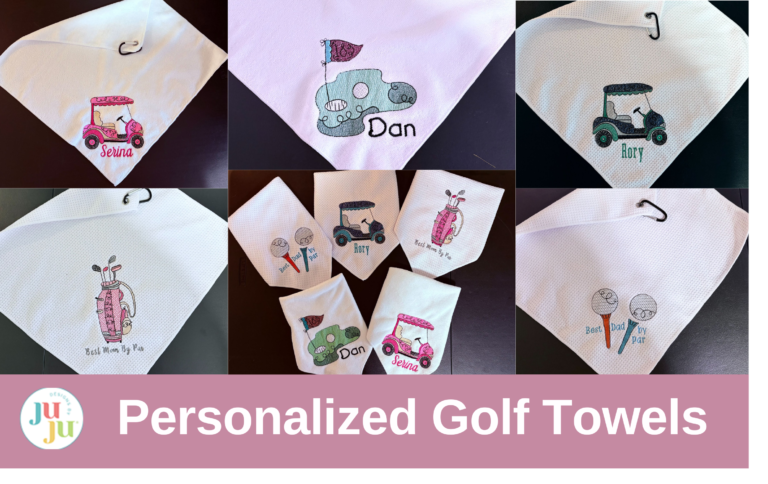
Looking for the perfect personalized gift for Mother’s Day or Father’s Day? These DIY embroidered golf towels are thoughtful, practical, and add a custom touch to your favorite golfer’s gear! Whether you’re stitching up a towel for mom, dad, or another golf-loving loved one, this easy tutorial shows you how to use the Designs by JuJu Golf Set with coordinating embroidery fonts to create a one-of-a-kind towel. Add names, fun sayings, or choose thread colors that match their personality for a truly personalized golf gift they’ll love and use on every trip to the course.
Check out the DBJJ team’s favorite supplies in the Designs by JuJu Amazon Store.

Gather your supplies and let’s get started.
There are four different designs in this set and they are so much fun to work with. I wanted the towels to represent the personalities of the mom or dad receiving them, so I decided to personalize them in multiple ways. First, I chose color schemes that are their favorites, along with a name or a small saying to include Mom or Dad. You can also choose to use the embroidery designs alone. Either way you will end up with a cute towel that they are sure to love and use.
Upload the design of your choice onto your machine. If you decide to personalize with a name or saying, you can do this in software and then transfer to your machine. This one was done with Embrilliance software and uses the golf bag design and Hand Brushed Embroidery Font.

If you do not have software, another option to personalize would be to do it directly onto your machine. To do this, use the Add button, select your font, and add each letter one at a time onto your screen. I used 1” letters for names and ½” letters for the sayings.

After you have added the letters, use the Edit button and Move button to bring up the Move arrows.

Select Edit.

Then select Move.

There are your arrows.

With the Move arrows, arrange your letters. Use the grid on the machine to line them up straight and centered in the design. My machine is a Brother Stellaire; your screen and functions may look different. Check your manual for help if needed.

If you decide not to personalize your towel, the designs by themselves will still look great.
Once you have your design uploaded and ready to stitch out, another way to personalize it is with thread colors. Depending on who I am giving the towel to, I choose thread colors to reflect their personality.
Here are a few examples:


To prepare your hoop, secure two layers of wash-away stabilizer in your embroidery frame.

Take the frame to your machine and use the trial/trace menu directional arrows to find the center of the design. If you are unsure where this function is on your machine, check your manual.


With the needle down, mark the center of the design on the stabilizer. You can also mark the four corners on the stabilizer. This will help in placing the towel. Remove the hoop from the machine and place on a flat surface.

The way your towel hangs will determine where to put the design. My towels hang at a diagonal, so I will put my designs close to the bottom corner. Some towels may hang differently. Be sure to lay your towel flat or hang it up to determine the best placement.

With a ruler the approximate size of the design and a fabric pen, mark the corners and center of where you want the design. You can also use a paper template if you prefer.


I want my design to fit inside my markings. My markings are large for demonstration purposes. Yours can be small.

Spray the stabilizer with an adhesive spray. To line up, stick a pin into the center mark on the towel and the center mark on the stabilizer, and lay the towel in place.

If you marked the corners of the design onto the stabilizer, the towel should cover all the markings.
When you are satisfied with your placement, remove the pin and smooth the towel flat. Pin the towel to the stabilizer, taking care to keep all pins away from the embroidery area.

Add the wash-away film topper. This will keep the threads on top of the towel instead of them sinking into the fabric. Use the arrow keys again to assure your design fits into your marked area. Adjust if needed.

Stitch out the design.
When finished, remove the hoop from the machine and the towel from the hoop. Tear away the film top. Trim away excess stabilizer from the back along with any thread tails. Wash and dry the towel to remove all stabilizer. Press with an iron and pressing cloth if desired.

Your towel is now ready to give as a gift!
Here are other examples of the towels I made using different designs in the set.


As you can see in the pictures below, the designs without added text are just as cute.


These embroidered golf towels will be a big hit for Mother’s Day or Father’s Day, adding a personal touch to your person’s favorite pastime. These designs would also be perfect on a tote bag or shirt front.
Be sure to share your projects in the Designs by JuJu Embroidery Blessings Group | Facebook, or anywhere on social media using the hashtag #designsbyjuju. We love to see what you create!
