Toggle Nav
 Inspire.
Create.
Stitch.
Inspire.
Create.
Stitch.
Search
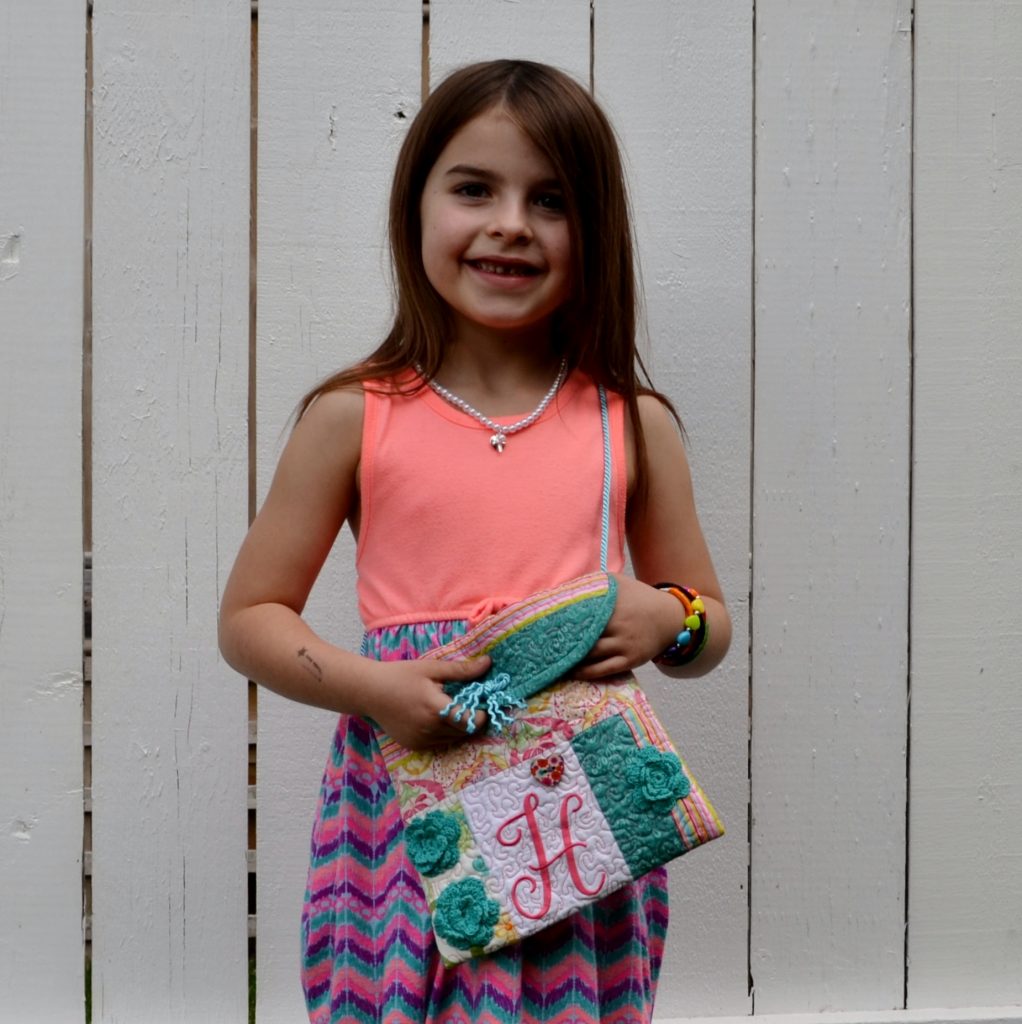 I’m thrilled to be joining you here on Designs by JuJu’s website! I’ve always LOVED JuJu’s delightful designs and have used them extensively in my work. This quilted and embroidered purse is a sweet and simple Summer project….just the right size for your favourite little girl.
For this project, I used the Janda Stylish Monogram design. Quilting fabrics are Carina by Amanda Murphy (except stripe fabric by Riley Blake)
I’m thrilled to be joining you here on Designs by JuJu’s website! I’ve always LOVED JuJu’s delightful designs and have used them extensively in my work. This quilted and embroidered purse is a sweet and simple Summer project….just the right size for your favourite little girl.
For this project, I used the Janda Stylish Monogram design. Quilting fabrics are Carina by Amanda Murphy (except stripe fabric by Riley Blake)
 Shopping List:
Janda Stylish Monogram design DBJJ671 in the letter(s) of your choice
Quilting cottons: (See attached fabric sample chart)
Fabric 1 White 10"x10"
Fabric 2 Stripe .3 yard
Fabric 3 Heart to Heart Pink fat quarter
Fabric 4 Romance White multi scrap 4"x8"
Fabric 5 Entwined Red scrap 3½"x22"
Fabric 6 Entwined Teal fat quarter
Medium weight tearaway stabilizer 10"x10"
Medium weight sew in stabilizer 11"x21"
Quilt batt 11"x21"
Thin teal cording 30"
Embroidery thread, bobbin thread, all-purpose thread
Embroidery needle, quilting needle, sewing needle
Fabric adhesive spray, optional
Free motion quilting foot, optional
Magnetic closure
Thimble, optional
Three Riley Blake crocheted flowers, optional
Wooden button, optional
*I used Brother Embroidery thread pink, 086.
Use a ¼" seam allowance throughout.
Embroidery:
Shopping List:
Janda Stylish Monogram design DBJJ671 in the letter(s) of your choice
Quilting cottons: (See attached fabric sample chart)
Fabric 1 White 10"x10"
Fabric 2 Stripe .3 yard
Fabric 3 Heart to Heart Pink fat quarter
Fabric 4 Romance White multi scrap 4"x8"
Fabric 5 Entwined Red scrap 3½"x22"
Fabric 6 Entwined Teal fat quarter
Medium weight tearaway stabilizer 10"x10"
Medium weight sew in stabilizer 11"x21"
Quilt batt 11"x21"
Thin teal cording 30"
Embroidery thread, bobbin thread, all-purpose thread
Embroidery needle, quilting needle, sewing needle
Fabric adhesive spray, optional
Free motion quilting foot, optional
Magnetic closure
Thimble, optional
Three Riley Blake crocheted flowers, optional
Wooden button, optional
*I used Brother Embroidery thread pink, 086.
Use a ¼" seam allowance throughout.
Embroidery:  Download the 3½" size monogram letter of your choice from the DBJJ671 collection to your embroidery machine. Using your machine’s medium sized hoop, center and hoop the 10"x10" piece of white fabric together with tearaway stabilizer. Stitch out the embroidery design.
Being mindful to center the embroidery design, trim the white fabric to measure 4½" wide x6" long. Remove stabilizer. Press.
Cut:
From Fabric 2 - Fold fabric so stripes run up and down. Cut three strips 2½"x12". Sub cut two pieces 2½"x4½", one piece 2¼"x6" and two squares 2½"x2½". Re-fold fabric to change orientation of stripes. Cut one strip 2½x12".
From Fabric 3 – Cut two strips 2"x22". Sub cut two strips 2"x12". Cut backing piece of 11"x21".
From Fabric 4 – Trim scrap to measure 3"x6".
From Fabric 5 – Cut one strip from scrap of 2½"x20". Sub cut to one piece 2½"x12" and two pieces 2½"x2½"
From Fabric 6 – Cut two strips 2½"x22". Sub cut one strip 2½"x12, two squares 2½"x2½" and one piece 2¼"x6. For binding, cut four strips 2½"x22".
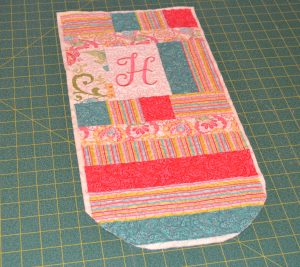
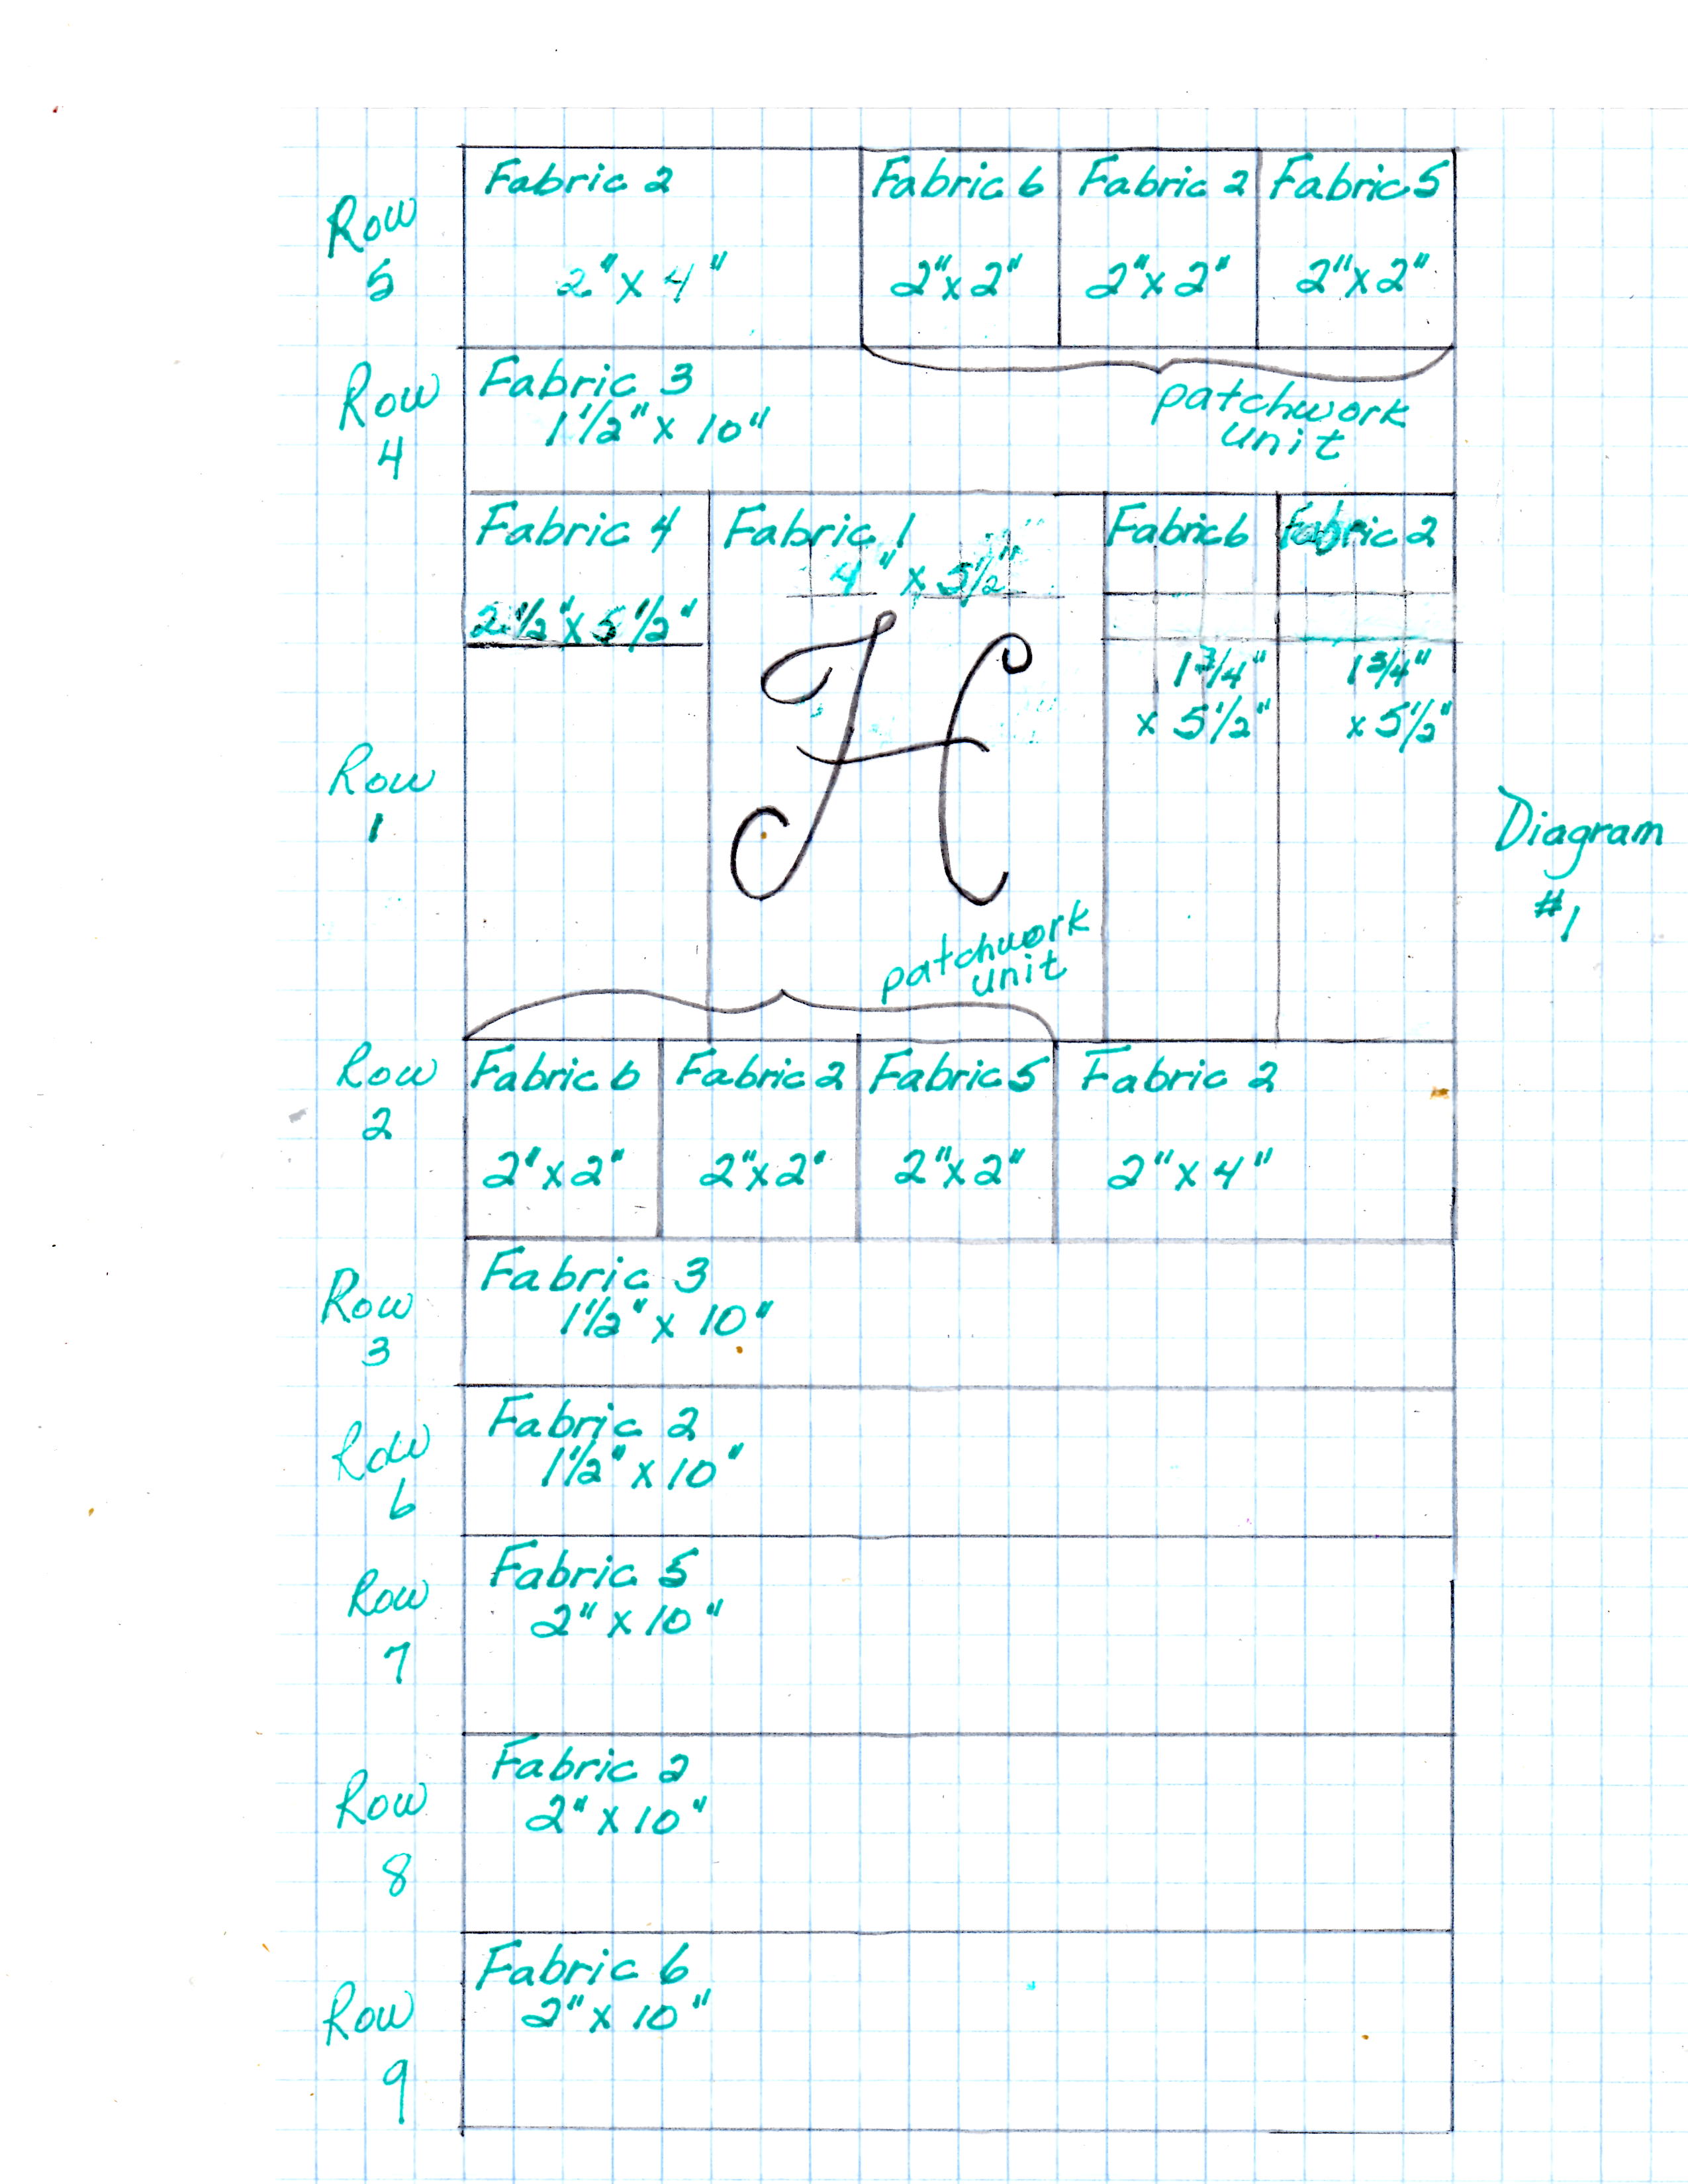
Construction: See Diagram #1 [Download]
Row 1 - Stitch 3"x6" piece of Fabric 4 to left side of monogram block and 2¼"x6" piece of Fabric 6 to the right side. Stitch a 2"x6" Fabric 2 piece to the teal piece. Press away from center.
Download the 3½" size monogram letter of your choice from the DBJJ671 collection to your embroidery machine. Using your machine’s medium sized hoop, center and hoop the 10"x10" piece of white fabric together with tearaway stabilizer. Stitch out the embroidery design.
Being mindful to center the embroidery design, trim the white fabric to measure 4½" wide x6" long. Remove stabilizer. Press.
Cut:
From Fabric 2 - Fold fabric so stripes run up and down. Cut three strips 2½"x12". Sub cut two pieces 2½"x4½", one piece 2¼"x6" and two squares 2½"x2½". Re-fold fabric to change orientation of stripes. Cut one strip 2½x12".
From Fabric 3 – Cut two strips 2"x22". Sub cut two strips 2"x12". Cut backing piece of 11"x21".
From Fabric 4 – Trim scrap to measure 3"x6".
From Fabric 5 – Cut one strip from scrap of 2½"x20". Sub cut to one piece 2½"x12" and two pieces 2½"x2½"
From Fabric 6 – Cut two strips 2½"x22". Sub cut one strip 2½"x12, two squares 2½"x2½" and one piece 2¼"x6. For binding, cut four strips 2½"x22".
Construction: See Diagram #1 [Download]
Row 1 - Stitch 3"x6" piece of Fabric 4 to left side of monogram block and 2¼"x6" piece of Fabric 6 to the right side. Stitch a 2"x6" Fabric 2 piece to the teal piece. Press away from center.  Row 2 - Stitch together two Fabric 6, 2 and 5 patchwork units using the 2½" squares. Set one aside for Row 5.
 Row 3, 4 – Stitch one 2"x12" strip of Fabric 3 to both top and bottom of purse unit.
 Row 5 – Repeat Row 2 except stitch Fabric 2 piece 2½x4½" to Fabric 6. Press
Row 6 – Stitch Fabric 2 piece 2"x12" to bottom of purse unit.
Row 7 – Stitch Fabric 5 piece 2½"x12" to bottom of purse unit.
Row 8 – Stitch Fabric 2 piece 2½"x12" to bottom of purse unit.
Row 9 - Stitch Fabric 6 piece 2½"x12" to bottom of purse unit.
Row 5 – Repeat Row 2 except stitch Fabric 2 piece 2½x4½" to Fabric 6. Press
Row 6 – Stitch Fabric 2 piece 2"x12" to bottom of purse unit.
Row 7 – Stitch Fabric 5 piece 2½"x12" to bottom of purse unit.
Row 8 – Stitch Fabric 2 piece 2½"x12" to bottom of purse unit.
Row 9 - Stitch Fabric 6 piece 2½"x12" to bottom of purse unit.

 Make a quilt sandwich. On a flat surface, lay down right side of backing fabric. (If using fabric adhesive spray, spray between each layer)
Layer quilt batt on top of backing fabric and smooth.
Layer stabilizer on top of quilt batt and smooth.
Make a quilt sandwich. On a flat surface, lay down right side of backing fabric. (If using fabric adhesive spray, spray between each layer)
Layer quilt batt on top of backing fabric and smooth.
Layer stabilizer on top of quilt batt and smooth.
 Layer on purse top and smooth. Pin to secure.
Pin to secure.
Quilt as desired. (The pattern shows a free motion quilting pattern all over).
Trim to ¼" around the perimeter of the purse top. Round both bottom corners of the purse top using template Diagram #2 [Download] and trim.
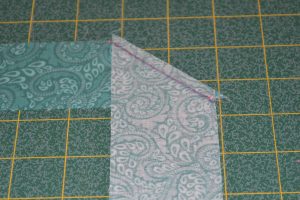
Binding:
Make binding by stitching together four 2½" strips of Fabric 6 together on the diagonal – mark a stitching line as shown. Stitch and trim ¼" from stitching line. Press seam open.
Layer on purse top and smooth. Pin to secure.
Pin to secure.
Quilt as desired. (The pattern shows a free motion quilting pattern all over).
Trim to ¼" around the perimeter of the purse top. Round both bottom corners of the purse top using template Diagram #2 [Download] and trim.
Binding:
Make binding by stitching together four 2½" strips of Fabric 6 together on the diagonal – mark a stitching line as shown. Stitch and trim ¼" from stitching line. Press seam open.

 Fold the binding strip in half, lengthwise, wrong sides together and press. At the beginning of the binding strip, fold back ½" and press.
Pin binding strip to the raw edge of the purse top.
Stitch ¼" from raw edge of purse top. Stop stitching 3/8" from corner of purse top. Fold binding strip up at a 45° angle.
Fold the binding strip in half, lengthwise, wrong sides together and press. At the beginning of the binding strip, fold back ½" and press.
Pin binding strip to the raw edge of the purse top.
Stitch ¼" from raw edge of purse top. Stop stitching 3/8" from corner of purse top. Fold binding strip up at a 45° angle.
 Lay the binding strip back down on the adjacent side of the purse top and begin stitching binding to raw edge.
 Finish off binding by tucking in the raw edge of the binding strip to the beginning point and stitch to secure.
Fold binding over and pin to the back of the purse top. Stitch in place by hand.
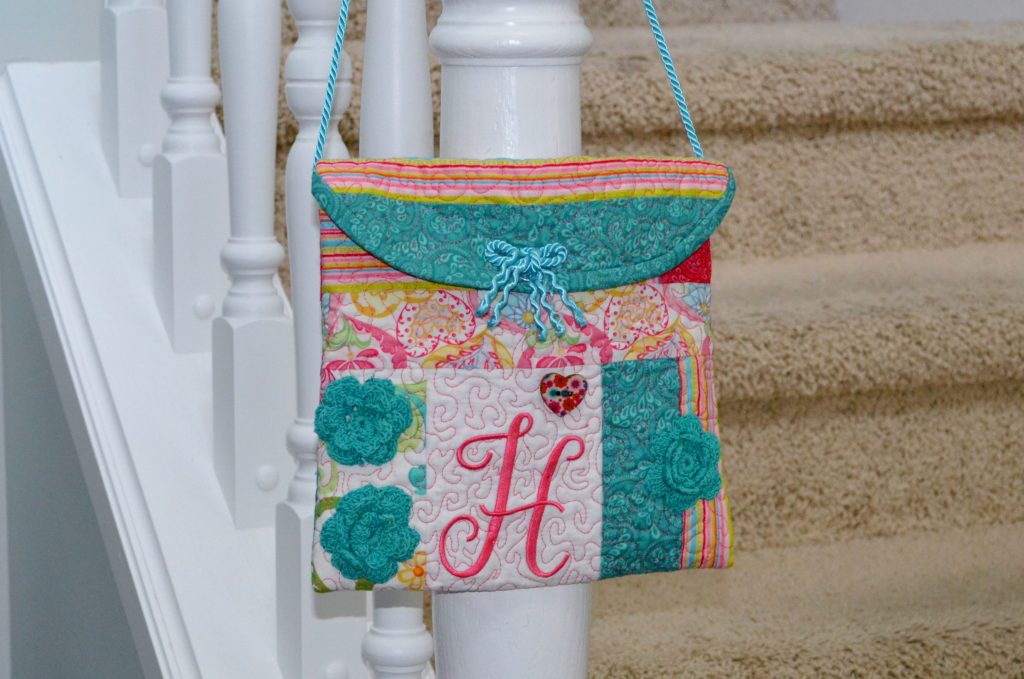
Hand stitch button, crocheted flowers (if using) in place. Wrong sides together, fold purse ½" from the bottom of the embroidered monogram to measure for magnetic closure placement. Center and affix the magnetic closure so the purse flap closes flat.
Finish off binding by tucking in the raw edge of the binding strip to the beginning point and stitch to secure.
Fold binding over and pin to the back of the purse top. Stitch in place by hand.
Hand stitch button, crocheted flowers (if using) in place. Wrong sides together, fold purse ½" from the bottom of the embroidered monogram to measure for magnetic closure placement. Center and affix the magnetic closure so the purse flap closes flat.
 Keeping the fold in place reverse purse with right sides together. Place teal cording into the seam on both sides of the purse. (The cording length on the finished purse measures 22". You may wish to shorten or lengthen) Stitch. Trim cording close to binding. Turn purse right side out. If you choose, you can embellish and cover the magnetic closure. I’ve tied a small piece of teal cord into a bow, frayed the edges and sewn in place.

 You are all done! Congratulations……
Kim Hanson
www.KimHansonQuilts.com
km.hanson@shaw.ca
You are all done! Congratulations……
Kim Hanson
www.KimHansonQuilts.com
km.hanson@shaw.ca