Toggle Nav
 Inspire.
Create.
Stitch.
Inspire.
Create.
Stitch.
Search
Looking for a creative and practical way to use your embroidery machine? Fabric baskets made with Designs by JuJu Quilting Backdrops are a fun and functional project that can be customized for any space or occasion!
Whether you're working with a large hoop or a smaller one, this tutorial will show you how to stitch, assemble, and personalize fabric baskets of any size. From choosing your favorite Quilting Backdrop designs to adding appliqué and embroidery, the possibilities are endless. Get ready to transform fabric into beautifully structured baskets perfect for storage, gifts, and décor. Let’s start stitching!

Making fabric baskets with Designs by JuJu’s Quilting Backdrops is so fun and easy! I have made fabric baskets before, but I am so thrilled with the structure and the way these baskets turned out. Even if you have just a small hoop, don’t let that discourage you. I will show you how to make any size basket with whatever hoop you have.
First, let’s talk about the makeup of a basket. There are a few ways that you can put a basket together, but I find it easiest to think of them with two pieces, the front and the back. The front will also include half of the left side, half of the right side, and half of the bottom. The back will be identical. Once you have these pieces you will sew the front to the back, box the corners, and add the lining. Let me show you just how easy it is.

Check out the DBJJ team’s favorite supplies in the Designs by JuJu's Amazon store.
DBJJ designs used in this project:
To get started, I went to Embrilliance and set up my design. My machine’s biggest hoop is a 6” x 10” and I wanted to make the biggest basket I could with this hoop. This would mean my basket could be a six-inch basket. I would also like the basket to fold over a couple inches on the top to have a nice cuff, so I decided to use the full 6” x 10” inches (Quilting Backdrops Plaid 1, 6-inch width block, DBJJQBPlaid1-QAYG-6x10).

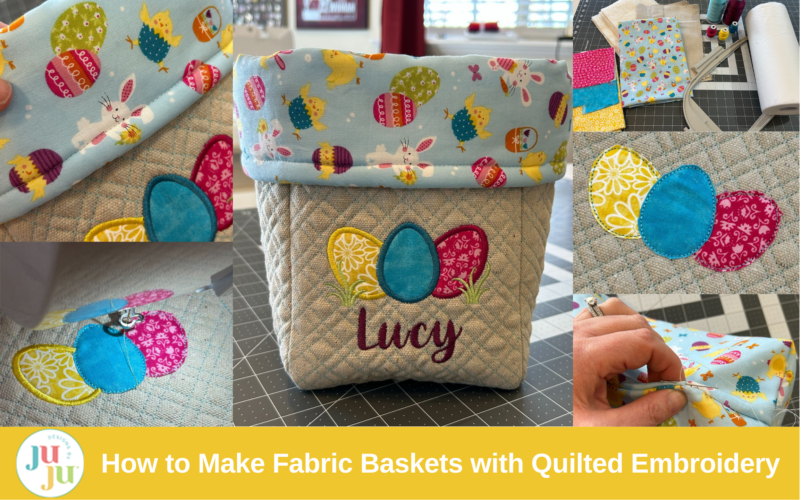
We can add an embroidery design (Egg Trio in Grass Applique shown added below) to the front of the 6” x 6” area in the bottom of the pattern. This will be the main body part of the basket. The four inches above will be a two-inch cuff that shows the fabric lining. Center the design within the 6” x 6” area. Adding a design is optional.

You can add as many designs as you’d like. If you want to personalize the basket you can do that now too ("Lucy" added below using What a Time Embroidery Font).

After we have the front of the basket designed. I like to lay out the rest of the basket so I can see how it will come together.

If we are going to make a 6” basket, each side will need to be half that length. (Remember, the quilt-as-you-go (QAYG) blocks are the finished sizes.) So I added two 3” x 10” strips to the sides (DBJJQBPlaid1-QAYG-3x10).

When it came time to add the bottom, there wasn’t a 3” x 6” QAYG block design, so I used a 3” x 10” design (you could use any block that's 3" wide and greater than 6" long) and cut the completed block down to match the front/back in a later step.
So now we have the front of the basket. The back will be identical but without the embroidery that was added to the front. So this basket will need 2 front panels, 4 side panels, and 2 bottom panels.
Here is a link to a downloadable, printable sheet that can help you figure out measurements for your basket.
If you’re new to DBJJ Quilting Backdrops, check out this post to see how to use them.
I like to start with the front panel. We begin by hooping the stabilizer.

Next, stitch the placement stitch for the batting.

Cover the placement stitch with the batting and stitch the tack-down stitch. Trim the batting close to the stitches. Cover the batting with the main fabric for the basket. Make sure you cover each edge by at least ½”.

Continue with tack-down stitch.

Continue with the design stitches for the pattern you have chosen.

After the design is finished, you can stitch the design on the front of the basket. If you’re new to applique, check out this post on how to do it.
Now stitch the placement stitches for the applique.

Then we cover the stitches with the fabric scrap.

Stitch the tack-down stitches for the applique.

Then trim close to the stitches, making sure not to cut the stitches.

Repeat through the rest of the applique fabrics.

Continue through the satin stitches and other stitches to finish your design.

Now the front panel is done and we can set it aside. Repeat the steps for the back. I didn’t put a design on my back so I stopped after the quilting stitch.
We now need to make the side and bottom panels. For this six-inch basket we will need four 3-inch panels. They need to be as tall as the basket front/back panels so I will make them 3” x 10” for my basket. We will need two 3” x 6” panels for the bottom, but as that’s not a size that we have in our patterns, I made two more 3” x 10” ones and trimmed them down. So to cover the two sides and the bottom we will need a total of six 3” x 10” panels.
We will do it in the same order that we did the front. Stitch the placement stitch, cover with the batting, and stitch the tack-down stitch.

Trim the batting close to the stitches.

Cover and stitch the fabric and design. Make sure you’re overlaying the edges of stitching by at least ½".

After we have the front, back, sides, and bottoms stitched out, it’s time to trim. From the backside we will cut the no-show mesh close to the outer edge of stitching.

After we have the no-show mesh trimmed, we will turn the pieces right side up and trim ½” from the edge of the stitching.

We now have the basket almost ready to go! We have the front/back, sides, and bottoms. Let’s trim the bottoms to fit.

I take the bottom and lay it next to the front, one edge lining up. I then cut off the excess of the bottom. The width of the design is 6” plus ½” on each side. So the bottom will be 7” when we are done.

I also will draw a line ½” from the cut edge so that I have that line to visualize when I sew things.

Now we will attach the panels. I started with the bottom, stitching it to the front panel. We line them up and stitch between the batting placement line and the edge of the design stitch.

After stitching, press the seams open. I like to use a pressing cloth so I won’t melt the no-show mesh.

Once the bottom is attached, we will add the sides. To make the sewing of the bottom a bit easier, we will undo the stitches from the edges to the outer edge seam line. This helps the box corners at the bottom lie flat. If you're good with your sewing machine you could also start and stop at these areas.

As we add the sides we will start and stop at the same point in the corner (highlighted in yellow). We will stitch completely to the top edge.

Here’s a view from the other side where I stopped sewing at the seam.

Repeat for the back panel. Don’t worry about making the bottom corners look pretty when you press them.

We will now use the front of the basket as a template to cut the lining and fusible fleece. Fold your lining fabric in half so you have two layers. Place the front of the basket on the lining fabric and cut around the edges.

I use a square ruler to make sure the corners are cut correctly and rather than following the folded edges.

After we have the linings cut, I use them to cut out the fusible fleece.

Now we will iron the fusible fleece to the wrong side of the lining fabric.

Now we have the two outsides and the two linings for our basket.

We will assemble the outside of the basket first. Place the front and back with right sides together and sew the side edges and the bottom.

Now we will create the corners of the basket. I start by standing the basket upside down so I can see the open sides and bottom.

Grab the corners where the stitching all comes together and pull them so that the edges come together in a line. I like to clip (or pin) the edges well and nest the seams so that they point opposite directions in the middle of the side and bottom of the basket.

Start stitching at the stitching and end at the stitching.

It may feel a little bulky at the corners so I make sure to pull the sides and fronts well out of the way so I’m only stitching the seam.

Repeat for the other side.

Hooray! You have boxed your corners!

Now turn the basket right side out. I like to press the seams on the basket to help it hold its shape.

The outside is complete. Now let's stitch the lining.

The lining is done the same way with one small adjustment. When we stitch the edges, we will leave an opening on one side to help turn the basket. You will need to turn the basket through this hole. Depending on the size of your basket, the hole size can vary, but I usually try to keep it around four inches.

I like to backstitch at the end and beginning of the gap for extra strength.

Sew the corners the same way we did for the front. Line up the raw edges, nesting the seams.

Stitch the corners using a ½” seam allowance.

Now we can attach the lining to the basket. Leave the lining inside out and the basket with the design on the outside.

Place the outside of the basket inside of the lining fabric. So now the right sides are together.

Pin or clip the raw edges together. Line up the seams to match. If the seams are pressed open, keep them open, if they are pressed to a side, nest them as best you can.

Now we will sew in between the stitching line and placement line on the front fabric. Sew completely around the basket top.

Now we will find the opening in the side of the lining.

Pull the front of the basket through the hole.

Turn the lining so the right side is out.

Hand stitch the hole closed.

Push the lining to the inside of the basket. Line up the seams and pin or clip the top of the basket. I like to leave a small edge of the lining peeking above the basket.

Sew around the top of the basket. I like to use about ½” seam allowance.

This gives us a nicely finished edge.

Now turn down the cuff of the basket two inches.

Now we can enjoy our completed project!

I mentioned that I only have a 6” x 10” hoop. But we don’t have to be limited with our hoop size. I decided to make a ten-inch basket without a cuff to put in my square shelf to hold my embroidery supplies.
I designed in Embrilliance what I wanted my basket to look like. I decided five 2” x 10” sashing strips (DBJJQBOrangePeel1-QAYG-2x10) for the front in alternating gray and pink colors would look nice.

For a ten-inch box I need five-inch sides. So I add in ten 2” x 5” sashing strips (DBJJQBOrangePeel1-QAYG-2x5).

For the bottom we need a 5” x 10” piece. I am adding a 6” x 10” piece (DBJJQBOrangePeel1-QAYG-6x10) and will trim it down before assembly.

So now we put it together like we did the previous one. Here is my front panel.

And the finished basket.

It fit perfectly in my shelf with the 12” x 12” openings.

You don’t have to be limited by the size of your hoop. Say you only have a 4” x 4” hoop. Here’s how you can easily make a 12” x 12” basket.
You would need a 3 x 3 grid of four-inch squares for the front and back. For the sides you would need a panel of three 4” x 4” blocks (DBJJQBCrossHatch-QAYG-4x4) and three 2” x 4” blocks (DBJJQBCrossHatch-QAYG-2x4-vertical/horiz). This will give you the six inches you need to do half of the side. The same would be needed for the bottom.

If you used alternating red and green squares it would be a nice Christmas basket. You can even add a design to the center of the basket with the 4” x 4” hoop (Santa Peeking Applique shown below).

If you have a larger hoop but still like the patchwork look, you can do a bigger design on the panel. An applique design would look nice as it will cover the seams (Nutcracker from Christmas Celebration Applique shown below).

I hope this helps you see all the possibilities available for making these baskets with Quilting Backdrops! You really are only limited by your own imagination.
If you loved this project, you’ll find plenty more just like it in our Home Hub—a curated collection of quick, creative, and practical projects perfect for gifting (or keeping!)
We'd love to see the projects you make. Please share them with us in the Designs by JuJu Embroidery Blessings Facebook Group or anywhere on social media using the hashtag #designsbyjuju. We can’t wait to see what you create!
