Toggle Nav
 Inspire.
Create.
Stitch.
Inspire.
Create.
Stitch.
Search

Looking to add dimension and texture to your embroidery projects? Fringe embroidery is a fun and easy technique that creates a gorgeous, 3D effect—perfect for floral designs, decorative accents, and more!
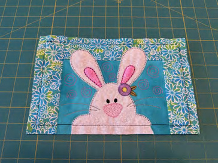
In this tutorial, we’ll walk you through the process of creating a beautiful fringe flower embroidery design from start to finish, using the In The Hoop Cottontail Lane Wall Hanging Project as an example. You’ll learn how to stitch, trim, and fluff your way to a textured masterpiece, plus get expert tips to ensure perfect results. Grab your embroidery machine, thread, and scissors—it’s time to get stitching!
This tutorial is focused on the fringe technique that's featured in DBJJ's In The Hoop Cottontail Lane Wall Hanging Project but would be applicable to any DBJJ project that uses the technique.
First, stitch the entirety of the design/block before starting the fringe process. Once the design is complete, you may prefer to fringe the design while it is still hooped so that the design lays flat and the fabric is held taut throughout the process.
Tip: When making white fringe flowers, you may prefer to use a dark colored bobbin thread for the fringe step only so that it is easier to determine which threads to cut.
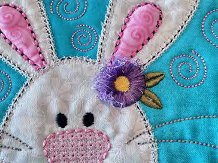
Step 1. This particular flower has three colorstops.
In our sample:
We used white bobbin thread for all three steps.

Step 2. Flip the hoop over so you are looking at the back side. To create the fringe look, we will cut the white bobbin thread of the pink step only.

Step 3. Using a pair of small, sharp scissors, carefully cut the bobbin thread, making sure not to cut any of the pink or yellow threads.
Take your time!

Step 4. Be extra careful when cutting the bobbin threads in this section where the leaves are stitched underneath the flower – you don’t want to accidentally snip the bobbin thread or green thread of the leaves.

Step 5. This is what it will look like when you are done.
Flip the hoop back over.
From the front, use your fingernail or a small pointed object to loosen the pink stitches.


Step 6. If some of the loops won’t loosen . . . turn the hoop back over and snip the remaining bobbin threads you missed.


Now your fringe flower is complete!

If you make this project, please share it with us in the Designs by JuJu Embroidery Blessings Facebook group, or anywhere on social media using the hashtag #designsbyjuju. We can't wait to see what you create!