Toggle Nav
 Inspire.
Create.
Stitch.
Inspire.
Create.
Stitch.
Search
Don’t let hoop size hold you back—my first 4x4 machine helped me create so many fun embroidery projects!
When I purchased my first embroidery machine years ago, I started out with a 4x4 hoop. I soon outgrew that machine, but my love for embroidery blossomed from all of the amazing projects and designs I was able to stitch on that starter embroidery machine. Whether you are new to embroidery or feel limited by your hoop, this blog post is for you! Today I am going to show you just how many projects you can create using a 4x4 hoop (including In The Hoop projects).
One of my favorite things about purchasing from Designs by JuJu is that every purchase you make includes multiple size options. This is a great feature because even though you may be limited to a 4x4 hoop now, if you ever decide to upgrade to a machine with a bigger hoop size, you don't have to repurchase the design.
Directly under the design you select, it will tell you every size that is included with your purchase. If you aren't sure if a design will fit your hoop capabilities, make sure to check the Product Details before you purchase.

Nearly every Embroidery Design (applique, redwork, filled stitch, sketch, bean stitch, free-standing lace, and even greeting cards) from Designs by JuJu is sized to fit a 4x4 hoop. These designs can be used on apparel, bags, baby blankets, quilting projects—basically anything you can imagine can be customized using one of these images. Make sure to check out the Designs by JuJu blog for lots of tutorials on a variety of projects. While some tutorials may show larger hoops, remember that the steps remain the same; the 4x4 hoop is just smaller. Don't underestimate the capabilities of this small but mighty hoop!
Check out these blog posts for tutorials specifically using a 4x4 hoop:
Did you know on the Designs by JuJu website you can filter In The Hoop (ITH) projects by hoop size? This is such a great feature because you can easily see just how many fantastic projects can be made with a click of a button.

You may be surprised to see that there are hundreds of ITH options available for a 4x4 hoop, including:
Check out the DBJJ team’s favorite supplies in the Designs by JuJu Amazon store.

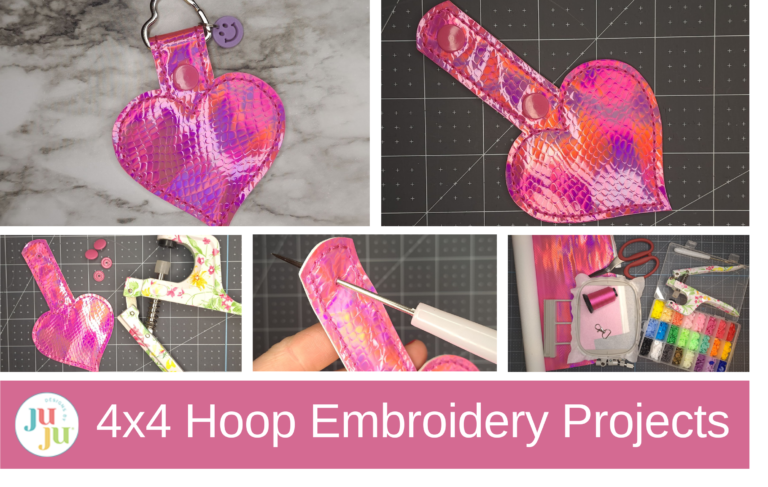
For this tutorial, I am going to be showing you how to make your own key fob keychain using the heart from the Blank Shapes Key Fobs ITH 4. These key fobs are very beginner friendly and stitch out so quickly. We have them on all of our keys and often customize them to give as gifts.
Step 1: Hoop tear-away stabilizer.

Step 2: Stitch the placement line for your key fob.

Step 3: Place the embroidery vinyl/faux leather over the entire placement line, making sure that you have at least 1/2" excess around all edges.

Step 4: Stitch the tack-down line for the front of the key fob.

Step 5: Remove the hoop from your machine and flip to the backside. Secure the second piece of embroidery vinyl over the placement line and secure it with paper medical tape or washi tape.


Step 6: Place the hoop back on your machine and run the final tack-down line to secure the embroidery vinyl to the back of the key fob.

Step 7: Remove the hoop from your machine and unhoop the key fob.

Step 8: Tear away all excess stabilizer.

Step 9: Using a pair of sharp, fine-tipped scissors, carefully trim all the way around the stitch line for the key fob. You can decide how much of a border you would like around the stitching. (I usually leave ⅛” to ¼” excess.)

Pro Tip: Using a pair of sharp, fine-tipped scissors will allow you to get into any hard-to-reach areas as you trim the embroidery vinyl. I have a pair of scissors that I use only for embroidery vinyl to ensure they stay sharp.

Step 10: Poke a hole in each of the eyelets using an awl.

Step 11: Using a press, set the plastic snaps you have chosen for your key fob. Make sure to follow the directions included with your snaps/press to ensure you set them properly.


Step 12: Select a keychain or D-ring to hang your key fob.

Optional: Accessorize with tassels or fun charms!

I hope you have enjoyed today's blog post on how to get the most out of your 4x4 embroidery hoop! Don’t let this small hoop size limit you from exploring the full capabilities of embroidery. A 4x4 machine makes a great starter machine that allows you to experiment with a variety of stitching styles and projects. Once you have mastered embroidery basics (and have become addicted like the rest of us here), then you can upgrade to a larger hoop, and the embroidery flood gates really open!
Make sure to join the Designs by JuJu Embroidery Blessings Facebook Group for more inspiration and to share your own creations using the hashtag #designsbyjuju. We can’t wait to see what you make! Happy stitching!