Toggle Nav
 Inspire.
Create.
Stitch.
Inspire.
Create.
Stitch.
Search
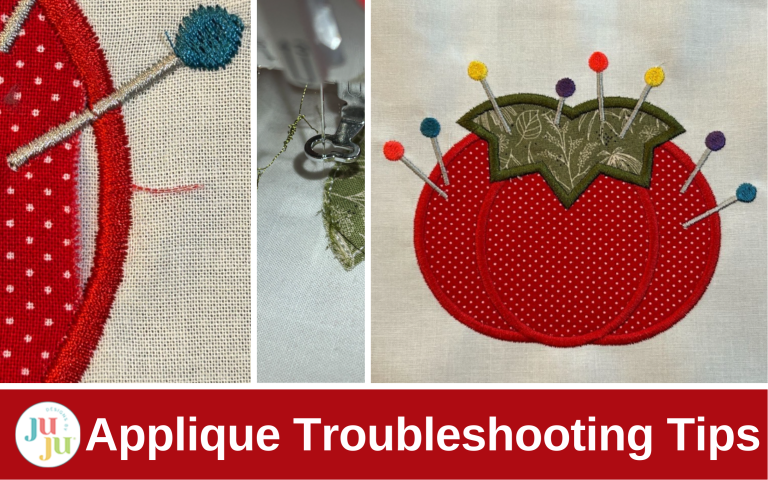
Troubleshoot with ease, fix common applique mistakes, build confidence, and stitch your next masterpiece.
This is Part 7 of our 8-part series, Applique Made Easy. In this installment, we’re tackling one of the most important skills every stitcher needs: troubleshooting. From puckering fabric and fraying edges to skipped stitches and misaligned placement, applique comes with its fair share of “oops” moments. But with a little know-how, you can fix these problems quickly and prevent them from happening again.
Think of this post as your embroidery safety net. You’ll learn practical tips to solve common applique mistakes, time-saving tricks to avoid frustration, and ways to reframe slip-ups as stepping stones toward mastery. Whether you’re a beginner who just hit your first snag or a seasoned stitcher looking to polish your technique, these troubleshooting strategies will help you stitch with confidence. Here’s what you can expect from the full series:
August 7, 2025 - Applique Made Easy - What Is Applique Embroidery? A Beginner’s Guide to This Fun and Easy Machine Embroidery Technique
August 14, 2025 - Applique Made Easy - How to Choose the Best Fabrics and Threads for Applique Machine Embroidery Projects
August 21, 2025 - Applique Made Easy - Your First Applique Project: A Step-by-Step Guide for Embroidery Beginners
August 28, 2025 - Applique Made Easy - Using Mylar and Vinyl in Applique Embroidery: Add Sparkle and Shine to Your Designs
September 4, 2025 - Applique Made Easy - How to Personalize Premade Items with Applique: Easy Embroidery Gifts and Custom Touches
September 11, 2025 - Applique Made Easy - Creative Applique Ideas: Adding Personality to Your Embroidery
September 18, 2025 - Applique Made Easy - Troubleshooting Applique Embroidery: How to Fix Common Problems and Avoid Mistakes (You are here)
September 25, 2025 - Applique Made Easy - Complete Guide to Mastering Machine Applique from Start to Finish
We’ve all been there: a design looks perfect on screen, but the stitched result doesn’t quite match the vision. Maybe the fabric puckered, the thread snapped halfway through, or the applique pieces didn’t line up the way you hoped. These challenges are a normal part of the stitching journey.
In this post, we’ll break down the most common applique issues and show you how to spot their causes. You’ll also pick up simple habits and tools that make a big difference in preventing problems before they start. With a few adjustments, you can turn frustration into confidence — and keep your projects moving forward. Let’s stitch through the snags together!

Check out the DBJJ team’s favorite supplies in the Designs by JuJu Amazon store.
Let’s look at some common applique mistakes and how to fix them.

Puckering happens when your fabric or stitches don’t have the support they need. One of the most common reasons is confusion about the difference between stabilizing the fabric and stabilizing the stitches. These are two separate steps that work together for a smooth, professional finish.
Stabilizing the fabric happens before hooping. This step keeps your fabric from stretching and distorting during stitching. A woven fusible interfacing like Pellon® SF101 (Shape-Flex®) is perfect for this job. Simply fuse it to the back of your fabric before hooping. It will add body without stiffness and works beautifully on knits, quilting cotton, and other lightweight fabrics. You can use SF101 in two places: Use it on the background fabric to give your main project fabric more body and prevent distortion. You can also use it on the applique fabric pieces to make trimming easier and reduce rippling under the satin stitch. This kind of stabilizing is optional depending on your fabrics.

Stabilizing the stitches happens in the hoop and is often what we think of when we talk about stabilizers. This supports the actual embroidery as the machine is stitching. These are the tear-away, cut-away, no-show mesh, or wash-away stabilizers that we use, depending on your fabric type and the density of your design. Every project needs this kind of stabilizer, even if you have used SF101. Our Embroidery Stabilizer Guide is helpful to determine which stabilizer to use for your project.

In many cases, you will want to use both types of stabilizing at the same time. Use the SF101 fused to your background fabric and/or applique pieces to keep them crisp, plus the correct stabilizer hooped underneath to keep your stitches smooth and pucker free. We have a blog article devoted to preventing puckering in machine embroidery that has more information.

One of the most frustrating things while embroidering is having to stop mid-project to rethread your machine . . . again! Thread breakage or skipped stitches often point to a handful of possible culprits. It could be the wrong needle type, incorrect tension setting, low-quality thread, or even just a dusty machine.
Try to ensure you’re using a high-quality embroidery thread. We have an article on Choosing the Right Thread for Your Embroidery Project that will help you confirm what you’re using is appropriate for your project. Match your needle to your thread and your project. Check out our article on Getting Started with Embroidery Needles to help you on your way. A 75/11 embroidery needle is a good starting point for most projects, but be certain it’s an embroidery needle and not a sewing one. And when was the last time you changed your needle? I forget to do that sometimes and am always amazed at how much better it is when I put a fresh one in my machine.
Make sure you are checking your bobbin tension and cleaning and oiling your machine regularly. Lint and dust can affect how smoothly your thread runs. Our Guide to Diagnose and Fix Common Embroidery Mistakes may help you figure out what is going on when your stitches aren’t working quite right.

When the edges of your applique fabric peek out from under your satin stitch or start to fray after washing, it’s often because the fabric was trimmed too far from the tack-down stitch. You want to trim close, just outside the tack-down line (but without snipping into it), so the cover stitch fully covers the raw edge.
I like to check my edges when the first steps of the cover stitch start. They are usually a wide zigzag stitch. I will stop my machine and look to make sure the edges are all caught in the stitches before I move on to the last part of the cover stitch or satin stitch.
For extra insurance, especially on fabrics prone to fraying, try using a fusible web like Heat-n-Bond Lite on the back of your applique fabric before stitching. (If you have used SF101 on the back of your applique fabric, you can still use the Heat-n-Bond Lite after the SF101.) The Heat-n-Bond Lite seals the edges and helps keep the fabric flat and in place.
Sometimes when we are trimming we will accidentally clip one of the tack-down stitches. It happens even if we are being careful. If it’s only one or two stitches and you are going to continue with the cover stitch for the edges, it should get caught in those stitches.

But if you are doing a raw edge applique or an applique with a bean stitch finish, you have two options. If you’re still in the hoop, you can use your machine to restitch over the area where you clipped the stitch. If that’s not possible, you can use some Fray Check to stop the clipped stitch from unraveling further. Use it on both the front and back.

The type of scissors you use can help with keeping your trimming neater and safer, especially in tight spots. I love my duckbill, precision point, and curved tip styles. I use them all in every project.


A design that ends up off center or with pieces not fully covering the placement lines can often be traced back to hurrying through the placement step. Taking a little extra time with this step often pays off in the finished result. Take time to press your applique fabric (you can even starch it for a crisp look) and smooth it carefully into place. Double-check that it fully covers the placement lines. A temporary spray adhesive can help hold it steady while the tack-down stitch runs.
Remember, slowing down at this stage is much faster than having to pick stitches out or start your project over. Slowing your machine down during the tack-down stitching can help things stay smooth to get cleaner corners and curves.
I decided to do a little experiment. I stitched two of the tomato pincushions from the Sewing Room Applique 2 set. On the first I did it fast, and on the second one I took all the advice I’ve given here so we can see if there is a difference.
I used the left piece of white fabric as is. On the right piece, I fused SF101 to help stabilize the fabric.

I grabbed a red and green fabric out of my scrap box. For the first example I used it as it came out of the bin.

For the second, I pressed it and fused some Heat-n-Bond Lite to the back.

Using the same tear-away stabilizer on both, I stitched them out. I didn’t remove my hoop from the machine when I placed the applique fabrics on the first piece. I quickly trimmed the fabrics when it was time to do that. I even broke a needle because I wasn’t paying attention to how I threaded my machine and the tension on the thread snapped it. Oops!
I removed it from the hoop and removed the stabilizer from the back, but I didn’t press it at all. You can see that there are some wrinkles in the applique fabrics and a bit of puckering in the background fabric. The right side of the pincushion has a small gap, because I didn’t remove the hoop from the machine, I couldn’t quite see if the fabric was covering all the white placement stitches.

Compare that to the second one, where I used the SF101 and the Heat-n-Bond Lite on the applique pieces. For this example, I removed the hoop from my machine to make sure I was covering all the placement stitches, and the fabric with the Heat n Bond Lite was smooth and flat all through the stitching. I trimmed the pieces carefully and then let all the finishing stitches stitch out. I again removed it from the hoop and removed the stabilizer from the back, but didn’t press it at all.

And here’s a side by side of them. The top one was the quick one and the bottom the one that I put a little more time into. And when I say a little more time, I think it added three minutes to my project. That three minutes made a world of difference on my finished project!

Here’s the truth. We often learn more from a wonky stitchout than a perfect one. If you’ve had to backtrack, pick stitches, or even restart from the beginning, it’s not wasted time. It’s practice that builds your skill set. Every time you press start on your machine, you’re improving. Give yourself grace, celebrate progress, and remember the best stitchers aren’t the ones who never make mistakes. They are the ones who keep stitching anyway.
I hope you’ve enjoyed this applique series and you have learned a thing or two. Now that you’ve worked through mistakes, you deserve to reward yourself with something fun. Sometimes the best confidence boost is jumping into a new project that excites you.
Applique is such a fun way to express your design style in your projects. Maybe it’s time for you to try some intricate florals to practice precision trimming and fussy cutting placement. You can experiment with layered appliques for a dimensional look. Or you can make something practical and giftable with in-the-hoop projects like bookmarks, mug rugs, or zipper pouches. And don’t forget to have some fun with character sets for the kids and grandkids, or just plain whimsy for yourself.
Maybe you need some seasonal stitching inspiration. Designs by JuJu has rainbows and florals for spring, and patriotic, beach themes, and barbecue decor for summer. For fall, check out the pumpkins and leaves, and winter is filled with snowmen and snowflakes. And don’t forget all the holidays! Halloween, Thanksgiving, Christmas joy, Easter, birthdays and Mother’s and Father’s Day designs abound! Check out our bestsellers and new arrivals here!
We want to see what you’ve learned and accomplished through this applique series! Please share your projects in the Designs by JuJu Embroidery Blessings Facebook Group, or anywhere on social media using the hashtag #designsbyjuju. We love to see what you create!
Join us next week as we wrap up the Applique Made Easy series with Part 8: "Complete Guide to Mastering Machine Applique from Start to Finish", available on September 25, 2025. It’s the ultimate step-by-step reference you can return to anytime you need a refresher or a boost of inspiration. Don’t miss it!
