Toggle Nav
 Inspire.
Create.
Stitch.
Inspire.
Create.
Stitch.
Search
Love bling? Add Mylar and HTV for instant sparkle in your applique—shiny finishes made simple.
This is Part 4 of our 8-part series, Applique Made Easy. In this installment, we’re diving into Mylar and heat transfer vinyl (HTV)—two specialty materials that add instant sparkle and shine to your embroidery. If you love a little bling, this guide is for you.
You’ll learn what Mylar and HTV are, which designs they’re best suited for (think sketch and select applique styles), how to place, stitch, trim, and press them, plus simple care tips so your shimmer lasts. Whether you’re brand new to applique or looking to elevate your projects with eye-catching finishes, this step-by-step guide will help you stitch with confidence.
Here’s what you can expect from the full series:
Check out the DBJJ team’s favorite supplies in the Designs by JuJu Amazon Store.
Mylar is a shiny, reflective plastic film. Mylar is used in many other items, such as birthday balloons. When purchasing Mylar for embroidery, make sure to choose a thinner film. You can purchase Mylar from many sewing machine shops or online at a variety of retailers. There is a wide range of colors and patterns available today.
Heat transfer vinyl is a specialty vinyl that adheres to fabric with the use of a heat press or iron. HTV also comes in an array of patterns and textures including glitter, shimmer, velvet, and many more. It is commonly used with cutting machines to create designs on clothing and bags but has recently gained popularity in the embroidery world because of the unique effect it can add to many designs. HTV can be purchased at most craft store retailers and online.
Mylar works best with sketch designs because the thinner density allows the Mylar to peek through, creating a shiny, sparkly appearance. Designs that are too dense will puncture the Mylar, causing it to tear loose and not remain attached, especially over time and with wear. Mylar can also be added to Free Standing Lace projects for a unique, stained-glass effect.
Heat transfer vinyl, on the other hand, can be used with a variety of designs including applique and sketch. HTV can also be ironed to traditional cotton fabric before stitching to create a whole new fabric and texture. HTV washes and wears well, making it great for clothing projects.
Check out this video for a step-by-step tutorial.
Step 1: Select a design that is low in stitch density. Sketch designs are perfect for Mylar. I am using the Arwin Sketch Alphabet.
Step 2: Hoop a stabilizer that is appropriate for the project you are creating. I will be stitching on cotton fabric for my example, so I will be using a cut-away stabilizer. I have hooped my stabilizer and fabric together.

Step 3: Cut your Mylar sheet to fit the design. Depending on the design you have chosen, you may need to stitch some design elements first, before you are ready to place your Mylar.

Step 4: Place your Mylar and carefully stitch your tack-down/design. I like to set my machine on the lowest speed. You can use some washi or medical tape to hold the mylar in place, or use That Purple Thang Sewing Tool to keep your fingers out of the stitch path and safe. (I LOVE That Purple Thang Sewing Tool. It is a sewing must-have!)

Step 5: Before embroidering the remaining design stitches, carefully remove the Mylar around the edges of the design. The Mylar should remove easily. As the design stitches the outline, it will perforate the Mylar. If there are any small pieces remaining, use tweezers or fine-point scissors to remove the excess.

Step 6: Complete the remaining stitches. Repeat the above steps if you want Mylar under any of the other stitch elements.

Note: Use caution when using high heat such as an iron or laundering in the dryer. Mylar can melt under extreme heat. Make sure to read and follow all package directions.
Check out this video for a step-by-step tutorial and more tips and tricks.
As stated previously, HTV could be used on its own as a base in a design or as the “fabric” in an applique design. In the tutorial below, I will show you how to use HTV as a base (similar to Mylar).
Step 1: Select a design that will adequately secure the HTV with a placement line. I am using Simply Plaid Alphabet.
Step 2: Hoop a stabilizer that is appropriate for the project you are creating. Again, I am stitching on cotton fabric for my example, so I will be using a cut-away stabilizer. I have hooped my stabilizer and fabric together.

Step 3: Cut your HTV sheet to fit the design. Depending on the design you have chosen, you may need to stitch some design elements first, before you are ready to place your HTV.
Step 4: Carefully remove the plastic adhesive film on top of the HTV.

Step 5: Place your HTV and carefully stitch your tack-down/design. Again, I like to set my machine on the lowest speed. Secure your HTV as needed using tape, etc.

Step 6: Before embroidering the remaining design stitches, carefully remove the HTV around the edges of the design. Like the Mylar, the HTV should remove easily. If there are any small pieces remaining, use tweezers or fine-point scissors to remove the excess. Do NOT tug or pull the HTV. If you feel resistance, use some fine-point embroidery scissors to carefully trim away the HTV. Tugging on the HTV runs the risk of shifting your fabric in your hoop and ruining your project.

Step 7: Complete any remaining stitches.

Step 8: Remove the project from the hoop and iron the HTV to the project following the package directions for fabric, temp, and duration. I always place a sheet of parchment paper between my project and my iron to protect my iron from any gunk or residue left behind by the HTV.
Once your HTV is ironed, it will wash and wear without issues. Have fun adding this fabulous specialty material into your embroidery projects!


I Miss Your Kiss Embroidery Font
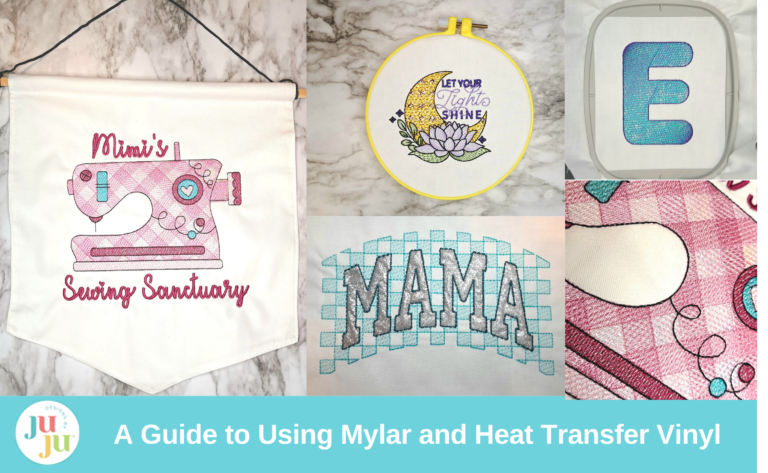
I used a clear, holographic Mylar behind the entire sewing machine design for this fun pennant banner for my mom’s sewing room. It is so bright and cheery!

I used a gold metallic Mylar behind the moon to add a glint of light to this inspirational decor piece for my daughter’s bedroom.

HTV works great with bean stitch designs as well! I added a silver heat transfer vinyl to this trendy mama design to make it really pop!

I used a royal blue HTV as a base for my letters and as an applique “fabric” on my pawprint. This shirt really glimmers in person!
Mylar and HTV are truly so easy to use. They can take your embroidery projects to a whole new level by adding sparkle and shine. Be sure to pick some up next time you are out and about.
Looking for other ideas and inspiration? Join the Designs by JuJu Embroidery Blessings Facebook Group to see other projects using Mylar and HTV, and share your own creations using the hashtag #designsbyjuju. We can’t wait to see what you make!
Remember to check out the next post in our Applique Made Easy series: “Applique Made Easy – How to Personalize Premade Items with Applique: Easy Embroidery Gifts and Custom Touches”, available September 4. We’ll show you how to customize onesies, T-shirts, denim jackets, tote bags, and more—with practical tips for stabilizing stretch fabrics, floating tricky spots, and creating meaningful, gift-ready pieces.