Applique Made Easy - What Is Applique Embroidery? A Beginner’s Guide to This Fun and Easy Machine Embroidery Technique
Turn fabric scraps into stitched masterpieces—discover the charm and creativity of applique embroidery!
If you've ever wanted to explore a creative way to add personality to your embroidery, applique is the perfect technique to try. In the 8-part series, Applique Made Easy, we’ll walk you through everything from the very basics to creative techniques and problem-solving tips—helping you become confident and inspired in your machine applique embroidery journey.
Whether you're brand new to machine applique or looking to polish your skills, this series will help you understand key techniques, try fun new materials like mylar and vinyl, personalize pre-made items, and troubleshoot common hiccups along the way. Here’s what you can expect from the series:
- August 7, 2025 - Applique Made Easy - What Is Applique Embroidery? A Beginner’s Guide to This Fun and Easy Machine Embroidery Technique (You are here)
- August 14, 2025 - Applique Made Easy - How to Choose the Best Fabrics and Threads for Applique Machine Embroidery Projects
- August 21, 2025 - Applique Made Easy - Your First Applique Project: A Step-by-Step Guide for Embroidery Beginners
- August 28, 2025 - Applique Made Easy - Using Mylar and Vinyl in Applique Embroidery: Add Sparkle and Shine to Your Designs
- September 4, 2025 - Applique Made Easy - How to Personalize Premade Items with Applique: Easy Embroidery Gifts and Custom Touches
- September 11, 2025 - Applique Made Easy - Creative Applique Ideas: Adding Personality to Your Embroidery
- September 18, 2025 - Applique Made Easy - Troubleshooting Applique Embroidery: How to Fix Common Problems and Avoid Mistakes
- September 25, 2025 - Applique Made Easy - Complete Guide to Mastering Machine Applique from Start to Finish
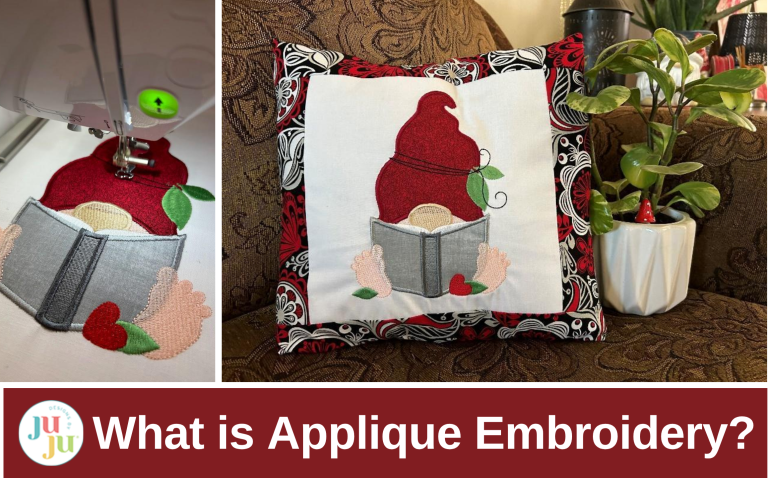
There's gnome better way to start your applique journey than with this Cute Loveable Gnomes project—bursting with charm, whimsy, and stitchy fun to spark your creative journey!
Cute Loveable Gnomes Project
Let’s get started! Select your applique design and print out the color chart. I am using the reading gnome from Designs by JuJu’s Cute Loveable Gnomes set. For my design, the first four steps are placement stitches and tack-down stitches. They are separate colors on the color chart, but I usually choose to do them in a light color or a color that matches my fabric so they don’t show. It’s not necessary to change colors between the placement stitch and tack-down stitch, but you can if you want to follow the order of the color chart.
Supplies
Check out the DBJJ team’s favorite supplies in the Designs by JuJu Amazon store.
- Hoop to fit the design
- Stabilizer
- Fabric for the hoop and for the applique pieces
- Thread to coordinate with your fabric and the design
- Small applique scissors
- Color chart
- Basting spray
- DBJJ designs used in this project:
Upload your design onto your machine. Hoop your design with stabilizer and your background fabric. Use a stabilizer that works for your fabric. I’m making a pillow on 100% cotton fabric, so I am using tear-away stabilizer.
Load your hoop into your machine and start your embroidery. My gnome design starts with a placement stitch for the hat. Stitch out the first step and remove the hoop from the machine.
Then cut a piece of fabric for the hat that completely covers the stitches. For added security, spray it lightly with adhesive spray so it won’t move while it’s being tacked down.
Load the hoop back in your machine and run the tack-down stitch. I usually choose a thread to match my fabric, but I chose a contrasting thread this time to better visualize the project. The machine will stitch the same lines as before and it will go around twice to secure it.
It’s now time to remove the extra fabric from around the stitches. A good pair of applique scissors is helpful. Some scissors have a duckbill on one side to help keep from clipping the stitches. I prefer a small pair that is sharp and precise clear to the tip. Clip as close as you can to the stitches without cutting them.
Once the fabric is trimmed, it’s time to move on to the next step of your design. This design has the second piece of fabric placed next, so the placement stitch will stitch first.
Cover it completely with the next choice of fabric.
Run the tack-down stitch.
And again, trim the fabric next to the stitches. Get as close as possible without cutting the stitches.
After the fabric is all trimmed, it’s time for the machine to finish stitching out the design. Follow the steps on the color chart and be sure you are going in order to ensure the edges of everything overlap correctly. For this design the face will stitch out next.
The next step is a satin stitch around the edge of the hat. The first stitches are a wide zigzag around the edges where the satin stitch will be placed. I like to check and make sure the edges are off my fabric so that I know the edge of the fabric will be under the satin stitch.
Then let the machine finish the satin stitching. There will be a few open areas that will be filled in with other stitching later.
Continue stitching through the steps on the color chart. Watch your design come to life as all the details are added to the applique.
Take the hoop out of the machine and trim all the threads. You can now remove the design from the hoop.
I removed the tear-away stabilizer from the back of my design and pressed the hoop marks out of the fabric.
Your applique embroidery is done, and it can be used in many different ways. I put a border on mine with an envelope back and put a pillow form inside. You could put the applique design on a baby onesie or an adult sweatshirt, or make several and turn them into quilt blocks! Enjoy the new technique you’ve learned!
Remember to check out the next post in the Applique Made Easy series: “Applique the JuJu Way: Choosing Fabrics/Threads”, available on August 14, 2025.


