Toggle Nav
 Inspire.
Create.
Stitch.
Inspire.
Create.
Stitch.
Search
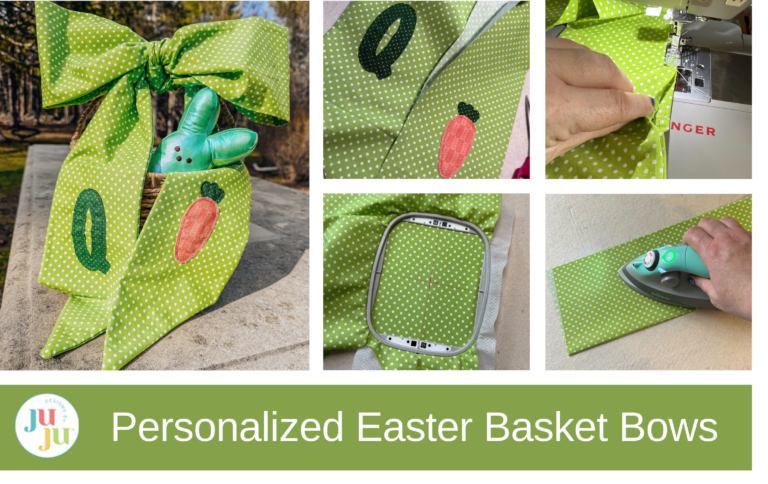
Easter baskets just got a whole lot cuter! One of our favorite ways to make this spring tradition even more special is with a personalized, embroidered bow. Whether you're dressing up a basket for an egg hunt or gifting a little one something sweet, this DIY bow adds a heartfelt, handmade touch that’s sure to become a keepsake.
In this tutorial, I’ll walk you through how to make a custom embroidered basket bow using our Daisy Doodle Alphabet and Easter Embellishment Kit. Let’s hop to it!
Check out the DBJJ team’s favorite supplies in the Designs by JuJu Amazon store.
We’ll be embellishing both ends of a long fabric strip, then sewing it into a bow you can tie onto a basket handle. This tutorial works great with any of our small designs and alphabets.
Pro tip: Use a chalk marker or air-erasable pen when marking your embroidery guides. I used a heat-erasable pen . . . and then ironed it away before taking some of the pictures. Oops!
Step 1: Cut your fabric to 55" x 11". If needed, sew two pieces together. I kept my seam in the middle of the strip—it hides nicely once you tie the bow.

Step 2: Fold the strip in half lengthwise, right side out. Press it flat so your strip now measures 55" x 5.5".

Step 3: Lay the folded ribbon in front of you with the ends closest to you, making sure the same side is facing up and the folded edge is on the outside. Then, on each outer edge, measure 5" up and mark.

Step 4: Draw a line from that 5" mark to the opposite bottom corner on both sides.

Step 5: Cut ½" below that line on both ends to shape the tails.

Step 6: From your 5" mark, measure 7" up and draw a horizontal line across. This 7" x 5.5" box is where you’ll place your embroidery. Mark the vertical center of this box—it will make hooping a breeze!

Step 7: Open the ribbon and place the pretty side down on your ironing board. Fuse a piece of SF101 (approx. 4" x 5") onto the back of the embroidery area, centering as best you can.

Step 8: Using your guides, hoop one side at a time and stitch your designs. I stitched an initial from the Daisy Doodle Alphabet on one side and the carrot from the Easter Embellishment Kit on the other.

Step 9: Once both ends are embroidered, trim away the stabilizer. Then fold the ribbon in half again, this time with right sides together, and press flat. Pin if needed.


Step 10: Sew around the ribbon with a ¼" seam, leaving a 3–4" opening in the center for turning.

Step 11: Turn the ribbon right side out. Press it flat again and topstitch around the edge to close the opening.


Step 12: Wrap your finished bow around your basket handle and tie it into a gorgeous floppy bow. That’s it!

We hope this tutorial inspires you to add a little handmade flair to your Easter celebration. Whether you're stitching names, carrots, or cute critters, this project is a sweet way to create a keepsake that will be treasured for years to come.
Share your basket bows with us! Use the hashtag #designsbyjuju or join our Designs by JuJu Embroidery Blessings Facebook Group to show off your one-of-a-kind creations. We can’t wait to see what you make!