Toggle Nav
 Inspire.
Create.
Stitch.
Inspire.
Create.
Stitch.
Search
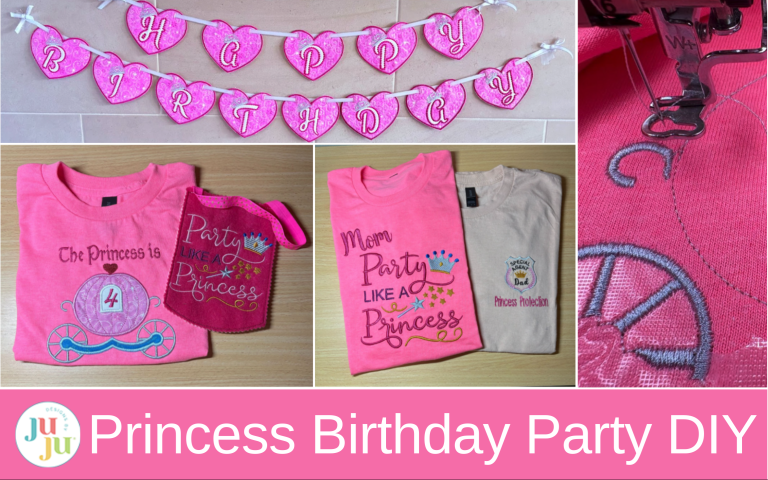
Party like a princess with embroidered shirts, banners, and treat bags that turn any birthday into a fairytale.
Transform your child’s special day into a fairytale adventure with matching family shirts, a whimsical banner, and enchanting gift bags, all embroidered with DBJJ designs. These simple embroidery projects weave together the magic for a celebration your family will cherish forever.
Check out the DBJJ team's favorite supplies in the Designs by JuJu Amazon store. And for your stabilizer and batting needs, be sure to check out Designs by JuJu+.
Now it’s your turn to party like a princess! Gather your supplies, pick your favorite DBJJ designs, and start stitching a celebration that’s as magical and unique as your little one.
Every princess needs her queen! Create a customized mom shirt to perfectly match your daughter’s royal birthday party.


If you want to personalize your shirt, load the design into your embroidery software. For beginners, try using user-friendly options like Embrilliance. These programs let you easily add names and other personal touches. Save your design on a USB or transfer the finished design to your machine.

Wash, dry, and press your T-shirts. Then fuse SF101 onto the inside to help prevent puckering. SF101 is a fusible woven stabilizer that provides added support to your fabric during embroidery, minimizing stretching and puckering. Find the center of the shirt. Measure about 2 inches down from the neck, and mark the spot with a pin or a fabric pen.

If you choose not to use software, select the size for your shirt design and load it into your embroidery machine.

Hoop wash-away stabilizer and bring it to your machine. Find the top center and mark the stabilizer. Remove the hoop, place it on a flat surface, and spray it with fabric adhesive.

Line up the center mark on your shirt with the center mark on the stabilizer. Smooth the shirt flat without stretching it. The spray adhesive will keep the knit fabric from shifting during stitching. If you want, pin the shirt to the stabilizer, but keep pins away from the stitching area.

Take the hoop and shirt to the machine. Using a film topper on T-shirts can help prevent puckering, though it's optional. Check to ensure the shirt is flat and smooth.

Set your machine speed to 350 spm to help reduce puckering. Use a 75/11 needle.

Stitch out the design.
Take the shirt out of the hoop. If you use a topper, tear it away. Trim the stabilizer, then wash and dry the shirt to remove any excess stabilizer. You can also trim away the SF101 for a neat finish on the inside. Press the shirt.
Every princess needs protection! This design for Dad adds humor and charm to a royal birthday party.

Decide on the badge size you want to use. You can choose to customize the design using the DBJJ font you prefer.


Add your letters and arrange them inside the badge.

Cut a template that matches your design size. Use it to help place the design, and when you’re happy with the spot, mark it with a pin.
Take away the template and fuse SF101 onto the inside of the shirt where the design will go.

Use an erasable marker to mark the top, bottom, and sides of the design.

Hoop wash-away stabilizer. At your machine, mark the top, bottom, and sides of your design onto the stabilizer.

Take the hoop out and place it on a flat surface. Spray the stabilizer with fabric adhesive. Place the shirt on the hoop, matching the marks on the shirt and stabilizer. Smooth out any wrinkles, but don’t stretch the shirt.

Put the hoop back in the machine and stitch the design. You can add a topper if you want. When you’re done, take out the hoop, remove the topper, and trim the stabilizer. Wash, dry, and press the shirt. Dad is now ready for security patrol!
With a crown, a smile, and a little embroidery magic, this princess shirt sets the tone for a fairytale celebration.


Prepare the shirt just like you did the others. Wash, dry, press, and fuse SF101 to the inside. Mark the center top with a pin or erasable pen.

Load the Birthday Princess Carriage Applique design into your embroidery machine.

Hoop wash-away stabilizer and take it to the machine. Mark the top center of the design on the stabilizer. Remove the hoop and place on a flat surface. Spray the stabilizer with adhesive spray.

Match the mark on the shirt with the mark on the stabilizer. Finger press the shirt flat. Do not stretch the fabric. Return the hoop and shirt to the machine.

For this design, use a water-soluble topper only on the embroidered areas, not where applique will be.

Stitch the embroidered area, then remove the topper before starting the applique stitches.

Stitch the placement line for the applique fabric (a light outline showing where the fabric goes).

Place the fabric over the stitches, making sure to cover them completely. Run the tack-down stitch. Take the hoop out of the machine and place it on a flat surface.

Trim the fabric close to the stitches, then put the hoop back in the machine and keep stitching the design.

If you’re using a topper, add it after the applique is finished to complete the embroidery stitches.

When you’re finished, take the shirt out of the hoop. Tear away the topper and trim the stabilizer from the back. Wash, dry, and press the shirt.
Filled with goodies and fairytale fun, handmade felt bags make the perfect take-home gift for little princesses.


Load the size ITH Birthday Treat Bags 3 you want to make. Use an 80/12 needle.
Next, load the Party Like a Princess design that will fit your bag. You will want the sides of the design to fit within the sides of the bag. Center the design.
Hoop your tear-away stabilizer.

Run the placement stitch for the front of the bag, then place the felt over the stitches. Be sure to leave enough room for trimming later.

Run the tack-down stitch.

Using the Stitch Forward key, forward the design to Party Like a Princess.

Continue to stitch out the design.

When finished, return to the stitches for the ribbon handle. Follow the instructions included with the bag design to finish adding the ribbon and backing.

When finished, remove the bag from the hoop. Remove the excess stabilizer and trim the treat bag according to the instructions. I used pinking shears to trim my bag.
Every royal celebration needs a statement piece, and this Happy Birthday Princess banner does it in true royal style.

For my banner, I used In The Hoop Big Set of Pennant and Bunting Shapes Set 2.
To decide on the size that worked best for me, I loaded two different sizes and then added the letter. I ran only the outline of everything onto the stabilizer. I found this to be very helpful.

Select the banner size and design you wish to use. Load to your machine.

.Add the alphabet font. I am using Princess Crown Applique Alphabet.
Center the letter inside your banner shape. I am only stitching out the letter and crown so I am not concerned if the entire design fits. If you are stitching out the entire letter design ensure it all fits into your banner shape.

Hoop tear-away stabilizer and take it to the machine.

The first step is the placement stitch for the batting. Place the batting over the stitches and run the tack-down stitch. Remove the hoop and place on a flat surface. Trim the batting close to the stitches.

Place your banner fabric over the batting. Return the hoop to the machine and run the tack-down stitch for the fabric.

Trim the fabric and if using a quilting stitch, run that. Do not add the back yet.

Using the Stitch Forward keys, advance the design to the letter. I am only stitching the letter and the crown, so I will start there.

Stitch out the placement line for the letter.

Position the fabric over the placement line and run the tack-down stitch.

Trim the fabric around the letter. Using applique scissors and snips will help.

Continue with the design.

When finished, do not remove the design from the hoop. Return to the beginning of the design. Advance to step 5. We need to add the back, the satin stitch around the shape, and the openings for the ribbon.

When finished with the entire design, remove it from the hoop.

Tear away the stabilizer.

Use a seam ripper to create the ribbon openings.

Take care to not cut through the stitches.

Continue on creating the rest of your banner.

Thread ribbon through the openings.

Tie off the ends.

Your banner is ready to hang!

From the matching family shirts to the banner and treat bags, every stitched detail helps turn a birthday into a fairytale memory. With a little fabric, thread, and imagination, you can truly party like a princess. Don’t be afraid to make this theme your own by changing colors, adding names, or mixing designs to fit your little princess perfectly. However you customize it, these embroidery projects are sure to create smiles, sparkle, and memories that last a lifetime.
Please share your projects in the Designs by JuJu Embroidery Blessings Group on Facebook, or use the hashtag #designsbyjuju anywhere on social media. We love to see what you create!
Happy stitching and happy celebrating!
