Toggle Nav
 Inspire.
Create.
Stitch.
Inspire.
Create.
Stitch.
Search
From simple to standout—learn how to embroider shoelaces and add playful charms. The perfect weekend project!
Step up your sneaker game with a touch of handmade flair! In this project, I’ll show you how to stitch personalized shoelaces with your embroidery machine and top them off with playful charms you create in the hoop. It’s an easy way to turn ordinary shoes into one-of-a-kind kicks that showcase your style. So gather your favorite designs, fire up your machine, and let your creativity run wild. Your laces and charms will steal the show!
Check out the DBJJ team’s favorite supplies in the Designs by JuJu Amazon store.
Don’t forget to check out Designs by JuJu+ for all your stabilizer and batting needs.

Lace up your shoe and measure the open space at the bottom. Mine measured 2”, so I planned for words that would fit within that area, usually 4–5 letters per word works best. With your measurement in mind, think of a fun phrase for your laces.

Start by choosing a font that fits the space you measured. I chose the Simple Block Embroidery Font. Ensure your font is about ½” tall so it fits well on your laces. I am using a sticky-back, tear-away stabilizer. You can also use a tear-away or wash-away stabilizer with an adhesive spray.

On your embroidery machine, choose a simple rectangle shape to use as a placement guide. Set the width to ⅝”, or as small as your machine allows. My machine only goes down to ¾”, but that still works.

Choose your font and add ½” letters to spell your first word. Use your machine’s grid to line up the word inside the rectangle. You can also align the letters first, then add the rectangle if that’s easier.
Before you start stitching, check that your letters are spaced well and even at the bottom. To check, use scrap stabilizer and a piece of scrap material. Load them to your hoop, and stitch out your letters.

My letters ended up too far apart, so I went back to the screen to adjust them and tried again.

I am still not happy with the placement, so I am going to move my G down just a bit and run again.

The third try worked! I’m happy with how the letters look, and the grid shows they fit inside the rectangle and are under 2” wide. When you’re satisfied, save your design to your machine or a USB stick for future use.

Using the Layout key, move your design to the top of your hoop embroidery area. This will allow you to stitch out both laces with one hooping. My machine is a Brother Stelaire; your screen may look different. If needed, refer to your machine manual.

I am now ready to stitch the letters onto my laces.

Hoop your stabilizer. If using the adhesive-back stabilizer, score lightly and remove the top paper.

If you are not comfortable with the rectangle approach, you can use the design placement keys to mark the center, top, and bottom as well as the left and right of the design. With the needle down, mark these positions onto your stabilizer.

Remove the hoop and draw a crosshair. This will show you your center.

If using the rectangle, take the hoop to your machine and stitch only the rectangle onto your stabilizer.

Now you will delete the rectangle and leave only the letters. Using the design placement keys, find the center. We want the center of the letters, not the rectangle. Return the hoop to the machine.

With the needle down, mark the center with a pen. Remove the hoop. Place on a flat surface.

Fold the laces in half lengthwise and mark the center with a pin.

Position the laces inside the rectangle, or line up with the crosshairs, matching the center mark on the stabilizer with the center mark on the laces. Press down but do not pull or stretch the laces.

For added security and to keep the laces from shifting, place a small piece of tape on both sides of each lace before stitching. This will hold everything in place and give you a cleaner finish. Return the hoop to the machine.

I added a piece of wash-away topper to ensure my stitches stay on top of my laces. For best results I recommend this step, but it is optional.

Stitch out your letters.

Gently remove the laces from the stabilizer. Trim any threads on both the front and the back. To prevent my laces from snagging I am leaving the small amount of stabilizer on the back. It does not show and will eventually wear off.

Repeat the above steps for the second shoelace.

For best results remember to do a test run.

And that’s it! You’ve just created your own personalized embroidered shoelaces! Fun, stylish, and totally one-of-a-kind.

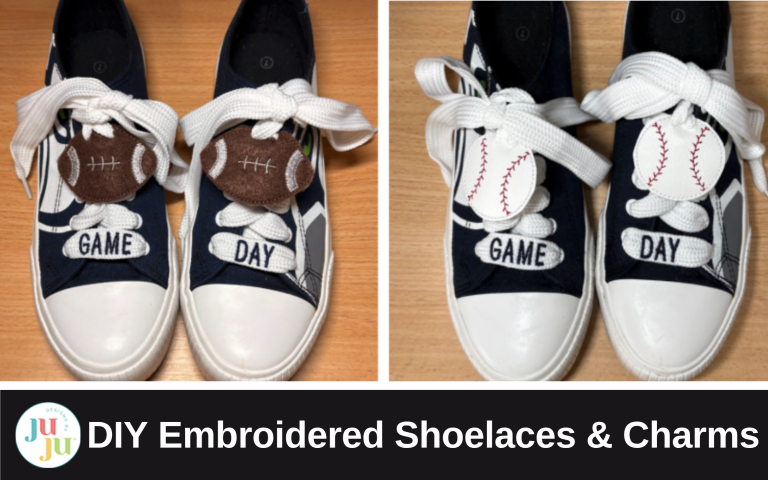
Have you seen the Embellishment Kits on Designs by JuJu? I absolutely love them! They’re so versatile and add the perfect finishing touch to so many projects. I find myself using them all the time. In this tutorial, I’ll show you how to make DIY baseball-themed charms with the Baseball Embellishment Kit Embroidery Set. These little charms are not only fun to stitch, but they’re also the perfect way to coordinate with my Game Day laces for a one-of-a-kind accessory at any sports event. These charms work best with vinyl or felt.
Note: I chose not to add a backing to my charms because I didn’t want them to be too thick. Depending on the thickness of your vinyl or felt, you may want to add one for extra stability. To do this, you can either stitch a backing on with your sewing machine before trimming, or run the tack-down step again at the end with a piece of material taped to the back of the hoop.

Choose the embellishment kit you want to use and load it onto your machine. Choose a size that suits your project.

I used the 2½” baseball.

Hoop cut-away stabilizer and take to your machine.

Stitch out the placement line.

Place your vinyl or felt on top of the hoop, ensuring it fully covers the outline with a little extra space for trimming. Once it’s secure, continue stitching out the design.

Remove from the hoop. Trim ⅛” around. Repeat to make the second charm.

With a hole punch, punch two small holes large enough for the lace’s aglet to fit through. Every charm will always need two holes so that it lies flat.

Now let's put the new laces and charms on our shoes. Place the words at the bottom, then lace up to the second-to-last eyelet.

Add your charms and finish lacing to the top.

Tie a bow, and your custom shoelaces and charms are ready to wear.


These charms were made using the Winter Alphabet Embellishment Kit. If your punched holes overlap with embroidery stitches, apply a no-fray solution around the area to prevent unraveling.

A charm with plain laces looks super cute too! I imagine it would be perfect on a pair of snow boots—if only I got more snow where I live. Still, I can’t resist adding a snowman design because I just love them!

Swap the charms, and you’ll have year ’round fun with only one pair of laces. These charms were made using the Football Embellishment Kit Embroidery Set.


The possibilities are endless—mix, match, and personalize your laces and charms to fit any style or celebration! These charms were created with felt using Football Embellishment Kit Embroidery Set, and Cheer Embellishment Kit Embroidery Set.

With a little imagination and the huge variety of designs in the Embellishment Kits, you can create laces and charms for any occasion. Be sure to explore all the kits, because what you’ve seen here is only a small sample of what’s available.
Warning: once you start making these, you won’t want to stop. Your shoes might just end up with a charm for every day of the week! Be sure to share your projects and ideas in the Designs by JuJu Embroidery Blessings Group on Facebook or use the hashtag #designsbyjuju anywhere on social media. We love to see what you create!
