Toggle Nav
 Inspire.
Create.
Stitch.
Inspire.
Create.
Stitch.
Search
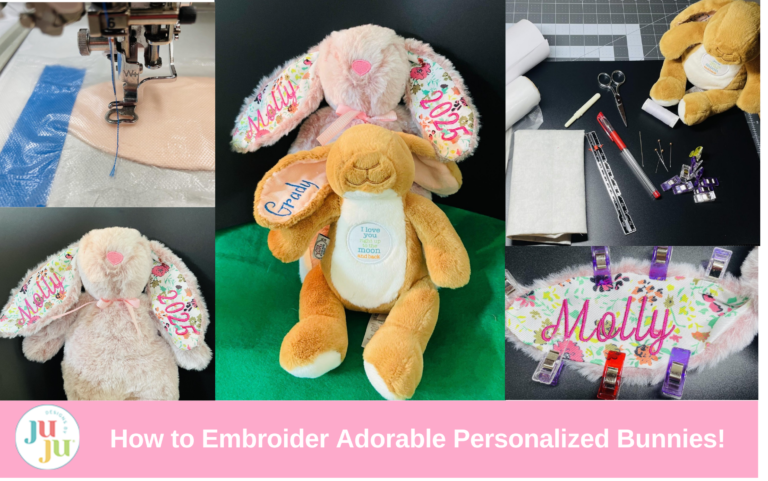
Looking for a baby shower or birthday gift? How about a special bunny for this year's Easter basket? We’ve all seen these adorable personalized bunnies, but have you ever wondered how this is done? It is not hard, and in this tutorial I will show you how, with a little patience and determination, you can make your very own personalized bunny.
Check out the DBJJ team’s favorite supplies in the Designs by JuJu Amazon Page.

Before you begin your embroidery, you will need to determine how much space there is for your design and which ear you are going to embroider on. I chose the right ear for the first name. You can choose to embroider one or both ears. Maybe the first name on the right and middle or last name on the left. Or maybe a date or special occasion. And remember, you are not limited to a bunny. Any plush animal with ears large enough to give you a nice embroidery space will do.


Lay the ear flat and with a sewing gauge measure the length and width of the ear. Do this before you take the ear apart. For this bunny I have 4” lengthwise and a little more than 1” width of space to work with. So I know when designing the name or date it will need to fit into these dimensions.

Choose the font you wish to work with. For this bunny I chose the Drive-In Movie Embroidery Font. Designs by JuJu fonts come in multiple sizes that allow you to pick and choose the size that will work best for you. I chose 1” letters. Add the letters needed to your screen. Using the arrows on the machine, space them apart until you achieve the desired look and size that will fit your plushy’s ear. My name is now 4” lengthwise and will fit nicely inside the ear. If you have software, you can create your design there first, then bring it to your machine.

Add a basting box around the image.

Hoop a piece of stabilizer of your choice and scrap fabric. Stitch out the name and remove it from the hoop.

This is going to be your placement template. Creating a template will allow you to see the design before you stitch it to the ear. This will tell you if you need to make any adjustments to the font or size. You may want the letters closer together, farther apart, or maybe larger or smaller. Once you have your design, trim around the basting box. Fold in half and line up the edges of the basting box. Finger press lines both vertically and horizontally. Draw crosshairs onto the template. This will give you the center on all sides.

Lay the template on top of the ear. Does the design fit and look the way you want? If not, make the appropriate changes and a new template. If it fits and you are happy with the look, great. This will be the template you will use.

With a seam ripper open up the ear.

Slip the seam ripper in between the front and back fabrics and gently remove the threads.

If your plush has fabric ears that can fray, you may want to use fray check around the edges, but this is optional. Lay the ear flat and center the template exactly where you want the name to stitch out. The basting box will most likely be larger than the ear. This is fine. You are only concerned about the placement of the design. Pin the template in place just shy of the halfway mark of the crosshairs, allowing you to fold the template in half.

Match the basting corners, sides, and crosshairs of the template to find the center.

Mark the center onto the ear with an erasable pen. Using a template also ensures you have the name going in the correct direction.

The ear is now ready to hoop.

Hoop a piece of sticky-back stabilizer.

Score the top paper, being careful to not cut through the stabilizer.

Tear away the top paper to expose the adhesive. Take the hoop to the machine.

On your machine find the center of the design. My machine is a Brother 8500; your screen may look different.

Mark the center of the design onto your stabilizer using the needle down position and an erasable pen.

Float the bunny ear flat onto the sticky-back stabilizer, matching the center mark on the fabric with the center mark on the stabilizer. Tape or pin the fabric down for added support to keep it from moving. Stitch out only the basting box.

If the fabric is plush, add the wash-away film topper over the ear before stitching. This keeps the stitches from getting lost in the nap of the fabric.

Lay the template on top of the ear, matching up the stitching of both basting boxes. If you are satisfied with the design placement, remove the template and continue to stitch out the design. If you are not, gently remove the basting box on the fabric and reposition the ear. Repeat the previous step until you are satisfied with your placement. Taking the time to do this step will ensure your name is centered and how you want it to look.


Once the design is complete, remove the ear from the hoop. Remove the basting box as well as the film top if used. Gently tear away any remaining stabilizer from the back.

Use the same steps if you want to put a name, date, or special occasion on the left ear.


Always double check the direction before stitching. As you can see, the picture on the left shows the date in the correct position with the ear facing downward.

Now you are ready to stitch the ear back together. You can do this with a sewing machine or by hand. If using a sewing machine, clip or pin the right sides together, and machine stitch along the previous stitch line. This is typically a ¼” seam.

Leave about a 1” opening close to the bunny’s head. Turn the ear right side out and hand stitch the remainder closed.

If you wish to sew the ear by hand, clip the front and back wrong sides together tucking under the edges ¼” and sew closed with a ladder stitch (How to Sew a Ladder Stitch - YouTube). This is also known as a slip stitch.

The right ear with the name is hand stitched closed. The left ear with the date is machine stitched closed. The picture doesn’t show it but the sizes are just a bit different. To keep both ears the same size, use the same method on both ears when closing.

Your bunny is now complete and ready to give to someone special. These personalized bunnies will be treasured for years to come. Remember, these steps can be used to personalize any plush with ears large enough to give you adequate embroidery space.
Please share your projects in the Designs by JuJu Embroidery Blessings Facebook Group, or anywhere on social media using the hashtag #designsbyjuju. We’d love to see what you create!
