How to Create a Seasonal Home Wall Hanging: A Step-by-Step Guide for DIY Enthusiasts
Looking for a fun and easy DIY project to add some seasonal charm to your home decor? Whether you're decorating for the holidays or simply want to bring some warmth to your space, a handmade wall hanging is a perfect choice. In this step-by-step tutorial, we’ll show you how to create a beautiful seasonal home wall hanging—a versatile craft that can transform your walls with every season.
This guide will walk you through the process of creating a stunning seasonal wall hanging that’s perfect for any occasion. You can also check out Stitch-by-Stitch: In The Hoop Seasonal HOME Wall Hanging by Designs by JuJu on YouTube to see this wall hanging created, step by step. Whether you’re new to DIY crafts or a seasoned pro, this project is guaranteed to add a cozy, festive vibe to your living room, entryway, or bedroom.
Let’s get started and make something special to brighten up your home all year round!
Project Details
5x7 Approximate Finished Size 6.9”x23.3”
6x10 Approximate Finished Size 9”x 30.6”
8x12 Approximate Finished Size 11.3”x 38.5”
Supplies
Check out Embroidery Supplies JuJu Uses for our favorite supplies!
- Fabric
- Batting
- No Show Mesh Cut Away Stabilizer
- WSS Stabilizer
- SF101 Stabilizer
- Scissors
- Thread
- Safety pins or Tie Tack pins
- Embroidery Designs
Stitch-by-Stitch Instructions
HOME Blocks
STEP 1: Hoop a piece of stabilizer. Please load design file labeled H Block.
Before starting please double check that you have loaded the correct design size
STEP 2: Stitch the placement line for the batting.
STEP 3: Cover placement line with batting, making sure all sides are completely covered.
Stitch tack down line. Trim the batting as shown.
STEP 4: Stitch placement line for center background fabric.
STEP 5: Position center background fabric over the placement line. Run tack down stitches to secure fabric. Trim away excess fabric as shown.
STEP 6: Stitch placement line for right side fabric.
STEP 7: Position the fabric strip with right side facing down, and parallel to the placement stitch. Extend the fabric strip approximately 1/8 — 1/4 inch over the placement line. Run tack down stitches to secure the fabric as shown.
STEP 8: Remove hoop from machine and fold over the fabric, pressing the seam well with your fingers. Tape down to secure in place. Run tack down stitches to secure the side with right side facing up.
STEP 9: Repeat steps 6 - 8 to attach the left side to the block.
STEP 10: Stitch the quilt motif for the sides of the block.
STEP 11: Use the applique method to tack down the H. For additional assistance with applique, please see applique tutorial included with the download (DBJJAppliqueTutorial.pdf).
STEP 12: The next stitching step is the satin stitches for this block. Refer to color chart, included with download, for satin and design stitching sequence.
STEP 13: Remove the block from the hoop and trim away excess stabilizer. Trim the edges of the block so each side is from 0.5" the outer stitching line. YOU ARE FINISHED WITH THIS BLOCK.
STEP 14: Repeat steps 1-13 to complete the blank block, M and E blocks.
YOU ARE FINISHED WITH THESE BLOCKS.
Sashing
STEP 15: Hoop a piece of stabilizer. Please load design file labeled Sashing.
NOTE: these pictures are from a different wall hanging so fabrics vary. Before starting please double check that you have loaded the correct design size.
STEP 16: Stitch the placement line for the batting.
STEP 17: Cover placement line with batting, making sure all sides are completely covered. Stitch tack down line. Trim the batting as shown.
STEP 18: Stitch placement line for center fabric.
STEP 19: Position center background fabric over the placement line. Run tack down stitches to secure fabric. Trim away excess fabric as shown.
STEP 20: Stitch the quilt motif for the center of the block.
STEP 21: Stitch placement line for top square fabric.
STEP 22: Position the fabric strip with right side facing down, and parallel to the placement stitch. Extend the fabric strip approximately 1/8—1/4 inch over the placement line. Run tack down stitches to secure the fabric as shown.
STEP 23: Remove hoop from machine and fold over the fabric, pressing the seam well with your fingers. Tape down to secure in place. Run tack down stitches to secure the fabric with right side facing up.
STEP 24: Stitch placement line for bottom square fabric.
STEP 25: Position the fabric strip with right side facing down, and parallel to the placement stitch. Extend the fabric strip approximately 1/8—1/4 inch over the placement line. Run tack down stitches to secure the fabric as shown.
STEP 26: Remove hoop from machine and fold over the fabric, pressing the seam well with your fingers. Tape down to secure in place. Run tack down stitches to secure the fabric with right side facing up.
STEP 27: Fold fabric left and tape in place.
STEP 28: Repeat steps 16-26 to stitch out the other block in this hooping.
Wall Hanging Construction
STEP 29: Remove the block from the hoop and trim away excess stabilizer. Trim the edges of the block so each side is 0.5" from the outer stitching line. Repeat this design 1 and a half more times so you have a total of 5 sashing blocks.
YOU ARE FINISHED WITH THESE BLOCKS.
STEP 30: Lay out the blocks to form the front of the wall hanging, with sashing blocks between each main block.
Sewing machine is required to complete project.
STEP 31: We will be working from top to bottom. The first blocks we will sew together is H block and sashing block.
STEP 32: Flip sashing block down onto H block. Line up the blocks so the stitching line and satin stitch on both blocks line up. Pin or clip together.
STEP 33: Sew the blocks together, sewing just barely inside the stitching line on the block. Press open seam.
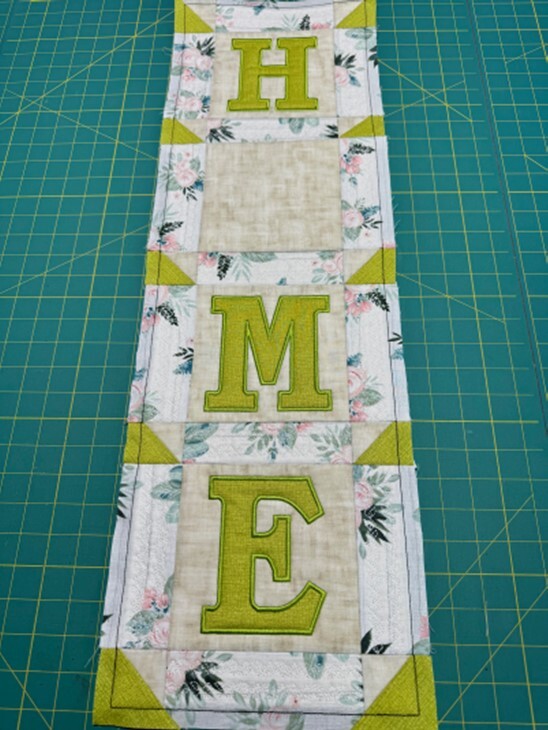
STEP 34: Repeat steps 32 & 33, attaching each sashing and block to the bottom of the previously sewn blocks until the front is complete and looks as shown.

STEP 35: Cut your backing according to the sizing in the supply list.
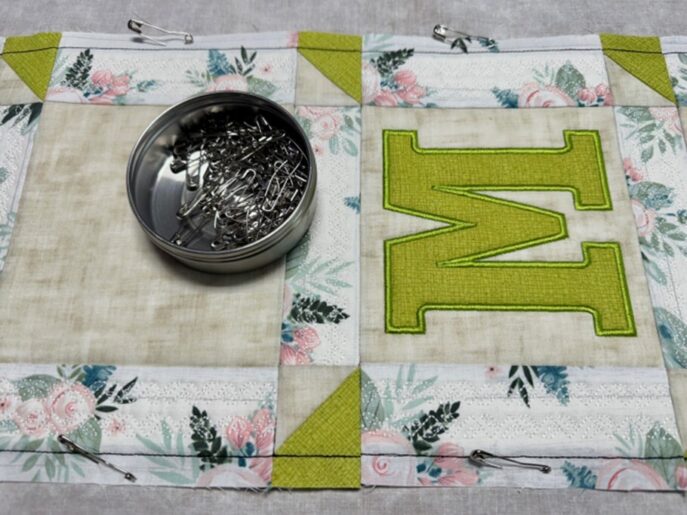
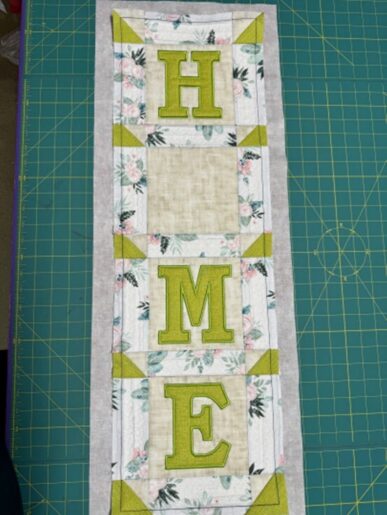
STEP 36: Turn the backing over so the wrong side is up. Center the sewn together blocks on the backing. Pin in place along the edges and along each seam on the wall hanging.

STEP 37: Use the stitch in the ditch method, sew and each seam line to the backing.
STEP 38: Trim each side of the backing so it is 1.25” larger than the wall hanging front. There are numerous methods and videos for binding the edges and doing mitered corners. Use one of your choice. All the pictures we have used are using method from this tutorial on Youtube.

STEP 39: Fold in each edge of the backing so it meets up with the outer edge of the front. Press with iron.
STEP 40: On each corner fold it diagonally so the fold is right at the corner of the front, as shown. Press the diagonal corner.
STEP 41: Trim away part of the corner, as shown. With right sides together, fold the corner so the ironing line matches up on both sides. Pin together.
STEP 42: Fold the ironed edges back in place and sew along the ironing line. Trim the seam as shown. Make sure you angle the corner at the fold, being careful not to cut past the sewing line.
STEP 43: Press the corner seam open. Repeat steps 40-43 for each corner. Pin or clip all the way around the wall hanging.
STEP 44: Next sew all the way around the binding.(Sew close to the edge of the binding)
STEP 45: Next we are going to make the tabs for the wall hanging. Cut the 2 squares according to the cut chart. You can add a third tab if you wish, just follow the steps making 3 instead of 2.
STEP 46: Press, wrong side together, 2 sides of the square (opposite sides). Press no less than 1/4”.
STEP 47: Fold over fabric and press in half as shown. Sew along the raw edge of the fabric, a minimum of 1/4”. The seam depends on how wide you want the tab.
STEP 48: Turn the tab right side out and press so the seam is in the back. Repeat steps 45-47 for the second tab. If you want a third tab repeat the steps again.
STEP 49: Turn the wall hanging over to the back side and evenly space out the tabs. Make sure the bottom of the tabs are at least 1/4” below the stitching line.
STEP 50: Sew the tabs to the wall hanging, sewing right on top of the previously stitched line. You can sew from the back or front depending on which side you want your bobbin thread to show.
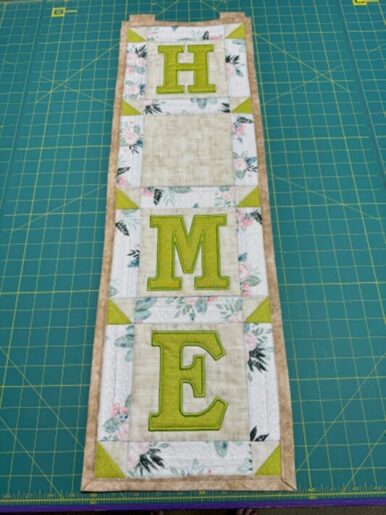
STEP 51: THIS PORTION OF THE WALL HANGING IS COMPLETE!!!!

Add Ons
Bunny Tail
STEP 52: Hoop 2 layers of water soluble stabilizer. Using 2 layers will make sure it doesn’t rip through while stitching.
STEP 53: Stitch the placement line for the batting.
STEP 54: Cover placement line with batting, making sure all sides are completely covered. Stitch tack down line. Trim the batting as shown.
STEP 55: Use the applique method to tack down the bunny tail fabrics.
STEP 56: The next few stitching steps are the satin and decorative stitches for the bunny pads.
STEP 57: Take the hoop off of the machine and turn to the back side. Place fabric over the placement lines. Secure in place with tape. Turn hoop to the right side and return hoop to machine. Stitch the tack down line. Take the hoop back off of the machine. Trim the fabric on the back side of the hoop.
STEP 58: The next few stitching steps are the satin stitches around the edge of the bunny tail.
STEP 59: Take the bunny tail out of the hoop. Trim away as much stabilizer as possible without cutting the satin stitching.
STEP 60: Use a wet cotton swab to remove the left over stabilizer around the outer edge.
Easter Egg
STEP 61: Hoop 2 layers of water soluble stabilizer.
STEP 62: Stitch the placement line for the batting.
STEP 63: Cover placement line with batting, making sure all sides are completely covered. Stitch tack down line. Trim the batting as shown.
STEP 64: Use the applique method to tack down the easter egg rows.
STEP 65: Take the hoop off of the machine and turn to the back side. Place fabric over the placement lines. Secure in place with tape. Turn hoop to the right side and return hoop to machine. Stitch the tack down line. Take the hoop back off of the machine. Trim the fabric on the back side of the hoop.
STEP 66: The next few stitching steps are the satin stitches around the edge of the decorative and Easter egg.
STEP 67: Take the egg out of the hoop. Trim away as much stabilizer as possible without cutting the satin stitching.
STEP 68: Use a wet cotton swab to remove the left over stabilizer around the outer edge.
Daisy
STEP 69: Hoop 2 layers of water soluble stabilizer.
STEP 70: Stitch the placement line for the batting.
STEP 71: Cover placement line with batting, making sure all sides are completely covered. Stitch tack down line. Trim the batting as shown.
STEP 72: Use the applique method to tack down the daisy.
STEP 73: The next few stitching steps are the satin and decorative stitches for the center of the daisy.
STEP 74: Take the hoop off of the machine and turn to the back side. Place fabric over the placement lines. Secure in place with tape. Turn hoop to the right side and return hoop to machine. Stitch the tack down line. Take the hoop back off of the machine. Trim the fabric on the back side of the hoop.
STEP 75: The next few stitching steps are the satin stitches around the edge of the daisy.
STEP 76: Take the daisy out of the hoop.
STEP 77: Use a wet cotton swab to remove the left over stabilizer around the outer edge.
Tulip
STEP 78: Hoop 2 layers of water soluble stabilizer.
STEP 79: Stitch the placement line for the batting.
STEP 80: Cover placement line with batting, making sure all sides are completely covered.
STEP 81: Use the applique method to tack down the tulip.
STEP 82: Take the hoop off of the machine and turn to the back side. Placefabric over the placement lines. Secure in place with tape. Turn hoop to the right side and return hoop to machine. Stitch the tack down line. Take the hoop back off of the machine. Trim the fabric on the back side of the hoop.
STEP 83: The next few stitching steps are the satin and decorative stitches around the edge of the tulip.
STEP 84: Take the tulip out of the hoop.
STEP 85: Use a wet cotton swab to remove the left over stabilizer around the outer edge.
Four Leaf Clover
STEP 86: Hoop 2 layers of water soluble stabilizer.
STEP 87: Stitch the placement line for the batting.
STEP 88: Cover placement line with batting, making sure all sides are completely covered.
STEP 89: Use the applique method to tack down the clover.
STEP 90: Take the hoop off of the machine and turn to the back side. Place fabric over the placement lines. Secure in place with tape. Turn hoop to the right side and return hoop to machine. Stitch the tack down line. Take the hoop back off of the machine. Trim the fabric on the back side of the hoop.
STEP 91: The next few stitching steps are the satin and decorative stitches around the edge of the four leaf clover.
STEP 92: Take the clover out of the hoop.
STEP 93: Use a wet cotton swab to remove the left over stabilizer around the outer edge.
Shamrock
STEP 94: Hoop 2 layers of water soluble stabilizer.
STEP 95: Stitch the placement line for the batting.
STEP 96: Cover placement line with batting, making sure all sides are completely covered.
STEP 97: Use the applique method to tack down the shamrock.
STEP 98: Take the hoop off of the machine and turn to the back side. Place fabric over the placement lines. Secure in place with tape. Turn hoop to the right side and return hoop to machine. Stitch the tack down line. Take the hoop back off of the machine. Trim the fabric on the back side of the hoop.
STEP 99: The next few stitching steps are the satin and decorative stitches around the edge of the shamrock.
STEP 100: Take the clover out of the hoop.
STEP 101: Use a wet cotton swab to remove the left over stabilizer around the outer edge.
How to Attach Add Ons
STEP 102: We recommend using either a safety pin or tie tack pins. Flat front tie tacks pins with rubber backs are nice and you can add a decorative button or craft item to the front with glue.
STEP 103: Center an add on onto the blank block. If using a safety pin, pin from the back so as little of the safety pin is showing. If using a tie tack, push pin through front and add backing on the back side.
If you make this project, please share it with us in the Designs by JuJu Embroidery Blessings Facebook group, or anywhere on social media using the hashtag #designsbyjuju. We can't wait to see what you create!

