Toggle Nav
 Inspire.
Create.
Stitch.
Inspire.
Create.
Stitch.
Search
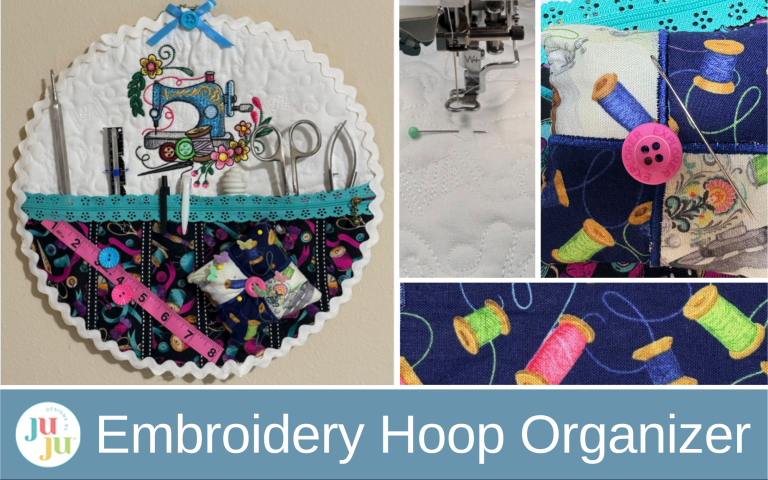
Organize your embroidery tools with a creative hoop project that blends quilting, stitching, and personal style.
If your embroidery tools are within reach but never quite organized, this embroidery hoop organizer is the perfect solution. Using basic supplies, machine embroidery, and a little creativity, you’ll stitch a practical organizer that keeps your tools handy while showcasing your favorite designs.
Finished size: 12” x 12”
(This project is made to a specific size in the tutorial, but dimensions may be adjusted to fit different hoop sizes.)
Check out the DBJJ team’s favorite supplies in the Designs by JuJu Amazon store.
For all your stabilizer and batting needs, be sure to check out Designs by JuJu+.
In this tutorial, I'm starting with a 12-inch embroidery hoop, but feel free to choose any size that inspires you. The steps are only a guide—let your imagination shape a one-of-a-kind organizer.

Cut a square piece of background fabric 2” to 3” larger than the hoop size, and a piece of fuseEZ interfacing the same size.

Apply the fuseEZ interfacing to the wrong side of the background fabric with a hot iron.

Center the hoop on the prepared fabric and draw a circle with a pencil or an erasable fabric marker around the inside of the hoop.

Fold the fabric in half, lining up the top and bottom lines of the drawn circle.

Press the fold with your fingers to make a crease.

Mark the fold and the top half of the circle with pins. Measure the half circle; this is the embroidery area where you will place your design.

Draw the same circle onto a piece of scrap paper to create a template.

Pin the template to a piece of batting and cut it out.

Spray fabric adhesive spray on the wrong side of the fabric with fuseEZ interfacing attached, then position the batting in place over the drawn circle.

Hoop cut-away stabilizer, spray with adhesive and take it to the machine.

Let your creativity take the lead. Choose an embroidery quilting design that excites you and load it into your machine. We will quilt the entire background, including outside the drawn circle. I am using Sewing 1 End-to-End Quilting Embroidery Design.

Starting at the top left, place the fabric down. You will want to ensure the entire area with the batting is quilted, so you might need to move the fabric in the hoop more than once. A magnetic hoop can help, but a regular hoop works too. Keep quilting until the whole circle is covered with stitches. If you need help, check out my blog on How to Align End-to-End Quilting Embroidery Designs.

When finished, remove the fabric from the hoop. Do not trim the stabilizer.

Fold the circle in half, lining up the top and bottom.

Then fold in half again to find the center and mark with a pin.

Unfold and measure the top half of the circle. This is the embroidery area.

Select the design you wish to use and load it to the correct size to fit your embroidery area. I am using Floral Sewing Machines 1 Embroidery Set. Find the bottom center of the design.

Center the fabric in your hoop with the pin on the fabric near the bottom center of the design.

Use the Design Placement keys to ensure your design is centered and fits within the half circle. If needed, adjust either the design on the screen or the fabric in the hoop. My machine is a Brother 8500; your screen may look different.

Once you are satisfied with the design and fabric placement, stitch it out.

Remove the fabric from the hoop and trim away the stabilizer.

Position the outside of the hoop over the fabric, but do not tighten the hoop. Now it's time to add embellishments that give your organizer a personal touch.

Choose your bottom/pocket fabric and gather any embellishments that catch your eye: ribbons, lace, zippers, or anything else you love. This is your moment to infuse personality and fun into your project.

Fold your bottom/pocket fabric in half. Make sure you have at least 2” of fabric outside the hoop. Lay it across the hoop. For my 12” hoop I cut my fabric 15” x 15”.

Insert the tools you will later be putting into the hoop, and mark the pocket areas with pins.

Remove the pocket fabric and draw straight lines down the fabric where the pins were. These will be your sewing lines to create the pockets.

If adding ribbon, position the ribbon over the drawn lines. Fold the top and bottom of the ribbon under.

Sew along the lines, using a 2.5 mm stitch length for added security, and remember to backstitch a little at the start and end to keep the stitches secure. Continue across until all pockets are sewn.

If you want to add more embellishments, add them before you sew your pocket fabric to the background fabric.


Download the Pieced Pincushion Set. Cut your fabric according to the directions included in the download.

Hoop cut-away stabilizer and run the placement stitch for the first piece of fabric.

Place the fabric over the placement line and run the tack-down stitches.

Trim the fabric. Run the next placement stitch.

Place the second piece of fabric down, then run the tack-down stitch. Trim the fabric.

Continue stitching according to the directions.

Place the final piece of fabric right side down. Run the final stitches.

Remove from the hoop and trim ¼” from the stitches.

Turn right side out and fill it with Poly-Fil. I recommend using just a little so it is not too full. This will make sewing the button on easier.

Turn the opening to the inside and pin. Hand stitch the opening closed.

With a large needle, attach a button to the center of the pincushion.

Place the top hoop over the fabric again. Position the background fabric and pocket fabric the way you like them, then remove the hoop and sew along the marked pocket lines to attach the front fabric to the background fabric. Place the pincushion where you want it and sew it to the pocket, or attach with hot glue.

Position the project in the hoop and tighten the hoop.

Trim the fabric approximately 1” wider than the hoop.

With a hot glue gun, glue the fabric over the back of the hoop.


If you want to add more embellishments, use a glue gun to attach rickrack, buttons, ribbon, or any other decorations that make your organizer unique.

Insert the tools into the pockets, add pins to the cushion, and your organizer is complete. Now your most-used tools are neatly stored and easy to grab when creativity strikes. This project is all about function with a personal touch, so feel free to adjust pocket sizes, fabrics, and embellishments to suit your sewing space. A little organization goes a long way toward making every sewing session more enjoyable.

Are you like me and always scrambling to find a pen and paper when it’s time to make a grocery list? Somehow when you’re in a hurry, both seem to disappear. Instead of searching every drawer, why not create a simple hoop organizer to hang in the kitchen or by the door? It keeps everything in one place and adds a handmade touch you’ll enjoy every day.
Whether you stitch one for your sewing room or gift one to a fellow maker, embroidered hoop organizers are a beautiful way to keep creativity tidy. Beyond embroidery tools, they’re perfect for holding pens, notepads, incoming mail, or even small craft projects waiting their turn. With just a hoop, fabric, and your favorite embroidery designs, you can create wall-worthy storage that’s as practical as it is decorative.
Have fun customizing the size, pockets, and colors to suit your space, and be sure to share your finished organizer in the Designs by JuJu Embroidery Blessings Group on Facebook, or use the hashtag #designsbyjuju anywhere on social media. As always, we love to see what you create!
Happy sewing!
