Toggle Nav
 Inspire.
Create.
Stitch.
Inspire.
Create.
Stitch.
Search
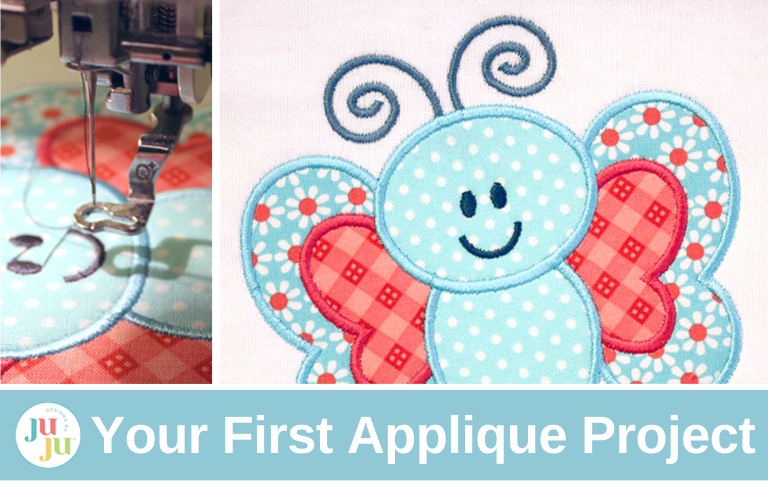
Start your first applique project with our easy step-by-step embroidery guide. Learn how to prep, stitch, and finish a beginner-friendly design.
This is Part 3 of our 8-part series, Applique Made Easy. In this installment, we’re walking you through your very first applique project with a simple, beginner-friendly tutorial. You’ll learn how to stitch a three-fabric design from start to finish, giving you the confidence to tackle future projects with ease. Whether you’re brand new to applique or just looking for a clear, step-by-step guide, this series is here to support you every step of the way. Here’s what you can expect from the full series:
If you’ve been curious about trying machine applique but weren’t sure where to start, you’re in the right place! This guide will walk you through your very first applique project step by step, so you can feel confident and excited as you stitch. We’ll be working with a simple three-fabric butterfly design that’s perfect for beginners—and by the end, you’ll see just how easy (and fun!) applique can be. Gather your supplies, follow along, and get ready to create something beautiful!
Check out the DBJJ team’s favorite supplies in the Designs by JuJu Amazon store.

Now that you’ve gathered your supplies, it’s time to get everything ready for stitching. A little preparation at this stage makes a big difference—helping your fabrics lay flat, your stitches look neat, and your final project turn out beautifully. Let’s start by prepping those fabrics so you’re set up for success!
Prepare your fabrics ahead of time with a fusible product. This step is not required BUT makes trimming easier, prevents fraying along the edge of the fabric, and adheres the applique fabric to the base item to prevent wrinkles. We use and recommend Heat-n-Bond Lite. Follow the manufacturer’s instructions for fusing to the back side of fabric.

Once it has cooled down, be sure to remove the backing paper.

Refer to the included color chart for your design. In general, our applique designs start with all the placement and tack-down stitches for the fabric portions of the design.

Please note: often our applique fabric steps are pink/green, but, depending on the design, there may instead be two shades of pink, or red/black. In any case, it is important that these steps alternate colors in the design file so that your machine stops between steps. However, this does NOT mean you need to use pink and green threads for these steps. Instead, pick a neutral color and use it for all placement/tack-down stitches to save time. Once all fabric is tacked down and trimmed, then use different thread colors for the remaining color steps to coordinate with your fabric choices.

Stitch Design Step 1: A single running stitch to show fabric placement for the outer wings.

Place the First Fabric: Place your first fabric, making sure the entire placement stitch is covered. (You may wish to use a spritz of spray adhesive to help hold it in place.)

Stitch Design Step 2: A double running stitch to attach the first fabric to the item.

Trim the First Fabric: Remove the hoop from the machine but do NOT unhoop your item. Place your hoop on a flat surface to support the hooped fabric so it remains taut.Trim around the tack-down stitches as closely as you can without snipping them.

Stitch Design Step 3: Return the hoop to the machine and stitch the placement stitches for the inner wings.

Place the Second Fabric: Place your second fabric, making sure the entire placement stitch is covered.

Stitch Design Step 4: This tacks down the second fabric. Then carefully trim around the shapes as before.

Stitch Design Step 5: Return hoop to machine and stitch the placement stitches for the body of the butterfly.

Place the Third Fabric: Place your third fabric, making sure the entire placement stitch is covered.

Stitch Design Step 6: This tacks down the third fabric.Then carefully trim around the shape as before.

At this point with all fabric trimmed, it is good to fuse the fabric in place before moving forward. Depending on the size of your hoop, you may need to use a small travel-size or craft iron.
NOW thread color matters! Pick threads that coordinate with the fabrics you have chosen and what you want for the remaining details. You may follow our color chart for inspiration or do your own thing.
Please note that our satin stitch steps start with a zig-zag underlay to provide a nice foundation for the satin stitches that follow.
Stitch Design Step 7: Satin stitches for the antennae.

Stitch Design Step 8: Satin stitches for the outside wings.

Stitch Design Step 9: Satin stitches for the inside wings.

Stitch Design Step 10: Satin stitches for the body.

Stitch Design Step 11: Face details.

Depending on what model embroidery machine you have, you may need to trim the jump stitches between design elements yourself when the design is completed.

All Done! Sit back and admire your work!

And that’s it—you’ve completed your very first applique project! With just a few fabrics, some simple steps, and a bit of patience, you’ve transformed a blank item into something truly special. Remember, each project will feel easier as you go, and there are endless ways to personalize your designs with different fabrics, colors, and textures. Most importantly—have fun with it! Applique is all about creativity, and every stitch is a chance to make something uniquely your own.
Now it's your turn! We would love to see pictures of your Baby Butterfly applique and what project you use it for! Share them with us in our Designs by Juju Embroidery Blessings Group on Facebook, or use the hashtag #designsbyjuju anywhere on social media.
Now that you’ve completed your first satin edge applique, you might be wondering — are there other ways to finish an applique design?
Satin edge is the most common edge finish, but it’s not the only option. The exciting part is that the core applique steps stay the same. You’ll still stitch a placement line, add your fabric, secure it with a tack-down stitch, trim, and finish with a decorative edge.
The difference comes down to the style of finishing stitch used around the fabric.
Bean stitch applique creates a slightly raised, sketch-style outline. In this method, the tack-down and finishing stitch happen together, forming the finished edge in one step. There is no satin edge afterward — the bean stitch is the final look.
Bean stitch applique is perfect when you want a lighter, decorative outline with a hand-stitched feel.
Watch our full How to Embroider a Bean Stitch Applique video.
Motif edge applique (often called blanket stitch applique) gives your design a decorative, handcrafted border. The fabric is secured with a tack-down stitch, trimmed closely, and then finished with a separate decorative motif edge.
This style is ideal when you want a classic stitched-by-hand appearance.
Watch our full How to Embroider a Blanket Stitch Applique video.
No matter which finishing stitch you choose, the foundational applique process remains the same — giving you the confidence to try new styles as you continue learning.
Next up in our Applique Made Easy series, we’ll explore how to add sparkle and shine to your projects with specialty materials like Mylar and vinyl in “Applique Made Easy - Using Mylar and Vinyl in Applique Embroidery: Add Sparkle and Shine to Your Designs”, posting on August 28. Get ready to take your applique designs to the next level!