Toggle Nav
 Inspire.
Create.
Stitch.
Inspire.
Create.
Stitch.
Search
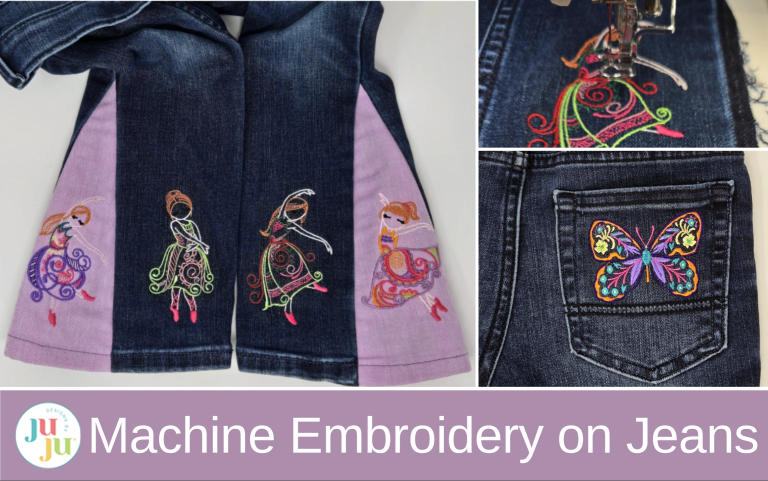
Give your jeans a bit of pizzazz! A little embroidery can turn your everyday jeans into one-of-a-kind wearable art!
Be sure to check out the DBJJ Amazon store for our favorite tools and products.
Notes for working with denim:
Gather your supplies and download your designs to a USB stick. My photo doesn’t include the tearEZ stabilizer I used because I was floating small pieces left over from previous projects.

I started with the back pocket. Remove the stitches around the pocket, except for the heavy darning-type stitch at the top corners. Hoop the sticky tear-away stabilizer and position the pocket so the butterfly design is right above the decorative line on the pocket. I started with the 4x4 design, but needed to downsize it even more to fit my pocket. Using the buttons on my machine, I got it down to about 2” x 3”. When ready to embroider, tuck a piece of tearEZ under the hoop and start stitching.

Start embroidering slowly. You can speed up a bit once you see it is embroidering smoothly.

After the design is embroidered, remove everything from the hoop and trim the back stitches. Remove the tearEZ, but just trim the sticky stabilizer close to the embroidery. I did not want to tear it away because it seemed quite stuck.

Once finished with the pocket, I moved on to the legs of the jeans. With a seam ripper, I removed the stitching from the outside leg seams of the jeans. (This is usually not the bulky seam that has been folded over and stitched on top.) Also remove part of the hem to make it easier to sew them back together. Open the seam to about 5” above the wear on the knees to make hooping easy. I wanted to fit my embroidery on the lower front of the leg, which you can see is much skinnier than the back leg! I chose to use the 4x4 designs and they fit perfectly!

For the legs, I chose the Mehndi Ballerinas—they are perfect for my red-headed granddaughter! Again, hoop the sticky tear-away stabilizer and position the jeans leg so the design will be about 1” above the hem. When I got to my embroidery machine, I floated the tearEZ under my hoop.

When the design finishes embroidering, rather than remove everything from the hoop, trim just the sticky stabilizer around the design in the hoop. This leaves a hole in the hooped sticky tear-away where you can stick another piece below the hole and reuse the hooped stabilizer for the other leg.


At this point I had planned to just sew the jeans back together, but flare-bottom pants are so popular now that I decided to add a little flare. Knowing my granddaughter, she will be dancing in these!
I had a piece of lighter-weight denim in my stash, so I cut an 11” x 14” rectangle. I fused a piece of Pellon 880F to the back to give it a similar weight to the jeans. Then I pressed a hem up at one long edge to the same size as the hem on the jeans.
Using a piece of scrap paper, cut out a triangular shape approximately 11” high and 4½” wide at the bottom. Lay it over the fabric and decide on placement, but don’t cut yet. My plan was to get two more ballerinas out of this piece of fabric, one for each triangle, allowing for seam allowances with my paper template.

I wanted my ballerina to be about 1”above the hem again. So this time, using the Move buttons on my machine, I got my design into position. Remember to float tearEZ under the hoop. After embroidering the first ballerina, I cut the window in my sticky stabilizer to remove the embroidery and put a scrap of sticky tear-away under the hoop to fill the hole, rehooped the fabric, and embroidered the second ballerina.

Below you can see how I cut the sticky tear-away and how much of the tearEZ was removed. I did not pull it out of every nook and cranny. It will soften and wash out as the jeans are laundered. I learned this trick from looking at ready-to-wear clothing—a lot of stabilizer is left in place when you buy it. If the sticky tear-away becomes a problem, it will be much easier to remove with repeated washings.

I used my scrap paper triangle as a pattern to cut out the shapes and then it was off to the sewing machine!

I sewed the triangle piece to one side of the jeans’ side seam, opening out the bottom hem. I tried to keep my sewing on the seam that was visible from taking the leg apart, so the darker fabric inside the seam allowance didn’t show on the outside. Remember to backstitch at the top. (This refers to the right seam below.) Notice I did not sew all the way to the top.
Then I sewed the left side. I don’t think it matters that my seams don’t meet exactly. I sewed the part I had opened above the flare as well. Finally, use a stitch on your sewing machine to finish the edges. You could zigzag, or if you have a serger, use that. This cover stitch worked for me. Then I went back and sewed the hem in place. Repeat the whole process for the other leg.


My last step was to sew the pocket back in place. I sewed over the lines I had ripped out, increasing my stitch length to 3.0mm. Remember to backstitch when starting and stopping.


I love how my granddaughter’s jeans turned out! But, what if you cannot get the part of your jeans where you want embroidery under the needle? I have you covered there too! Make a patch! I talk about making patches in this blog post: How to Make Patches with an Embroidery Machine, and if you are wondering how to get your patch on your garment, check out this blog post: How to Add and Remove an Embroidered Patch.
I hope I have inspired you to go and play with a pair of jeans. It is such a fun project! My next pair is going to have wildflowers . . . or maybe mushrooms . . . or . . . JuJu has so many wonderful designs that would look great! You could even use quilting designs! Check out Charlotte’s blog post on turning plain denim into fun, crazy patch jeans.
Be sure to share your projects in the Designs by JuJu Embroidery Blessings Facebook Group, or use the hashtag #designsbyjuju anywhere on social media. We all love to see what you create!
