Toggle Nav
 Inspire.
Create.
Stitch.
Inspire.
Create.
Stitch.
Search
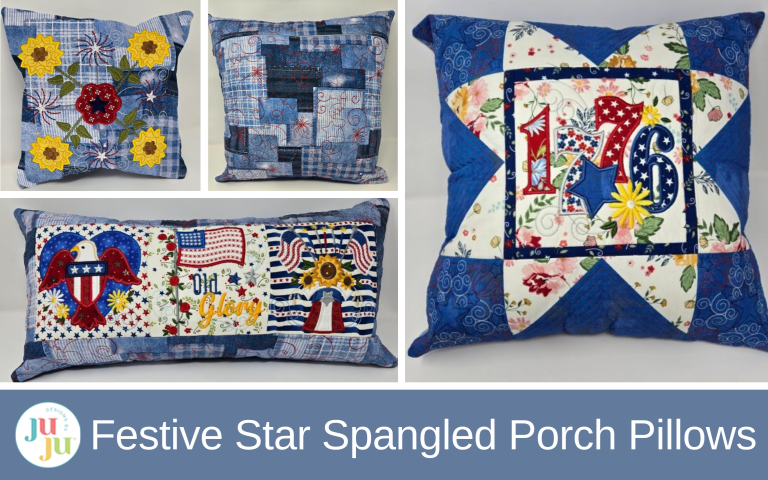
Celebrate America’s 250th birthday with a few festive machine embroidered pillows! The minute your guests arrive at your patio, they will know they are in for a treat! Design by JuJu’s Star Spangled Stitches are so fun to embroider! Need a bench pillow? Hammock pillow? Chair cushion? We have you covered!
Approximate finished sizes: 12” square, 16” square, 12” x 22”
Be sure to check out the DBJJ Amazon store for our favorite tools and products. And for stabilizers and batting, Designs by JuJu+ has everything you need.
First I made the backing fabric for my pillows. I wanted to quilt the backing fabric, so I used the Quilting Only files from the Patriotic 1 Quilting Backdrops. These are different from edge-to-edge quilting files as there is no starting and stopping points. My largest hoop is 9.5” x 14”, so this is as large an area as I could quilt. You might have a smaller or larger hoop—just quilt your pieces of fabric with whatever hoops you have. I quilted in a contrasting color for the back of the pillows.
The first thing I did was cut two 18” x width-of-fabric strips from my yardage. Fuse fusible fleece to the back. I hooped this piece without any other stabilizer. The fusible fleece is quite dense and my fabric was a lighter-weight home decor fabric.
Load the design on your USB drive and head to your machine.
It took me four hoopings to get across my fabric. Since I knew I would be cutting my fabric up, I just lined the embroidery up to the left side of my hoop leaving a bit of the previously quilted part showing each time I moved my hoop. I ran each stitch out twice to give the quilting a lot of texture. It is like using a heavier 30 weight thread without having to search for that thread in the color you want! You can see the difference in the photo below.


Cut a piece of leftover (unquilted) backing fabric 14” square. Cut a square of fuseEZ the same size and fuse it to the back of your fabric. Fuse a piece of fusible fleece on top of the fuseEZ.
Hoop a piece of magicMESH and float your fabric, centering it on your hoop. I used the 9” Baltimore Album Block from Star Spangled Stitches Set 4. I also added the 9” Patriotic 1 QB. This is optional but I wanted to try to give my pillow texture behind the design. I used a matching thread so it wouldn’t detract from the Baltimore Album design. Embroider the quilting, then skip the placement and tack-down steps for the batting since the fusible fleece is enough. Embroider the design following the steps.

Once the embroidery is finished, remove it from your hoop, trim your threads, and press your piece. I like to use a wool mat for pressing.

Trim the piece to 12½” square, centering the design. Cut a 12½” square of your quilted backing fabric.

I chose to use an invisible zipper to close my pillow. You do need a special foot for your sewing machine for this type of zipper. You could also cut your backing pieces larger to make a flap, or use hook-and-loop tape or buttons. Closing choices are up to you. There are a lot of options, so go with your favorite.

Sew the remaining three sides of your pillow with right sides together. Remember to leave the zipper open partway so you can turn your pillow cover right side out. Give it a quick press and put your pillow form inside. Voilà! Your first pillow is complete!


I used the 7x12 hoop size of the Patriotic Mini Quilt for my pillow front. This makes approximately a 16” pillow.
For the center block, I created the 1776 Block from Star Spangled Stitches Set 1. I stitched the 9” x 9” size by following the included block instructions, and had so much fun picking out different fabric pieces to bring it all together. I also embroidered all of the components for the Patriotic Mini Quilt Project.

Did you notice that my center block is larger than the star point pieces in the photo above? That was intentional. I wanted a little of the border around 1776 to show, but not all of it. I used my 8½” ruler to trim equal parts off of all sides.

Sew your mini quilt/pillow top together following the mini quilt instructions. I did not add a backing to this piece as this will be inside the pillow form.

Since my largest hoop was not 16”, I needed to cut two pieces for the back. The larger piece is 14” x the same width as my pillow top, plus a 4” x width of pillow top strip for below the zipper.
Note: If you are closing your pillows another way, you will need to cut your fabric accordingly.

Once I had the zipper inserted, I cut the back the same size as my pillow front. Sew the pillow together the same way you did for the first pillow, and be sure to open your zipper for turning. Give it a good press and insert your pillow form.


For this pillow I chose three Star Spangled designs. The Eagle from Star Spangled Stitches Set 1, Old Glory from Star Spangled Stitches Set 4, and the Flags from Star Spangled Stitches Set 3. I embroidered the 6” size of each.
Since I chose some rather wild backgrounds and didn’t want them to show through, I doubled the white fabric for the Eagle’s head and the flag in Old Glory. It worked like a single piece of fabric, but it covered my background.


For the shield, I cut out the star background.

When I got to the Flags in the Hat, I used a white felt for the flags. Since the embroidery is so open, I didn’t want the flags to disappear. After they embroidered, I cut the felt close to the stitching. It’s easier to do this without nicking the stitching if you leave a scant ⅛ inch around.


Sew the blocks together in a row and add quilted backing fabric evenly to the sides to equal 23” wide (leaving ½” seam allowances). Do the same for the top and bottom borders to make the pillow front 13” tall. I did need to piece the top and bottom borders, but it is very hard to see.
Next, cut the backing rectangle the same size as the front of the pillow. Sew together the same way you did the previous pillows. This time I put my invisible zipper on a side.


We don’t have all of our summer furniture out yet, and it is raining as I am writing this, but we will soon! We are outdoors a lot in the summer and I can’t wait to decorate our patio for the next family party!

I hope you decide to use the Star Spangled Stitches blocks to make your own summer pillows. Whether you use them outside or inside, they are sure to add a festive touch to your decor.
Be sure to share your projects in the Designs by JuJu Embroidery Blessings Facebook Group, or use the hashtag #designsbyjuju anywhere on social media. We all love to see what you create!
