Search
Project Tutorial - Bryn's "Don't Bug Me" Garden Apron
Blog post by Kim Hanson
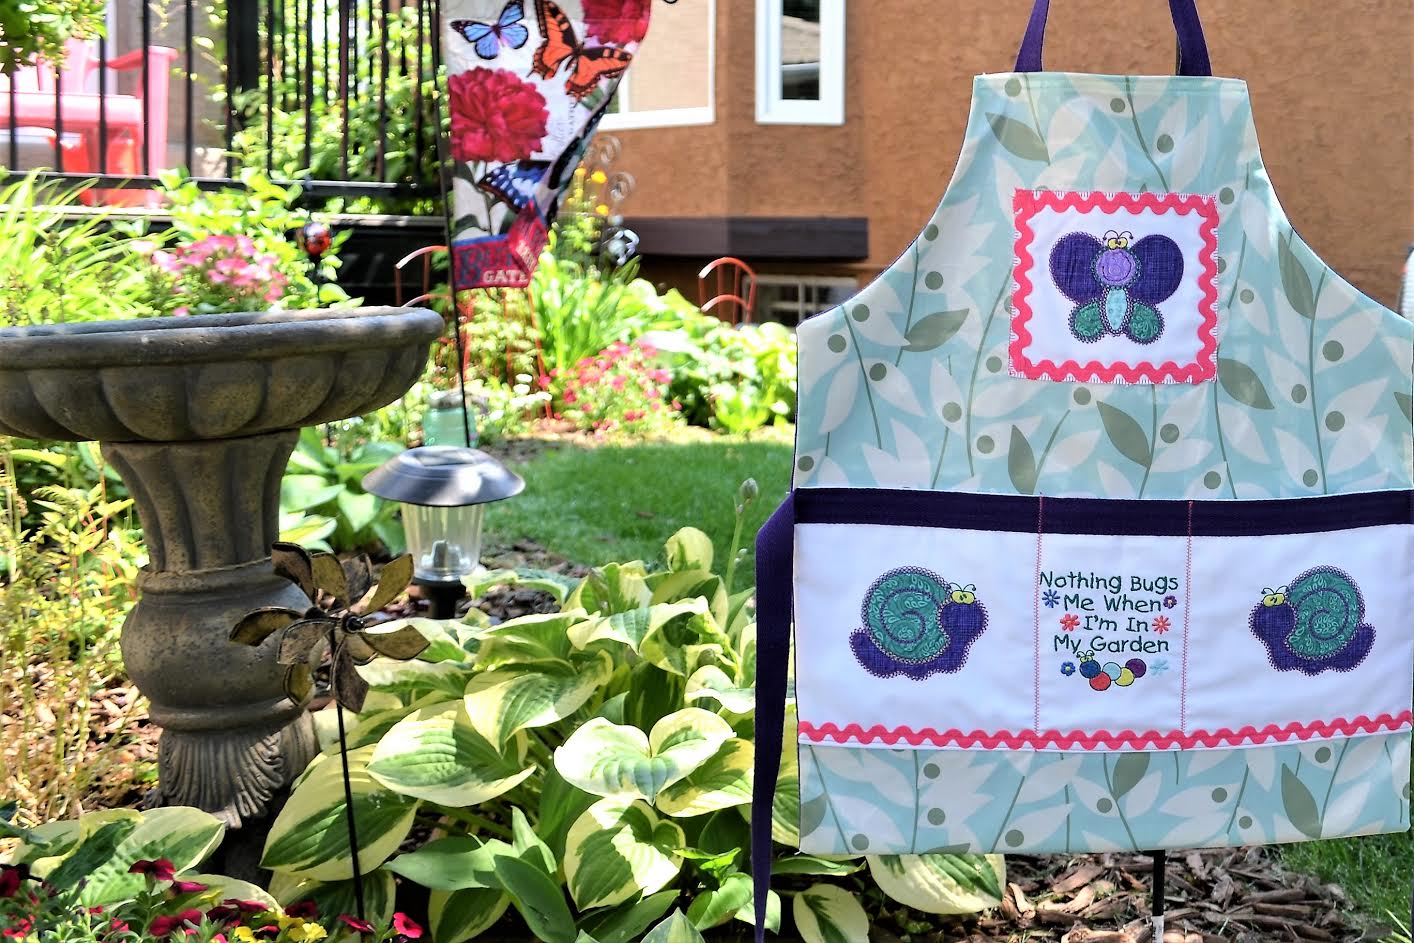
 Welcome everyone. I’m pleased as punch to be back here again with all of you! This time, we are making a summery, sweet and super-easy child’s gardening apron, embroidered with Designs by JuJu’s Bugalicious design set . They are just perfect for this project! This apron is made using laminate for a clean and easy “wipe down” after use, and can be made over the weekend. Why not get started? Your five-year old will love it!
Please be sure and read through all the instructions prior to commencing. (If you have never worked with laminate before, please note the special instructions at the end of the pattern).
Welcome everyone. I’m pleased as punch to be back here again with all of you! This time, we are making a summery, sweet and super-easy child’s gardening apron, embroidered with Designs by JuJu’s Bugalicious design set . They are just perfect for this project! This apron is made using laminate for a clean and easy “wipe down” after use, and can be made over the weekend. Why not get started? Your five-year old will love it!
Please be sure and read through all the instructions prior to commencing. (If you have never worked with laminate before, please note the special instructions at the end of the pattern).
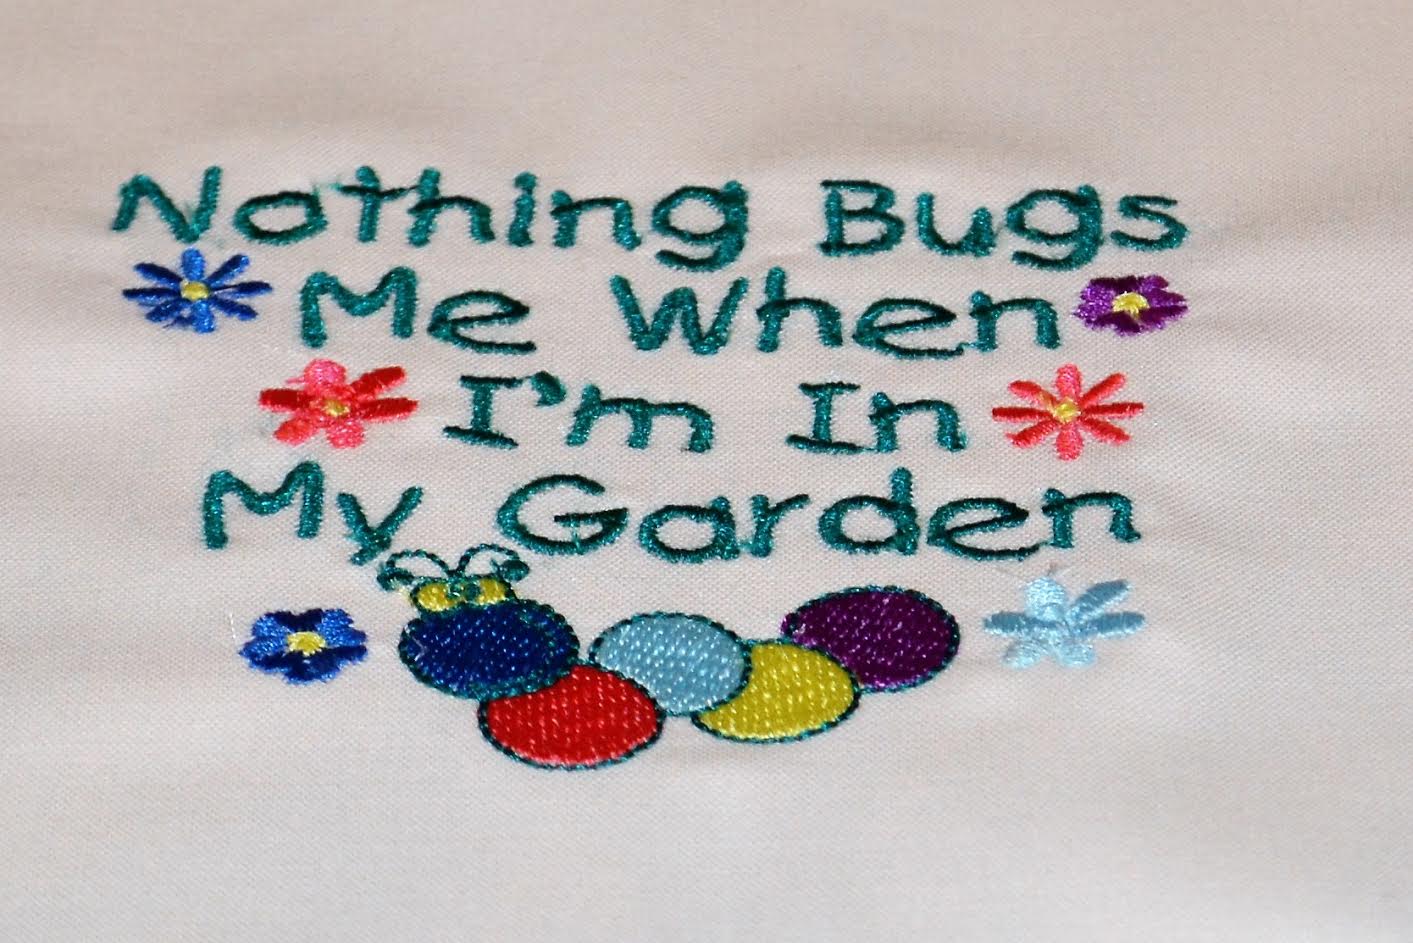
 3. Stitch out the word/saying – Nothing Bugs Me When I’m in My Garden. Always clip jump threads as you go.
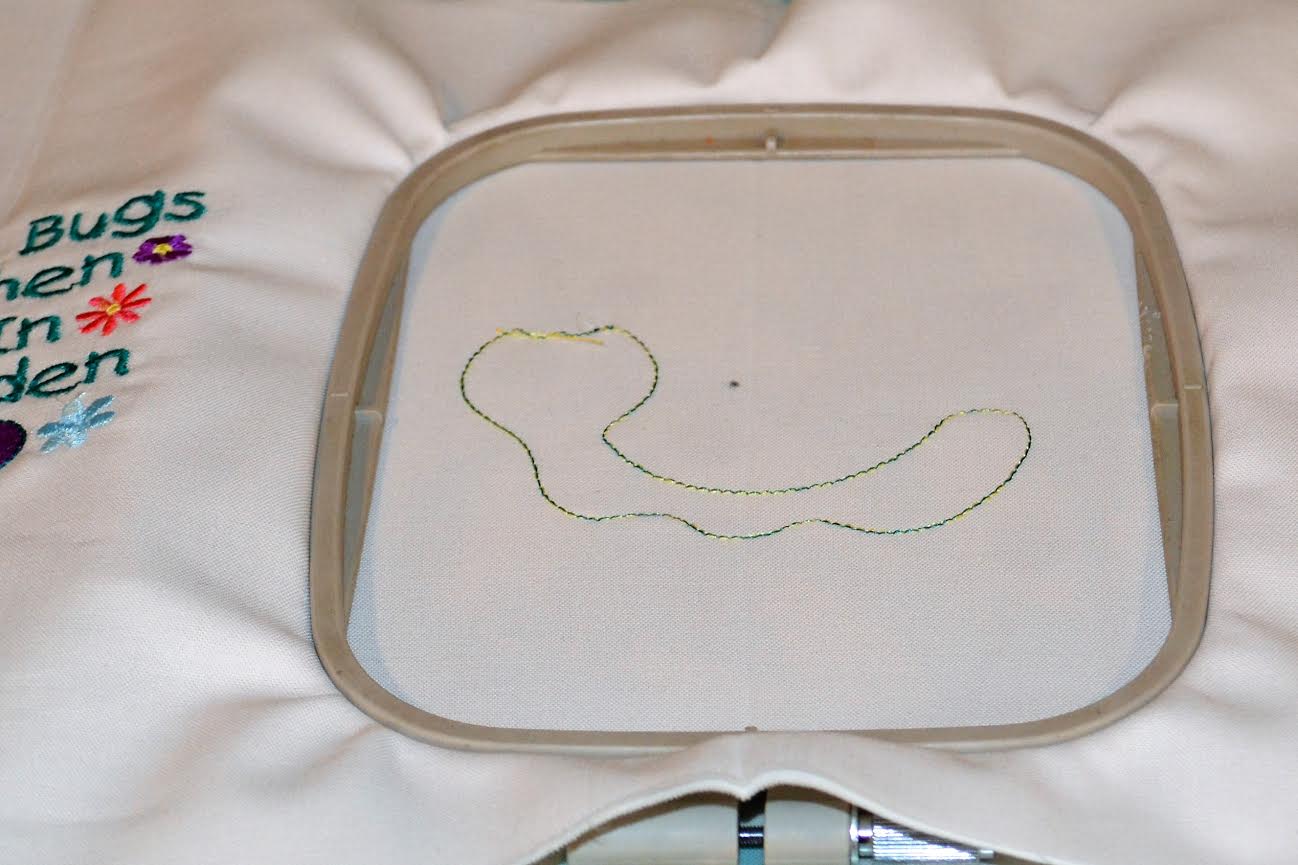
 4. Remove hoop from machine and fabric from hoop. Press. Fold in right outer edge to mark center and press. Mark with a pencil. Re-hoop fabric and stitch out first snail applique design.
5. Place the hoop onto the machine and stitch out the embroidery design outline.
4. Remove hoop from machine and fabric from hoop. Press. Fold in right outer edge to mark center and press. Mark with a pencil. Re-hoop fabric and stitch out first snail applique design.
5. Place the hoop onto the machine and stitch out the embroidery design outline.
 6. Remove hoop from machine. Cut a fabric scrap slightly larger than the outline stitch. Spray starch the right side of fabric scrap and press. Spray the wrong side of fabric scrap with temporary spray adhesive. Center and finger press fabric onto the outline stitching.
 TIPS: Cover ironing board when using spray starch and fabric adhesive to prevent over spray.
Temporary fabric adhesive often leaves behind a residue on the needle. It may be necessary to clean your embroidery machine needle as you go.
7. Replace the hoop onto the machine and embroider tacking stitches. Remove hoop from the machine and carefully trim around the outline. Place hoop back onto machine and finish embroidering the rest of the design.
TIPS: Cover ironing board when using spray starch and fabric adhesive to prevent over spray.
Temporary fabric adhesive often leaves behind a residue on the needle. It may be necessary to clean your embroidery machine needle as you go.
7. Replace the hoop onto the machine and embroider tacking stitches. Remove hoop from the machine and carefully trim around the outline. Place hoop back onto machine and finish embroidering the rest of the design.
 8. Remove hoop from machine and fabric from hoop. Press. Fold in left outer edge and press to mark center. Mark with a pencil. Re-hoop fabric and stitch out the mirror image of the snail applique design, following same steps as outlined above. (See photo of apron for design placement) Press. Trim pocket/pouch to measure 8"x18½".
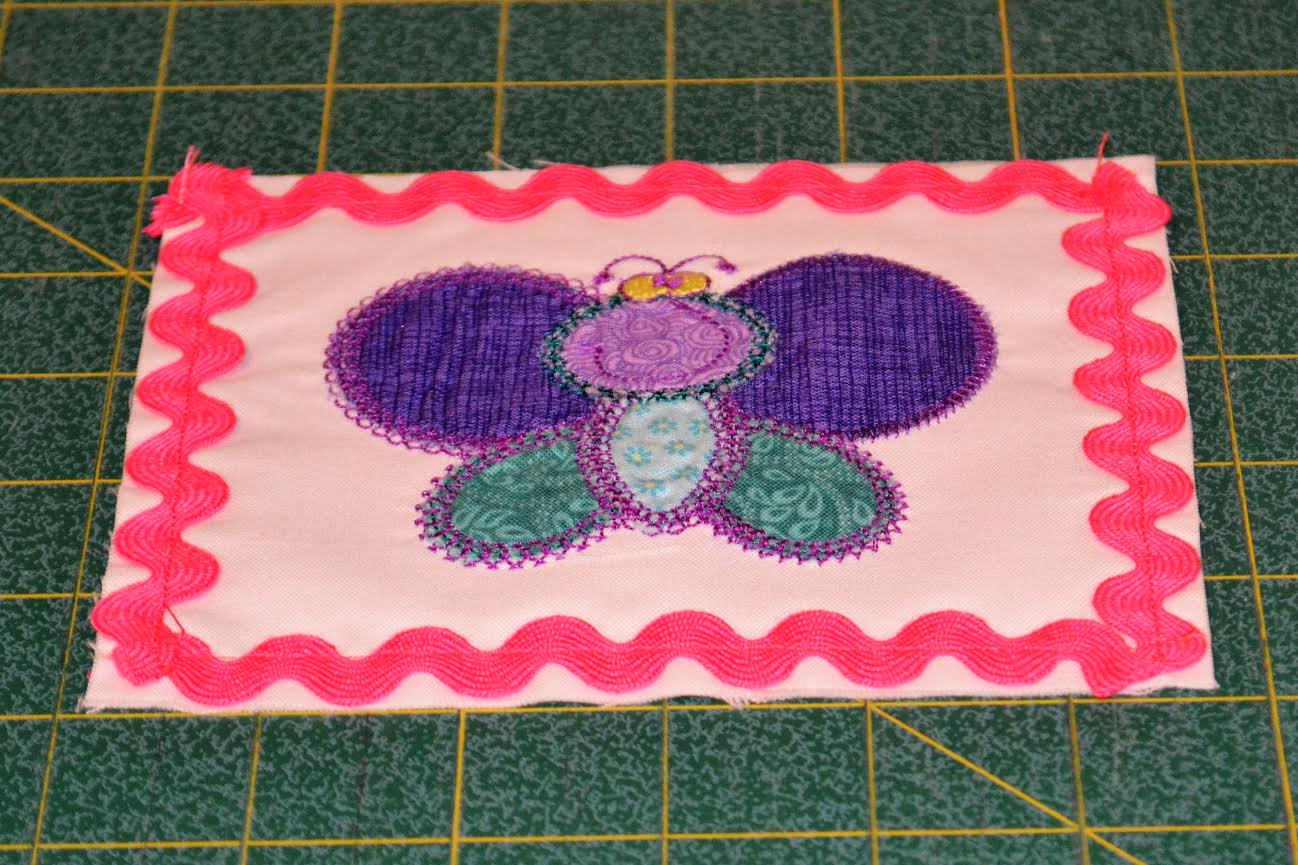
9. Hoop both pieces of white fabric measuring 8"x10". Stitch out butterfly (upper) embroidery design in the same manner as instructions outlined above. Press. Trim butterfly block to measure 5½" (length) x 6" (wide). Set aside.
8. Remove hoop from machine and fabric from hoop. Press. Fold in left outer edge and press to mark center. Mark with a pencil. Re-hoop fabric and stitch out the mirror image of the snail applique design, following same steps as outlined above. (See photo of apron for design placement) Press. Trim pocket/pouch to measure 8"x18½".
9. Hoop both pieces of white fabric measuring 8"x10". Stitch out butterfly (upper) embroidery design in the same manner as instructions outlined above. Press. Trim butterfly block to measure 5½" (length) x 6" (wide). Set aside.
 11. Stitch pink rickrack along bottom edge of pocket/pouch. Cut 48" of purple strapping. Trim each end of strapping on the diagonal to prevent fraying. Center and pin purple strap to top of pocket/pouch. Stitch.
 12. Stitch rickrack in place around perimeter of butterfly design.
 14. Fold over fat quarter in half lengthwise.
 15. Draw armholes on wrong side of laminate with permanent fabric marker. Trace using diagram #1. Cut. Open.
16. Cut purple apron lining in same shape as apron front. Set aside.
17. Position butterfly embroidery applique design in place. Stitch.
18. Mark a straight line with a pencil 3½" from bottom edge of apron front. Position pocket/pouch on the straight line and stitch along bottom edge only. Carefully trim pocket/pouch to even on both sides of the apron. Be mindful not to cut through the purple waist strapping.
15. Draw armholes on wrong side of laminate with permanent fabric marker. Trace using diagram #1. Cut. Open.
16. Cut purple apron lining in same shape as apron front. Set aside.
17. Position butterfly embroidery applique design in place. Stitch.
18. Mark a straight line with a pencil 3½" from bottom edge of apron front. Position pocket/pouch on the straight line and stitch along bottom edge only. Carefully trim pocket/pouch to even on both sides of the apron. Be mindful not to cut through the purple waist strapping.
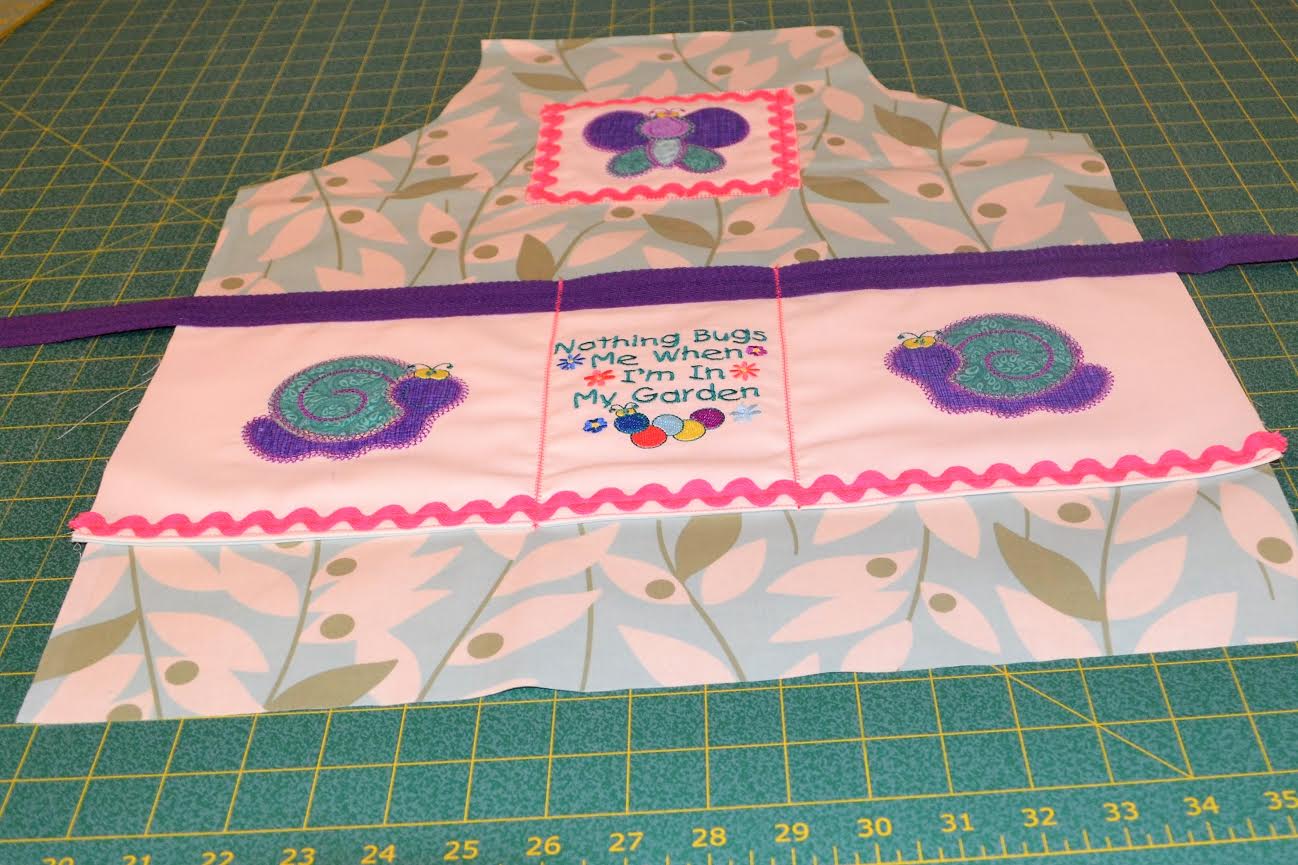 19. Mark pencil lines on pocket/pouch either side of the embroidered saying. Stitch down both pencil lines to make three pockets.
20. Fold in both ends of purple strapping and temporarily pin to the center of the apron top.
21. Right sides together, match purple apron lining with apron top. Pin to secure. Mark both the top and bottom of purple strapping on both sides of the apron top with pins. Stitch around perimeter of the apron leaving the top seam open and stopping at side pins to leave opening for purple strapping.
22. Turn apron right side out being mindful to carefully pull out bottom apron corners.
23. Undo pins holding purple straps in place.
24. Fold in fabric edges around strapping on both sides of the apron top and stitch to secure.
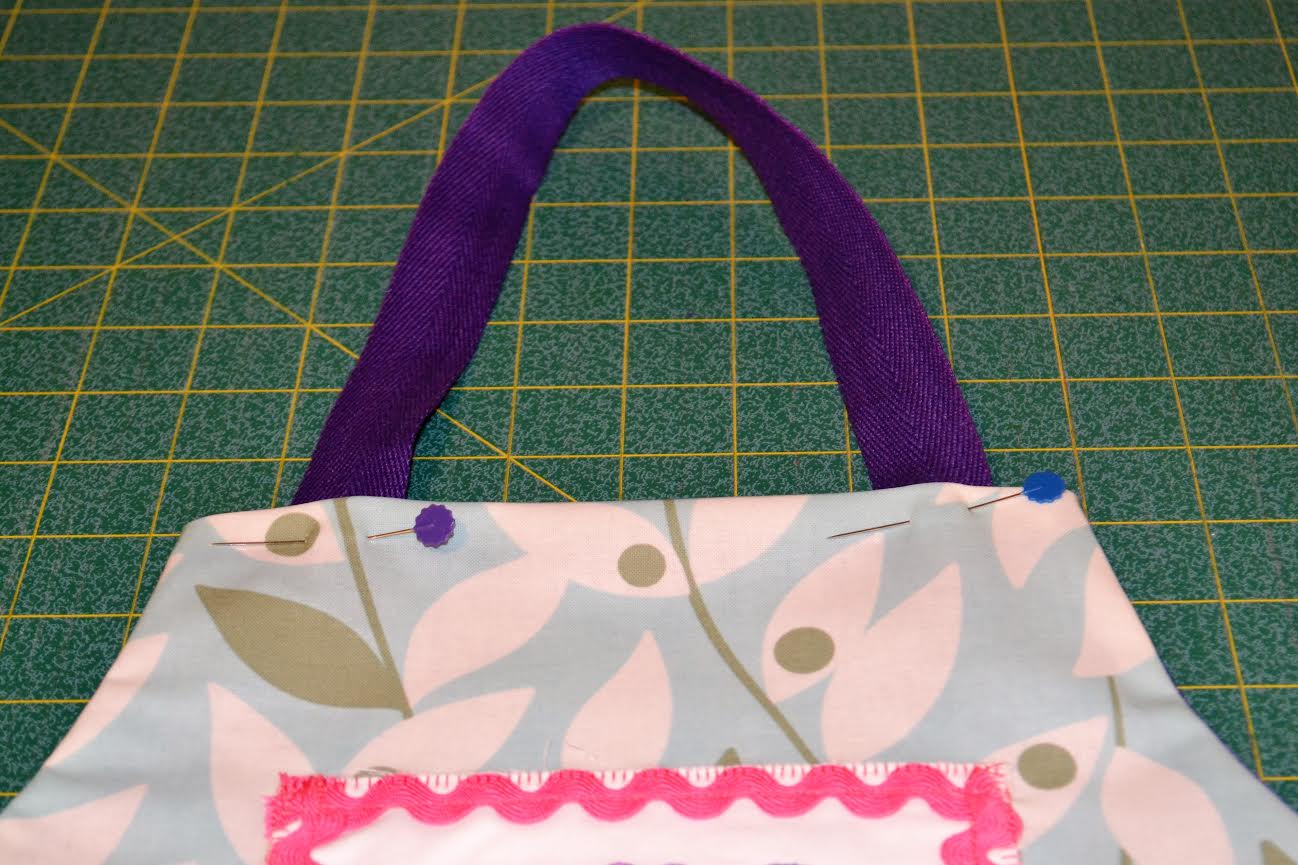
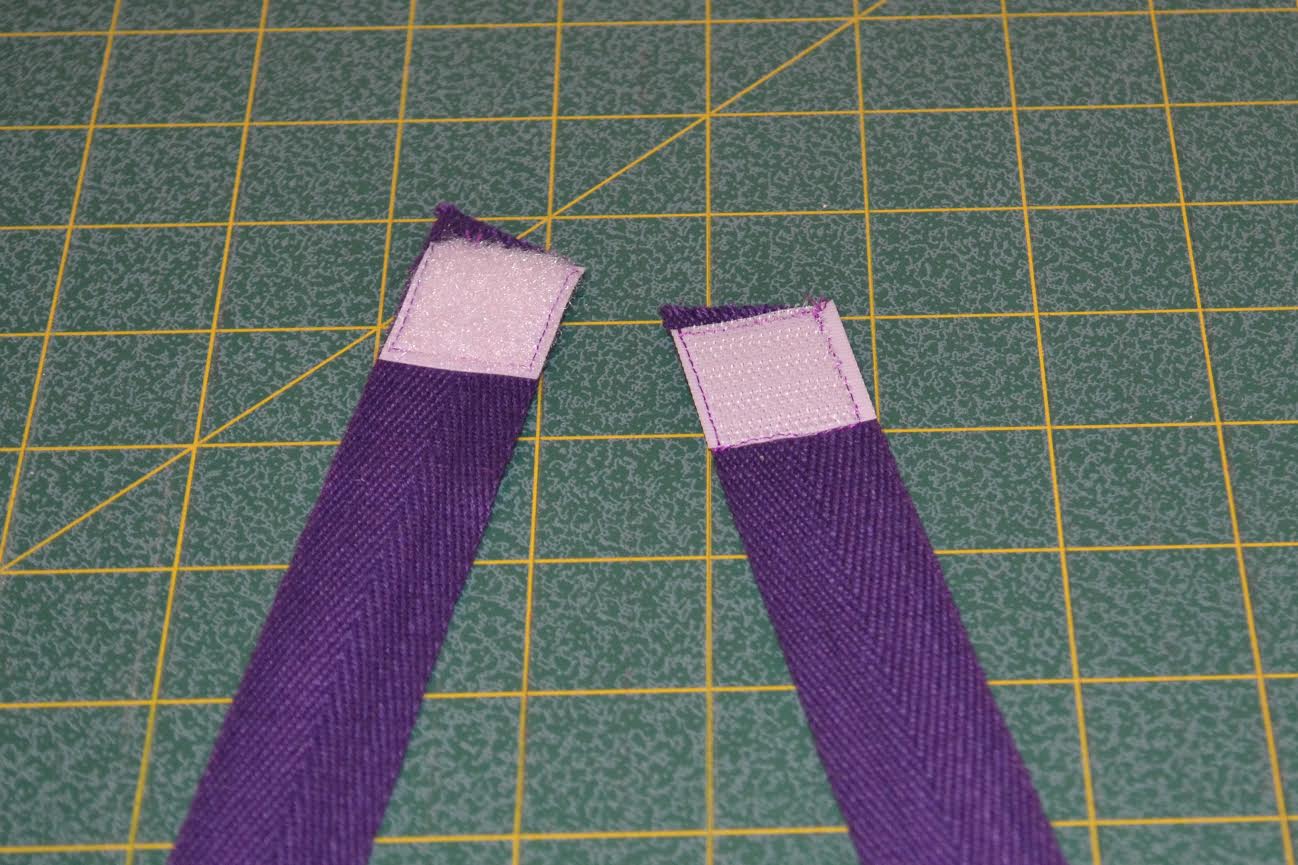
25. Insert neck strap into upper opening, fold under seams and pin as per photo. Stitch opening closed encasing the neck strap. *Optional – You can snip the neck strap in two and use Velcro to re-fasten or a D-ring as an adjustable option, for a tighter fit.
19. Mark pencil lines on pocket/pouch either side of the embroidered saying. Stitch down both pencil lines to make three pockets.
20. Fold in both ends of purple strapping and temporarily pin to the center of the apron top.
21. Right sides together, match purple apron lining with apron top. Pin to secure. Mark both the top and bottom of purple strapping on both sides of the apron top with pins. Stitch around perimeter of the apron leaving the top seam open and stopping at side pins to leave opening for purple strapping.
22. Turn apron right side out being mindful to carefully pull out bottom apron corners.
23. Undo pins holding purple straps in place.
24. Fold in fabric edges around strapping on both sides of the apron top and stitch to secure.
25. Insert neck strap into upper opening, fold under seams and pin as per photo. Stitch opening closed encasing the neck strap. *Optional – You can snip the neck strap in two and use Velcro to re-fasten or a D-ring as an adjustable option, for a tighter fit.
 Yippee! You are all done. Thanks so very much for following along with me on this pattern. Please email me at km.hanson@shaw.ca if you have any questions about the pattern.
Kim Hanson
Yippee! You are all done. Thanks so very much for following along with me on this pattern. Please email me at km.hanson@shaw.ca if you have any questions about the pattern.
Kim Hanson
Welcome everyone. I’m pleased as punch to be back here again with all of you! This time, we are making a summery, sweet and super-easy child’s gardening apron, embroidered with Designs by JuJu’s Bugalicious design set . They are just perfect for this project! This apron is made using laminate for a clean and easy “wipe down” after use, and can be made over the weekend. Why not get started? Your five-year old will love it!
Please be sure and read through all the instructions prior to commencing. (If you have never worked with laminate before, please note the special instructions at the end of the pattern).
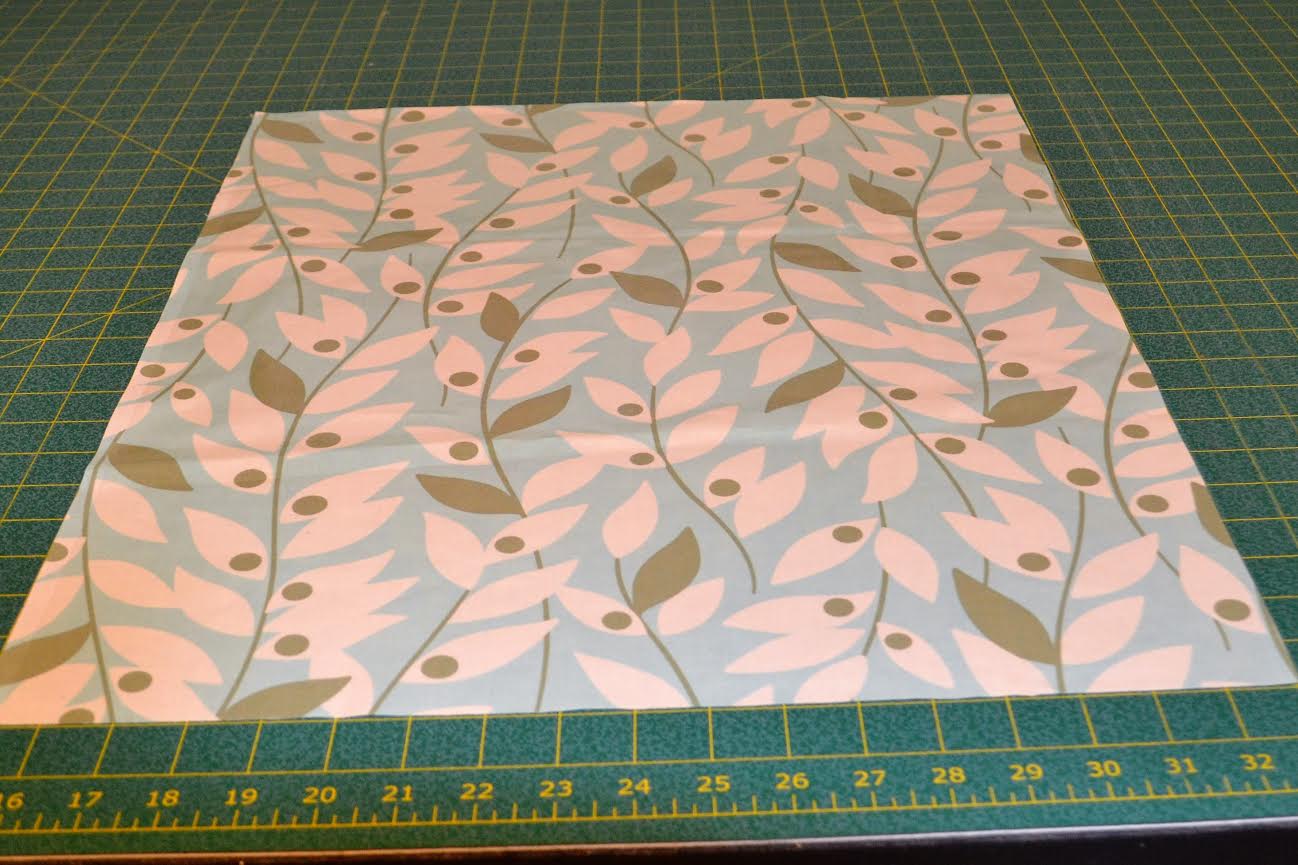
Shopping List: Designs by JuJu DBJJ531 – Bugalicious Applique White for embroidery and pocket pouch ½ yard Cut into one piece 10"x44" for pocket pouch and two pieces 8"x10" for upper design Lining for pocket/pouch - teal 8"x18½" Laminate for apron front (18"x22") Fat Quarter Lining for apron back – purple Fat Quarter Scraps for embroidered appliques Strapping for waist and neck ties 66" Cut 48" for waist and 18" for neck Small Pink rickrack 41" Velcro or D-ring Embroidery thread, embroidery bobbin thread, embroidery needles, embroidery scissors Pencil, omnigrid ruler, rotary cutter Spray starch and Temporary Spray Fabric Adhesive Permanent fabric marker *I use Brother Embroidery thread for all my projects
MACHINE EMBROIDERY:
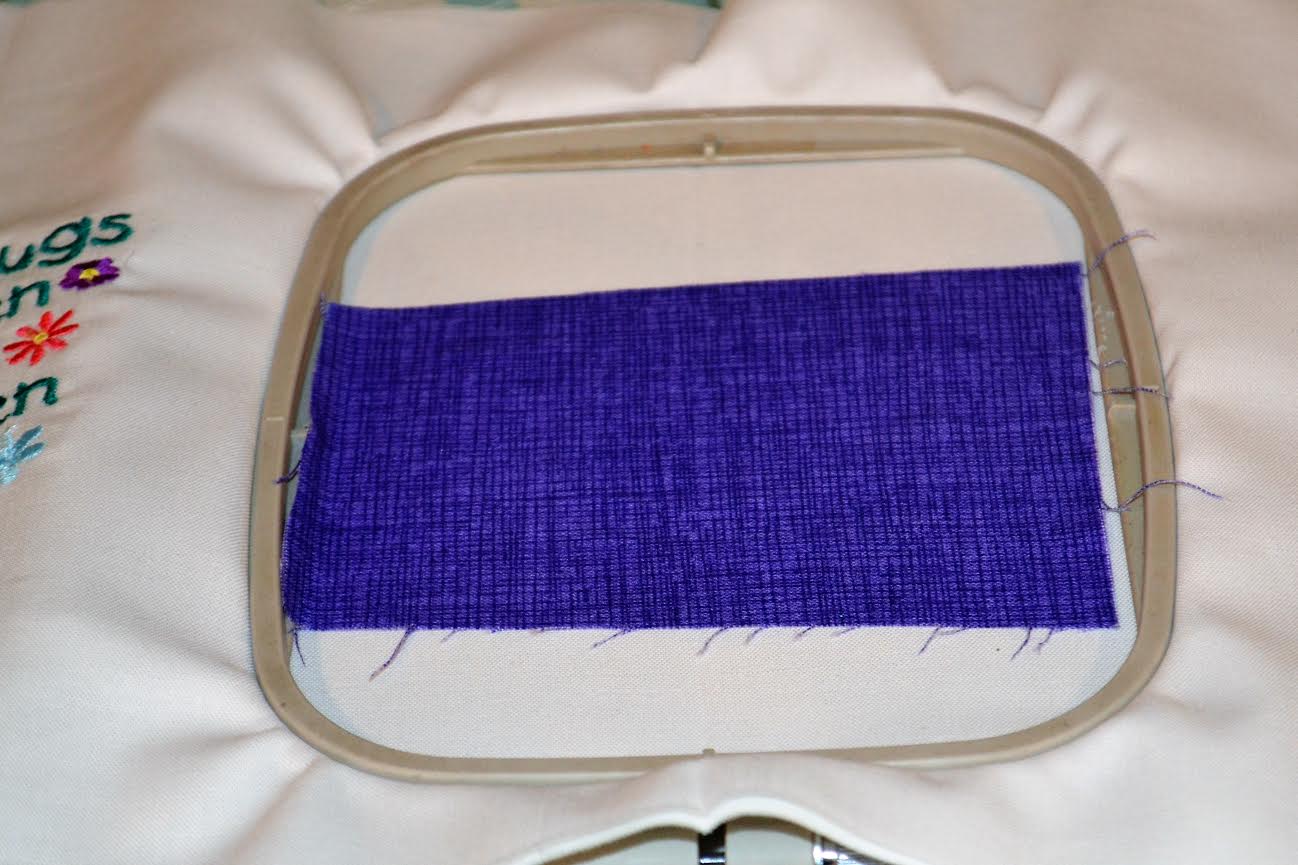
1. Download three Bugalicious designs (as per the photo of the apron front, or choose your own) all in the small, 4"x 4" size. Beginning with the word/saying embroidery design, load it into the machine. 2. Fold 10"x44" piece of white fabric in half to measure 10"x22"and press to mark the middle. Trim 1/8" from right edge. Mark center with a pencil. Medium hoop white fabric and place the hoop onto the machine. Note: I didn’t use stabilizer for this project, but instead used a double fold of fabric to strengthen the front pouch/pocket even more.
3. Stitch out the word/saying – Nothing Bugs Me When I’m in My Garden. Always clip jump threads as you go.
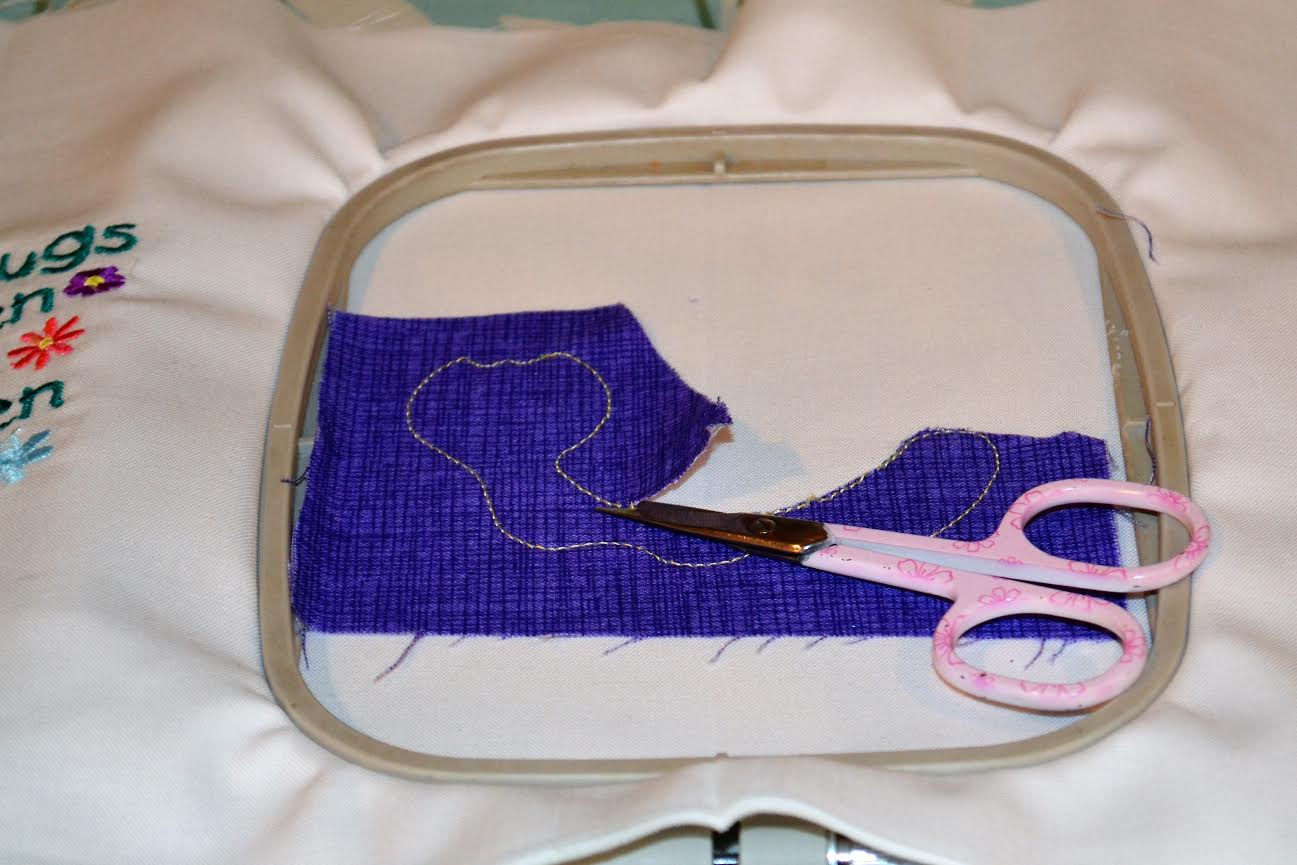
4. Remove hoop from machine and fabric from hoop. Press. Fold in right outer edge to mark center and press. Mark with a pencil. Re-hoop fabric and stitch out first snail applique design.
5. Place the hoop onto the machine and stitch out the embroidery design outline.
6. Remove hoop from machine. Cut a fabric scrap slightly larger than the outline stitch. Spray starch the right side of fabric scrap and press. Spray the wrong side of fabric scrap with temporary spray adhesive. Center and finger press fabric onto the outline stitching.
TIPS: Cover ironing board when using spray starch and fabric adhesive to prevent over spray.
Temporary fabric adhesive often leaves behind a residue on the needle. It may be necessary to clean your embroidery machine needle as you go.
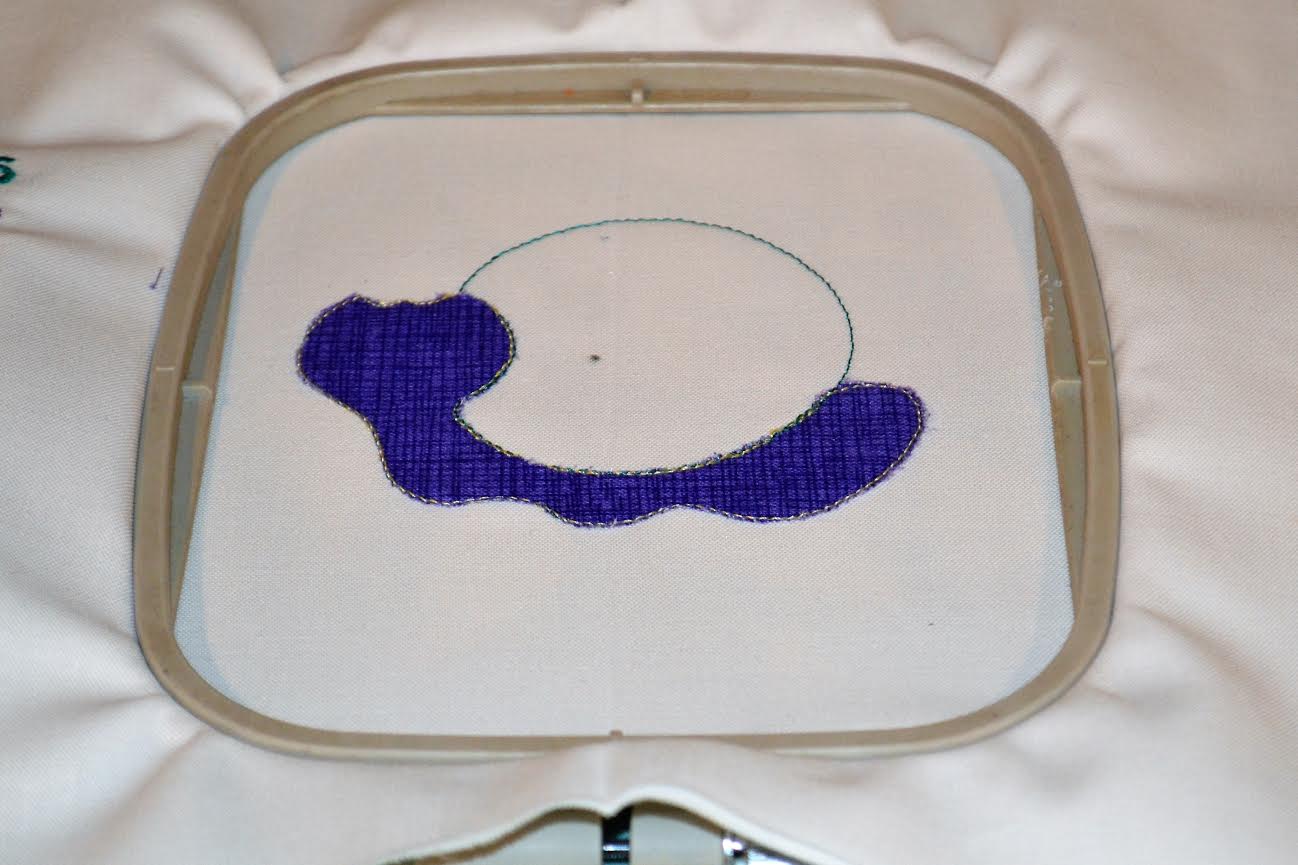
7. Replace the hoop onto the machine and embroider tacking stitches. Remove hoop from the machine and carefully trim around the outline. Place hoop back onto machine and finish embroidering the rest of the design.
8. Remove hoop from machine and fabric from hoop. Press. Fold in left outer edge and press to mark center. Mark with a pencil. Re-hoop fabric and stitch out the mirror image of the snail applique design, following same steps as outlined above. (See photo of apron for design placement) Press. Trim pocket/pouch to measure 8"x18½".
9. Hoop both pieces of white fabric measuring 8"x10". Stitch out butterfly (upper) embroidery design in the same manner as instructions outlined above. Press. Trim butterfly block to measure 5½" (length) x 6" (wide). Set aside.
CONSTRUCTION
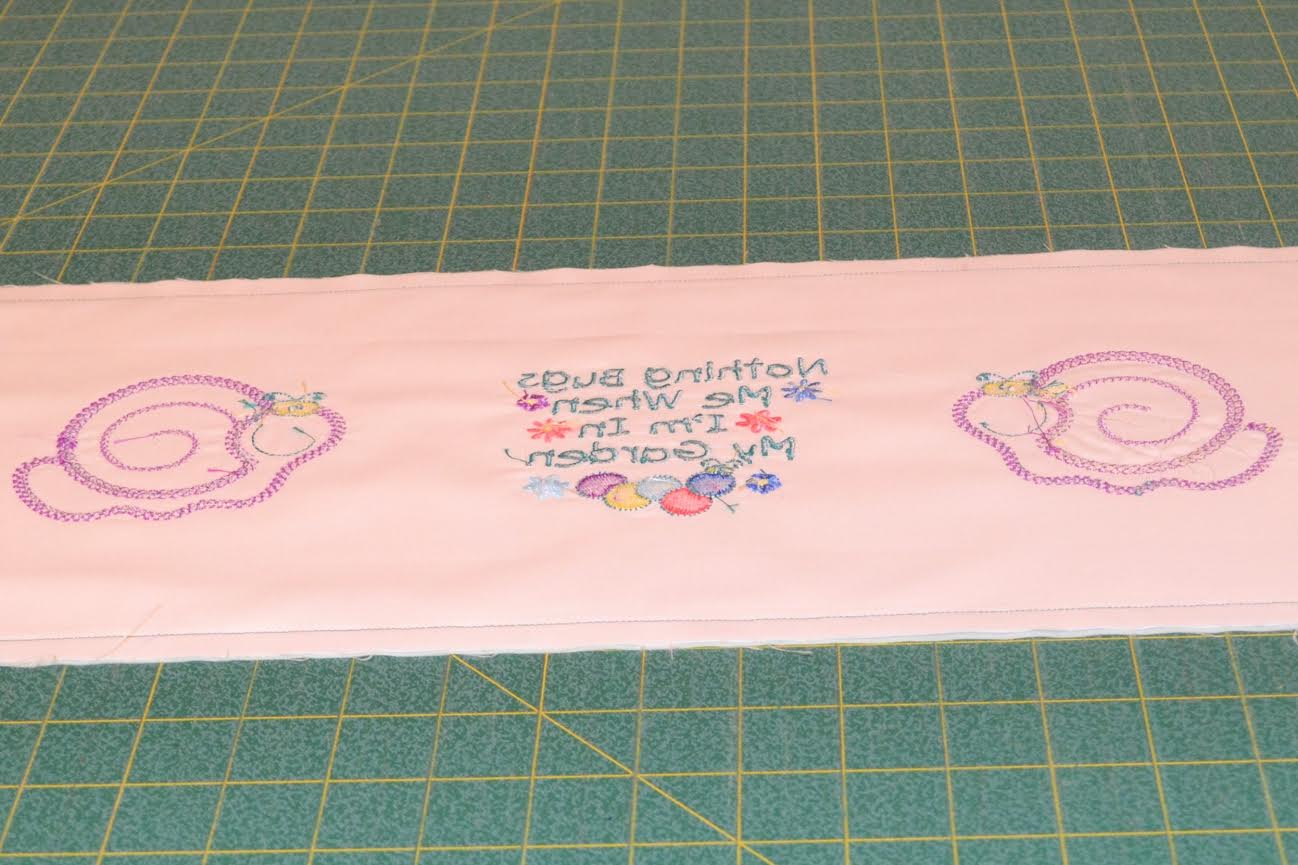
10. Right sides together match pocket/pouch with teal lining. Stitch bottom and top ¼" from edges. Leave sides open. Turn pocket/pouch right side out, and pull out the corners. Press.
11. Stitch pink rickrack along bottom edge of pocket/pouch. Cut 48" of purple strapping. Trim each end of strapping on the diagonal to prevent fraying. Center and pin purple strap to top of pocket/pouch. Stitch.
12. Stitch rickrack in place around perimeter of butterfly design.
LAMINATE – APRON FRONT
13. Press laminate fat quarter on back of fabric. Do not press on the laminate front! Your iron will stick to the fabric and it will be ruined. Lay out the fat quarter wrong side down on a flat surface.
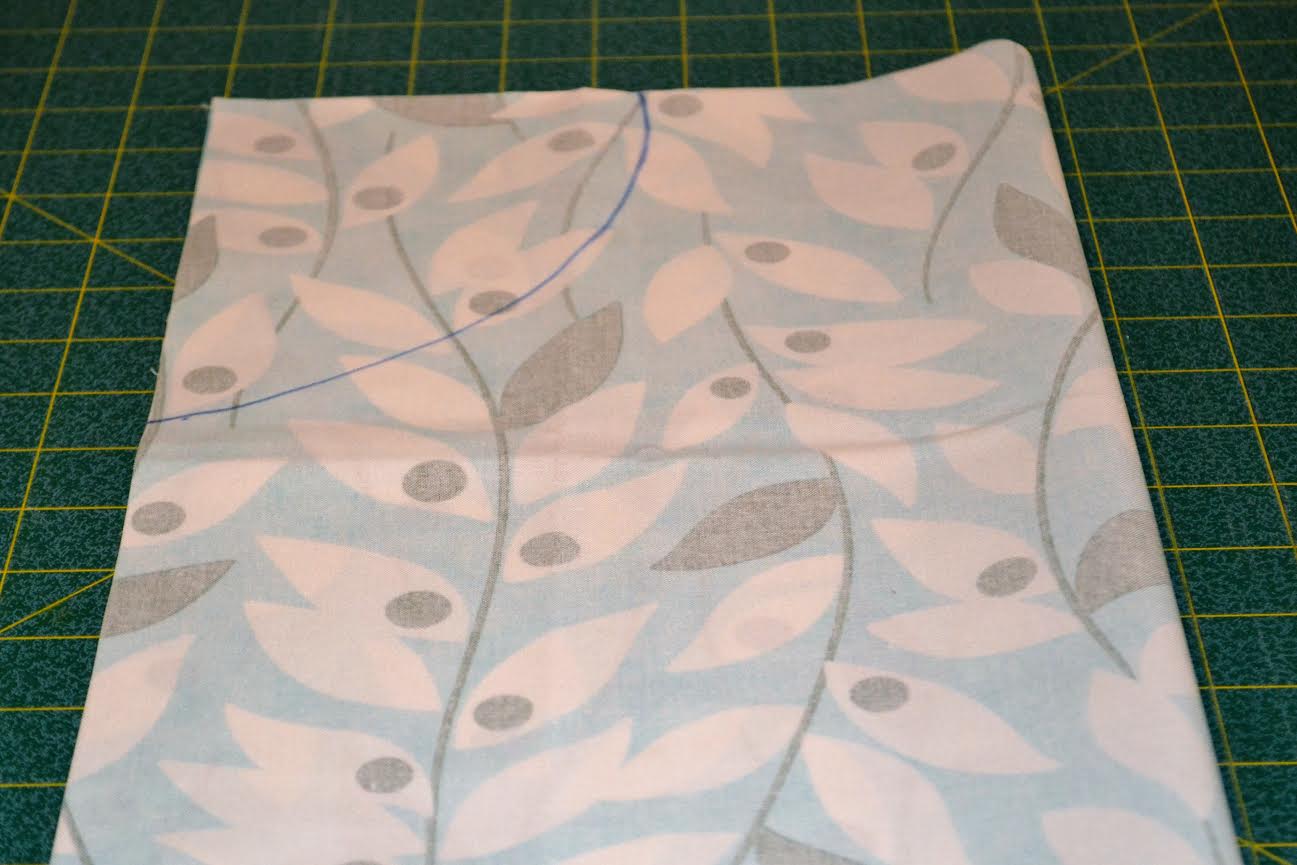
14. Fold over fat quarter in half lengthwise.
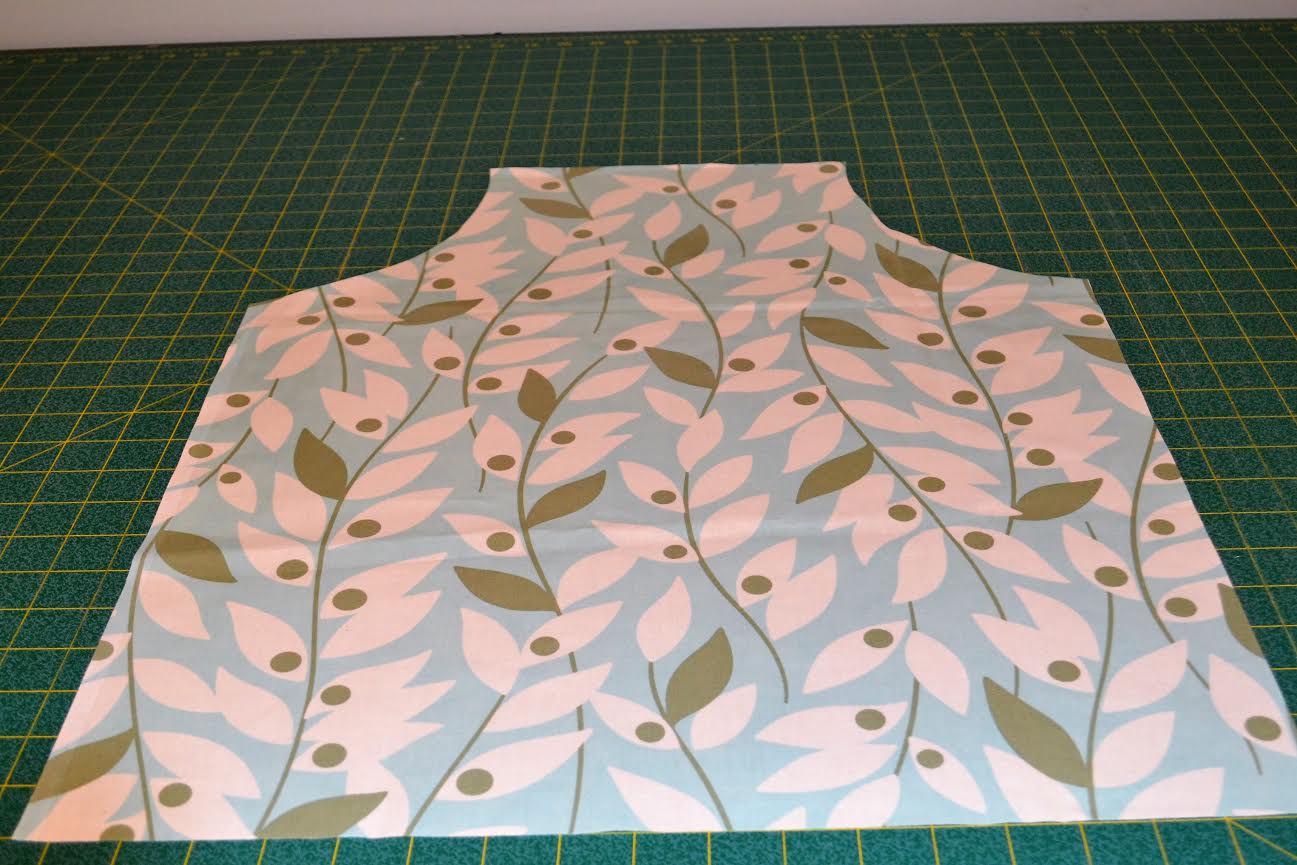
15. Draw armholes on wrong side of laminate with permanent fabric marker. Trace using diagram #1. Cut. Open.
16. Cut purple apron lining in same shape as apron front. Set aside.
17. Position butterfly embroidery applique design in place. Stitch.
18. Mark a straight line with a pencil 3½" from bottom edge of apron front. Position pocket/pouch on the straight line and stitch along bottom edge only. Carefully trim pocket/pouch to even on both sides of the apron. Be mindful not to cut through the purple waist strapping.
19. Mark pencil lines on pocket/pouch either side of the embroidered saying. Stitch down both pencil lines to make three pockets.
20. Fold in both ends of purple strapping and temporarily pin to the center of the apron top.
21. Right sides together, match purple apron lining with apron top. Pin to secure. Mark both the top and bottom of purple strapping on both sides of the apron top with pins. Stitch around perimeter of the apron leaving the top seam open and stopping at side pins to leave opening for purple strapping.
22. Turn apron right side out being mindful to carefully pull out bottom apron corners.
23. Undo pins holding purple straps in place.
24. Fold in fabric edges around strapping on both sides of the apron top and stitch to secure.
25. Insert neck strap into upper opening, fold under seams and pin as per photo. Stitch opening closed encasing the neck strap. *Optional – You can snip the neck strap in two and use Velcro to re-fasten or a D-ring as an adjustable option, for a tighter fit.
Yippee! You are all done. Thanks so very much for following along with me on this pattern. Please email me at km.hanson@shaw.ca if you have any questions about the pattern.
Kim Hanson