Toggle Nav
 Inspire.
Create.
Stitch.
Inspire.
Create.
Stitch.
Search
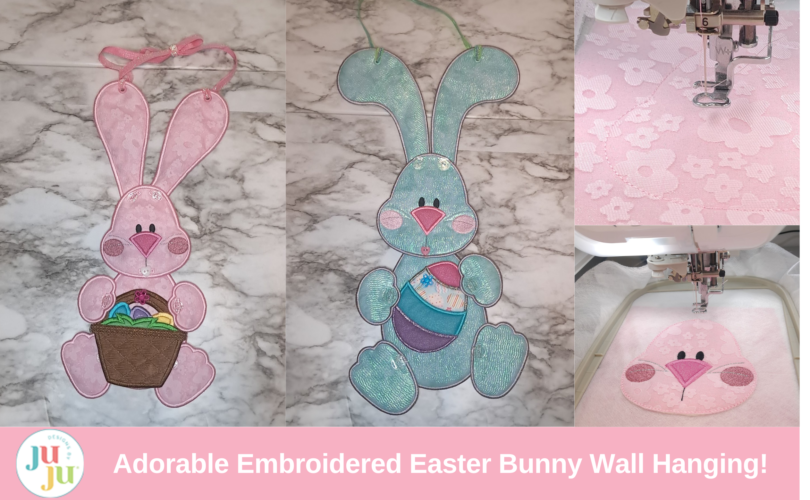
In today’s blog post, we are going to be making the ITH Easter Bunny Wall Hanging from Designs by JuJu. This adorable bunny is sure to brighten up any room and add something egg-stra special to your Easter and spring decor this season. We will also take a peek at some of the other fun holiday wall hangings available from DBJJ and how you can easily take these cuties to the next level with some unique fabric and thread customizations.
So get egg-cited and let’s get stitching!
Check out the DBJJ team’s favorite supplies in the Designs by JuJu Amazon Store.
Each of the character wall hangings follows a similar set of stitch steps. The steps below are applicable to most of the hoopings, but make sure to reference the PDF instructions and color charts for your specific purchase regarding stitch and design details.
For the tutorial below, I am stitching the 5” x 7” bunny head hooping.
Step 1: Hoop two pieces of water-soluble stabilizer. Two pieces are recommended to prevent your project from ripping through during stitching.

Step 2: Run the placement line for the batting.

Step 3: Lay down your batting, making sure to cover the entire placement line, and run the tack-down stitches to secure the batting in place.


Step 4: Remove the hoop from your machine and trim around the tack-down line, making sure not to cut any of the stitches.

Step 5: Run the placement stitch for the applique fabric.
Step 6: Lay your applique fabric over the placement line and run the tack-down stitch.
Note: SF101 is highly recommended for all applique fabrics. It provides added support for the wall hanging and helps to prevent puckering caused by the decorative and satin stitches.

Step 7: Trim away the excess applique fabric, making sure not to cut the tack-down stitches.
Repeat Steps 6 & 7 for any remaining applique pieces.
Step 8: Complete any decorative stitches (reference the color chart for satin and design stitching sequence.)

Step 9: Remove the hoop from your machine and add the backing fabric. I like to apply SF101 to my backing fabric also for added support and durability.
Note: The sequence of this stitch step may be different depending on the hooping/design you are creating. Reference the color chart/PDF for your specific purchase.


Step 10: Run the tack-down line to secure the backing fabric.
Step 11: Remove the hoop from your machine and trim away the backing fabric around the tack-down line.

Step 12: Stitch the remaining satin stitches and button placement lines (if applicable).
Step 13: Remove the design from your hoop. Trim away the excess stabilizer, leaving approximately 1/16” around the outer edges. Be careful not to nick any of the satin stitches.

Step 14: Remove the remaining water-soluble stabilizer using a water-saturated cotton swab.

Step 15: Repeat the above steps for any remaining hoopings (i.e., ears, body, paws, accessories).
Step 16: Lay out all of the pieces for your character wall hanging.
Use a sewing needle and thread to attach buttons where appropriate.

Step 17: Use a seam ripper (or sharp-tipped scissors) to carefully open all buttonholes.

Step 18: Use a hole punch to open the holes at the top of the wall hanging.
Optional: Reinforce the holes with an eyelet. I like the professional look this gives my wall-hanging, as well as the added structure.

Step 19: Assemble the wall hanging and add your ribbon of choosing to the top. There are many ways to tie the ribbon. Choose a style that is suited best with how you plan to display your creation.


Check out this YouTube video for additional tips and tricks for stitching your own character wall hanging.
One of my favorite parts about stitching the wall hangings is the option to add personality through fabric and thread selection. I have explored velvet, embroidery vinyl, tulle, glitter, and more. Each material has stitched great and added a bit of flare to my project. Pair those materials with specialty threads such as variegated, holoshimmer, metallic, and poly-sparkle and you will have a truly magical wall hanging. Get creative and have fun!
There are so many other fabulous character wall hangings available from Designs by JuJu. Once you stitch one, you won’t want to stop!
Not only are the wall hangings beginner friendly, but each design comes in multiple sizes (including 5” x 7”). You are sure to find a size perfect for your style and design space.


I hope you have hopped into some creativity and enjoyed today’s tutorial and video on creating an ITH Easter Bunny Wall Hanging—it's sure to egg-cite your crafty side and make somebunny smile this Easter season!
If you loved this project, you’ll find plenty more just like it in our Home Hub—a curated collection of quick, creative, and practical projects perfect for gifting (or keeping!)
Make sure to join the Designs by JuJu Embroidery Blessings Facebook Group for more inspiration and to share your own creations, or use the hashtag #designsbyjuju anywhere on social media. We can’t wait to see what you make!