Toggle Nav
 Inspire.
Create.
Stitch.
Inspire.
Create.
Stitch.
Search
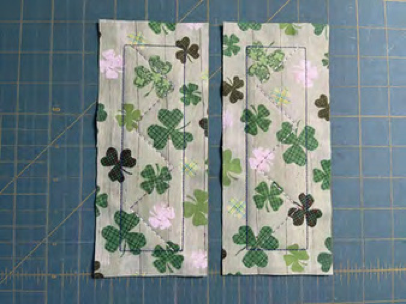
Discover how to craft a beautiful, modular, seasonal table runner with our easy-to-follow instructions, perfect for adding a personal touch to your home decor and impressing your guests with your DIY skills.
Build your own holiday table runner by mixing and matching the different block options of our 3-in-1 Modular Seasonal Table Runner.
TO START:
Check out Embroidery Supplies JuJu Uses for our favorite supplies!
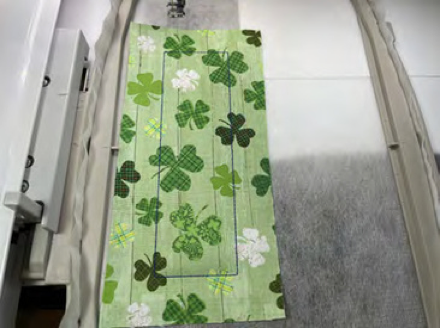
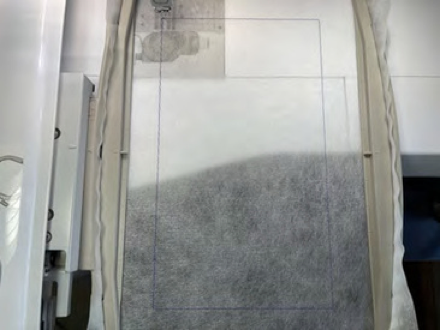
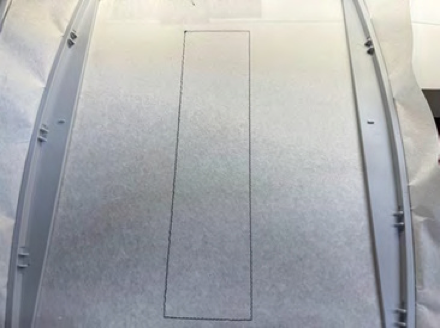
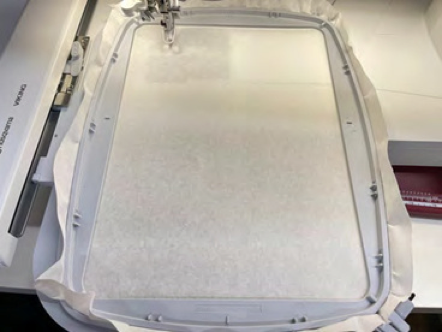
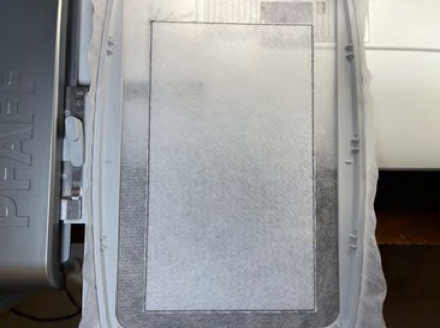
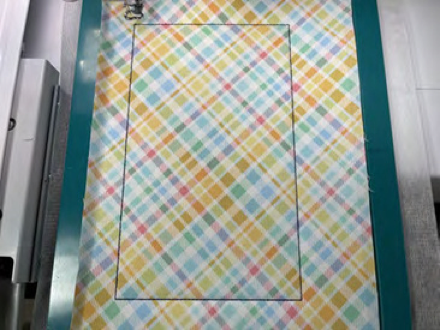
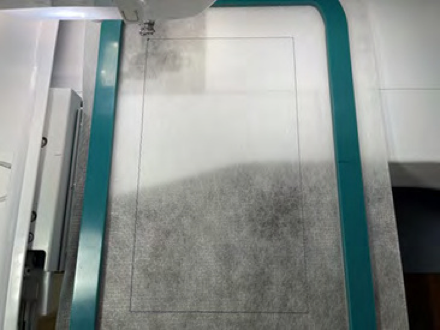
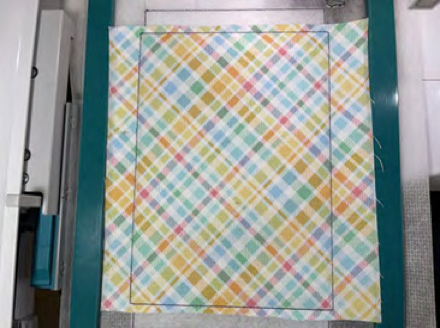
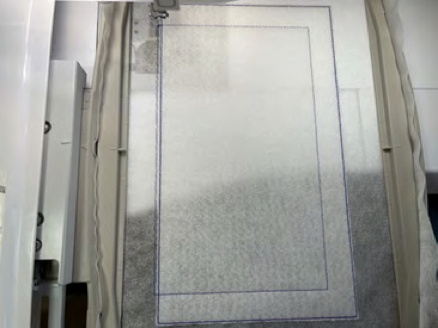
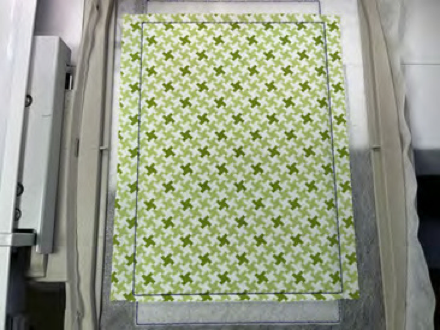
STEP 1: Hoop a piece of stabilizer. Please load design file labeled Border Horizontal Block.
Before starting please double check that you have loaded the correct design size.

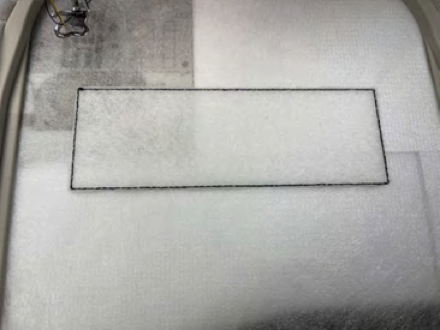
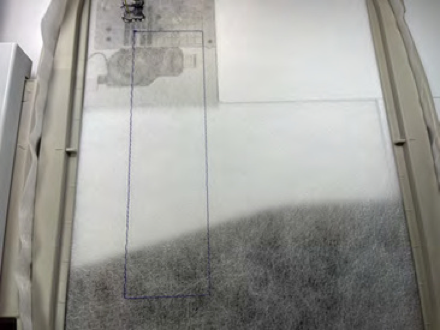
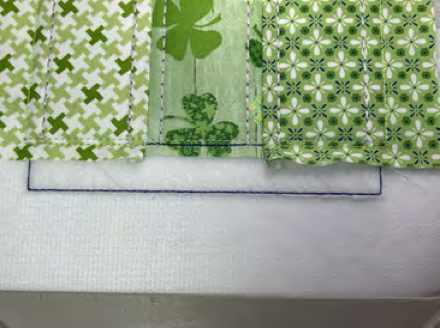
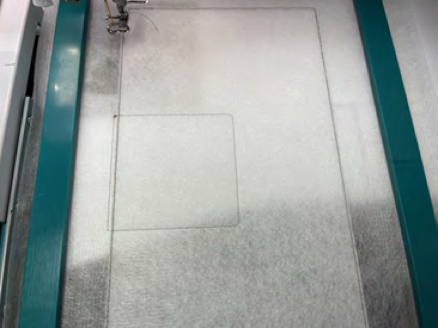
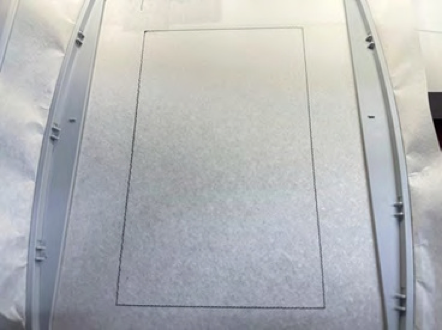
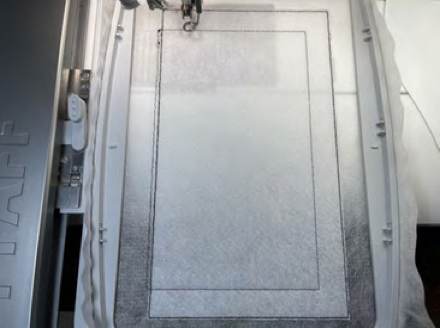
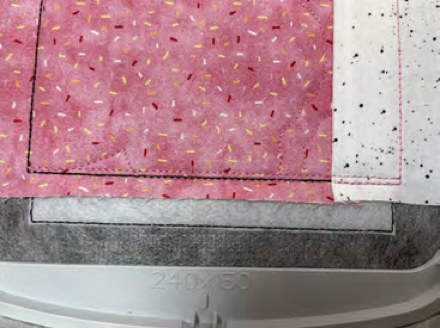
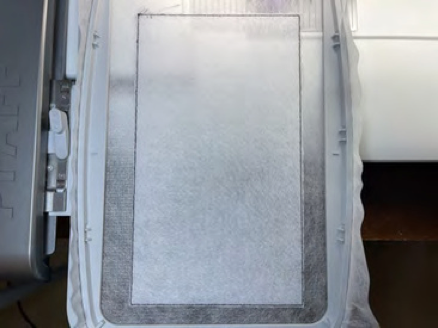
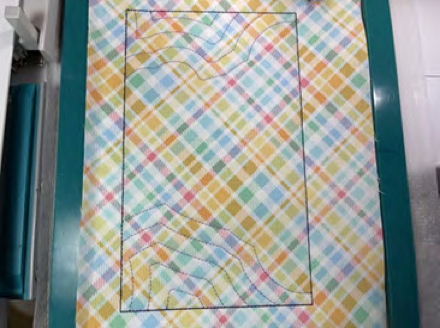
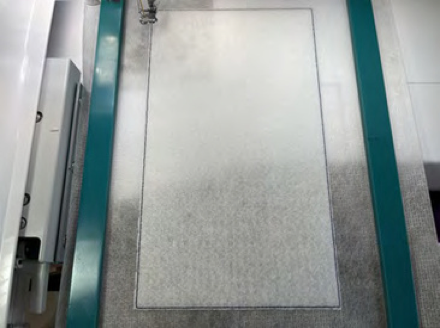
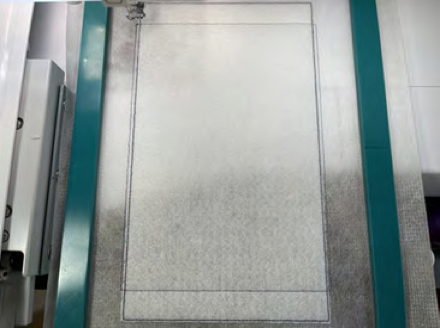
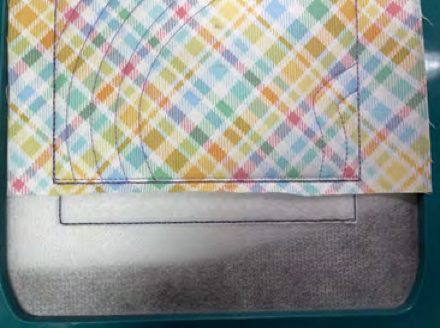
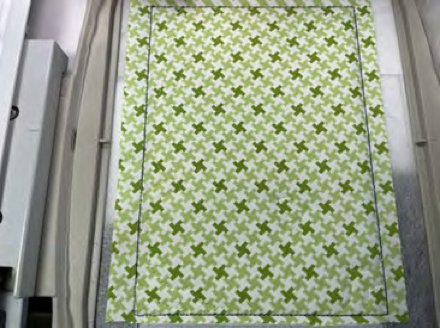
STEP 2: Stitch the placement line for the batting.

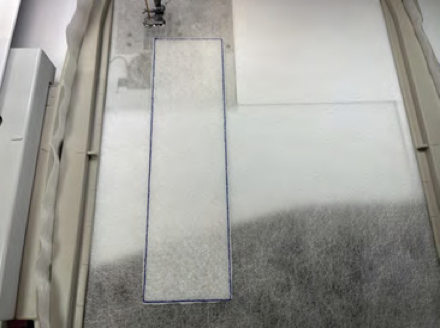
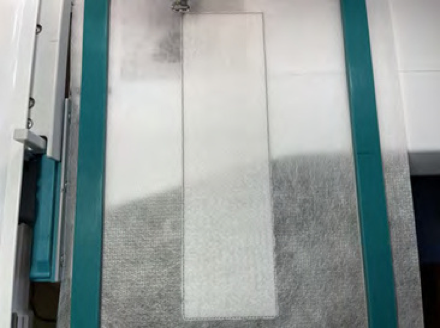
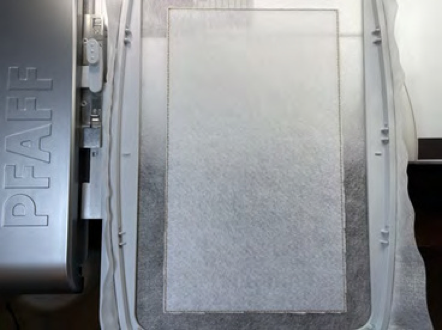
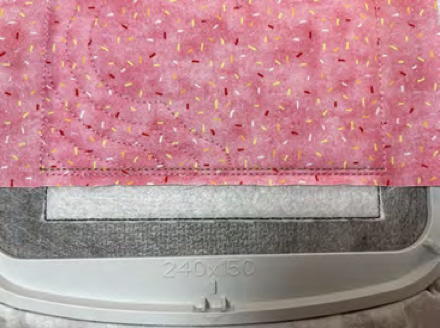
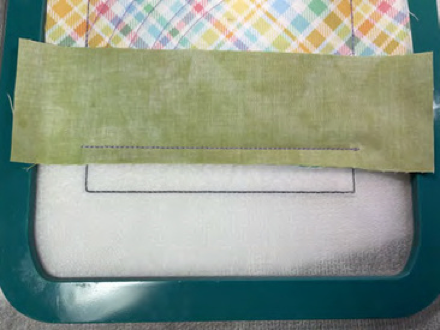
STEP 3: Cover placement line with batting, making sure all sides are completely covered. Stitch tack down line. Trim the batting as shown.
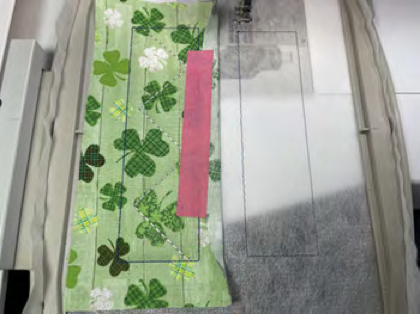
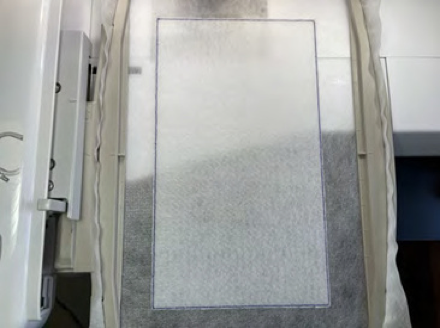
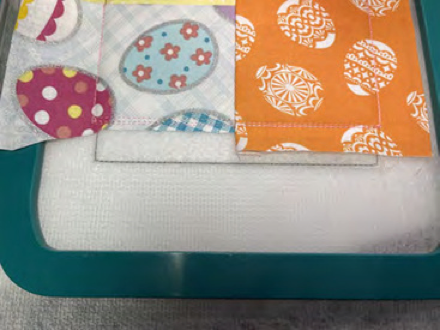
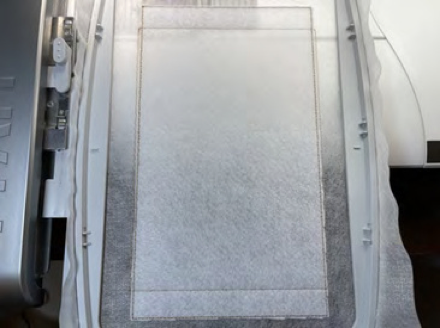
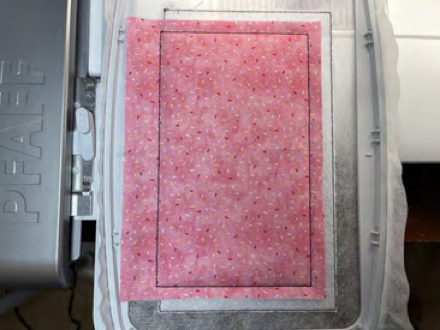
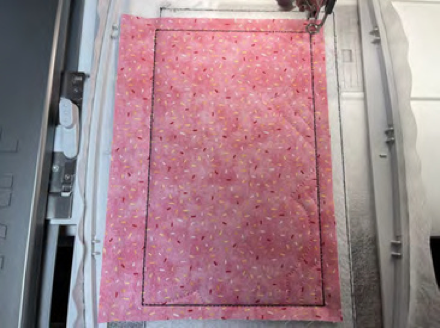
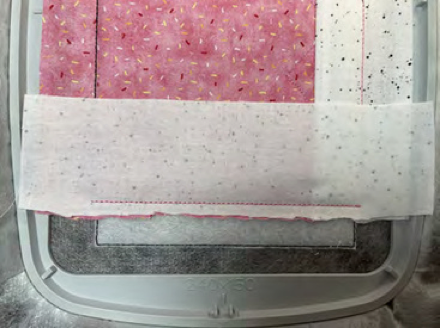
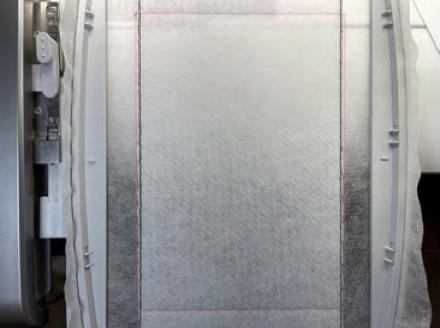
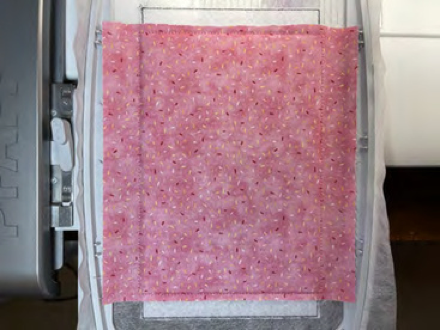
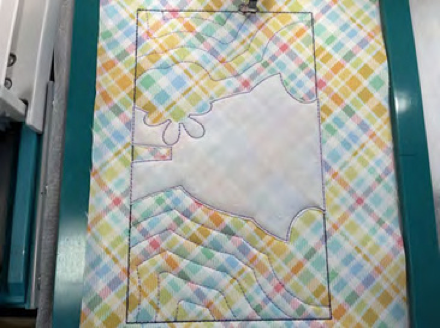
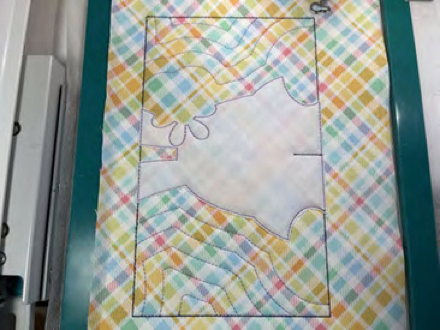
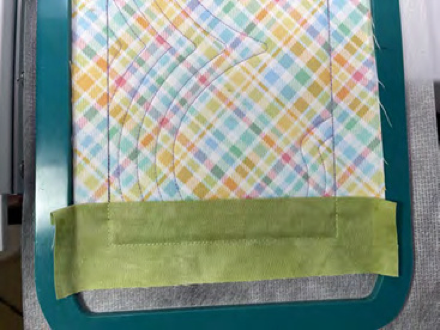
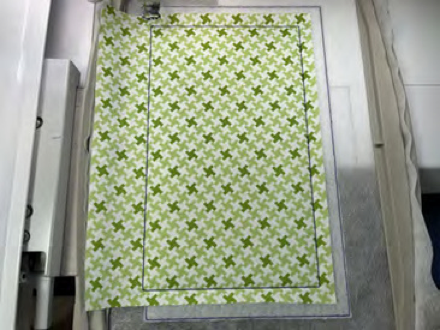
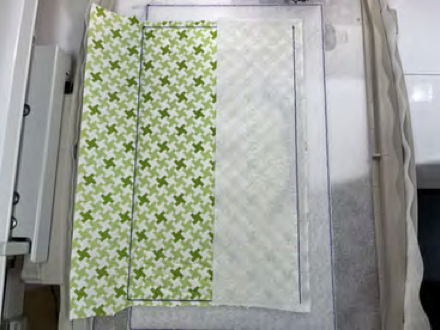
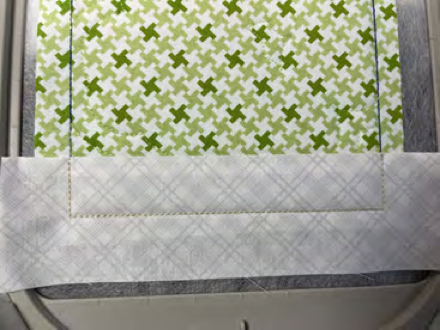
STEP 4: Use the tack down line for the batting as the placement line for the background fabric. Cover placement line with background fabric, making sure all sides are covered. Stitch tack down line.
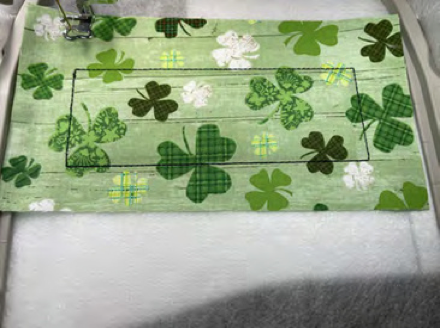
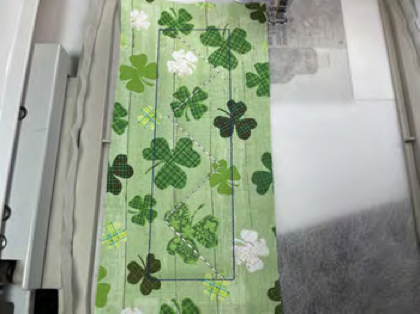
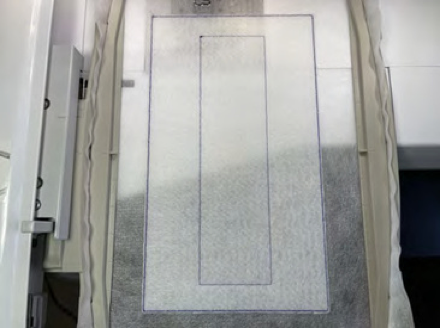
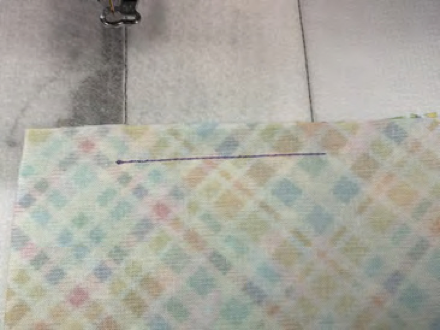
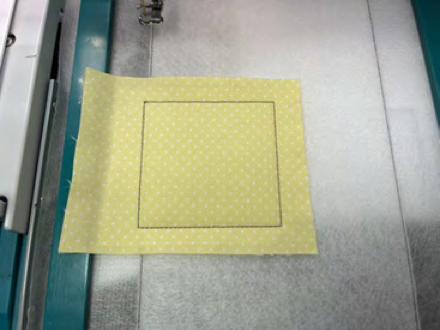
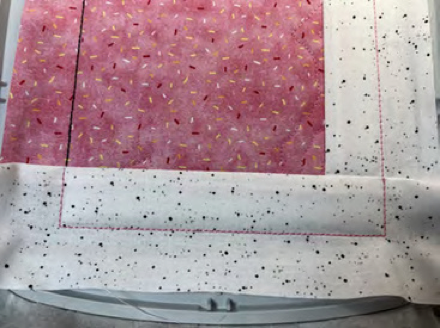
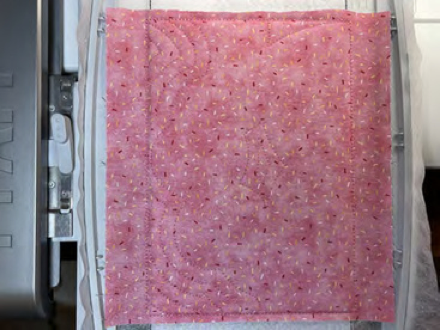
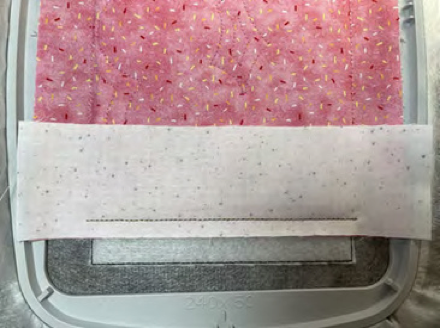
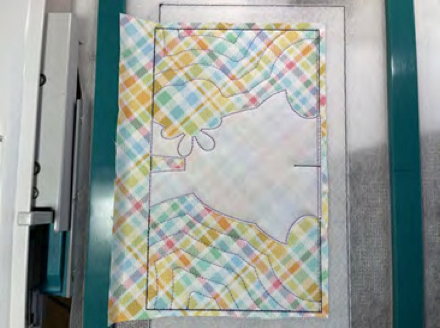
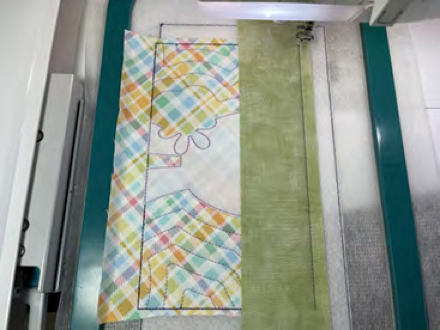
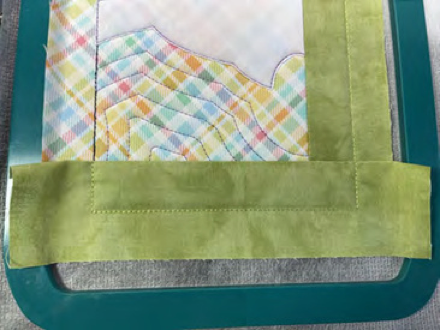
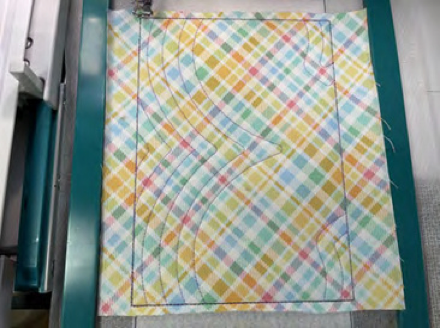
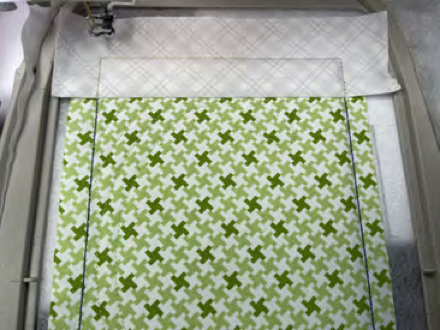
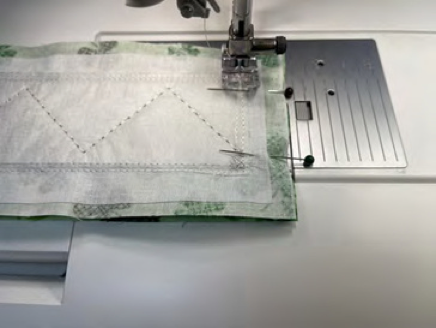
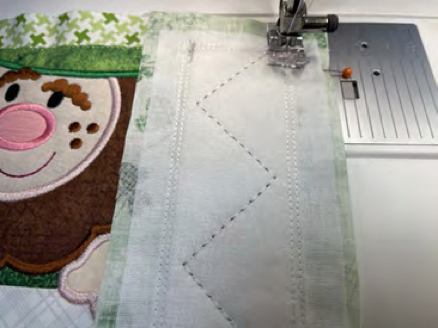
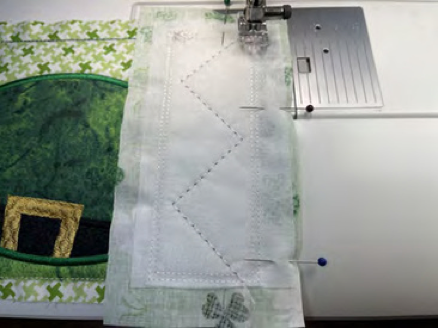
STEP 5: Stitch the zig zag line for this block.
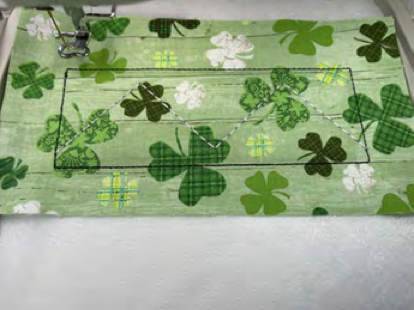
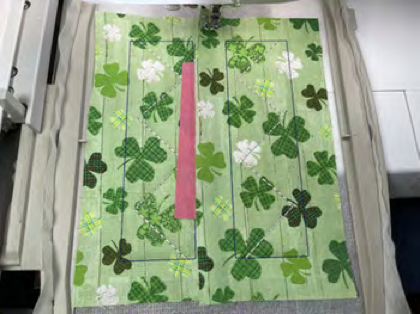
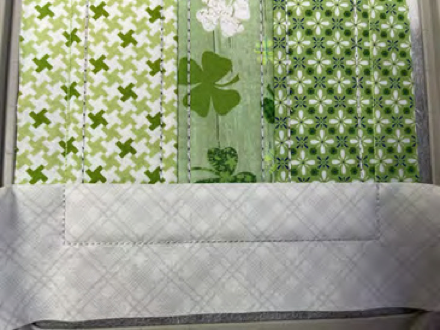
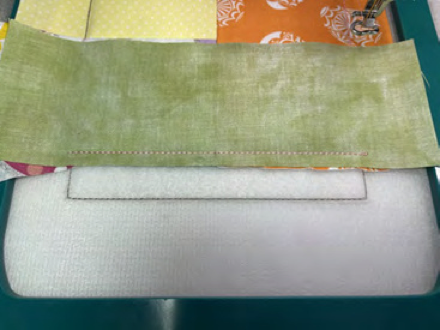
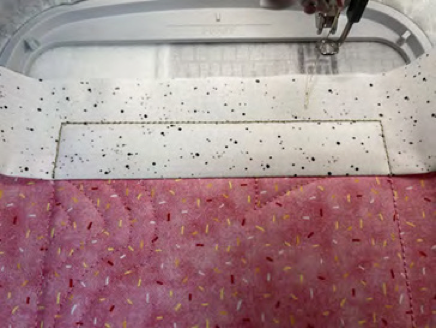
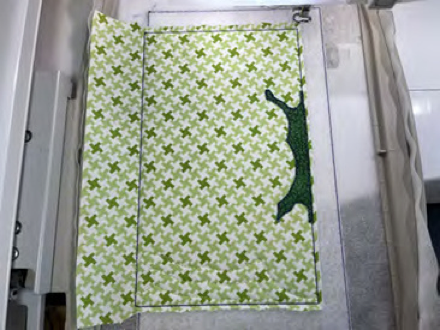
STEP 6: Fold up fabric and tape.
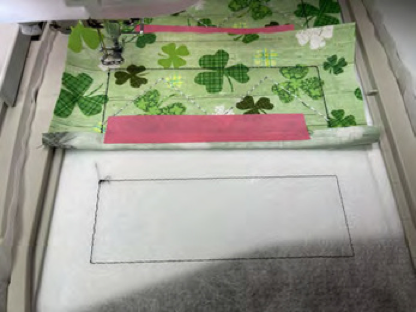
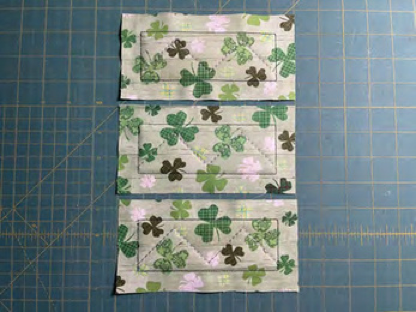
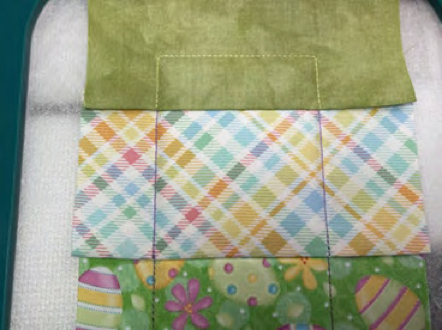
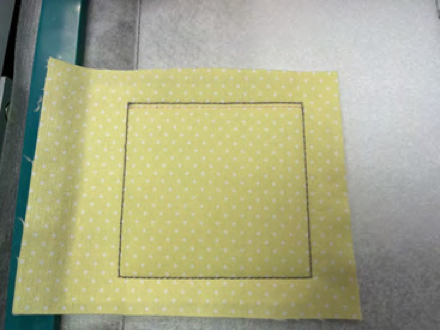
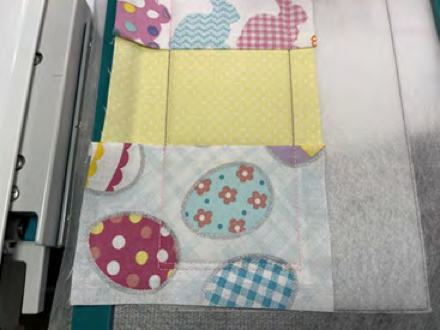
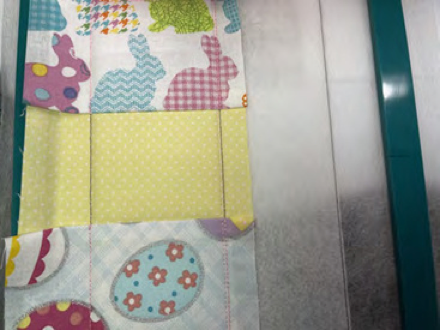
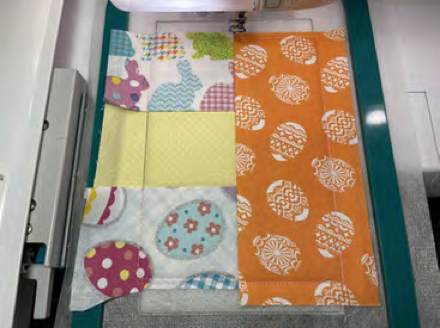
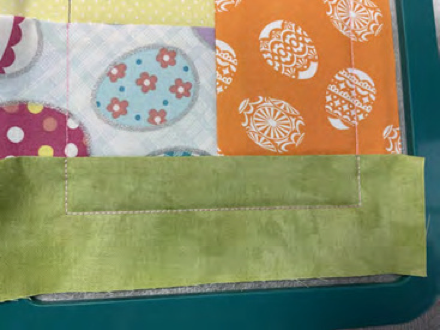
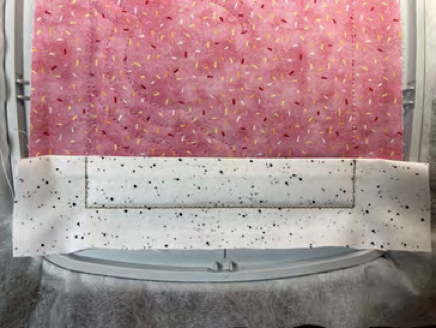
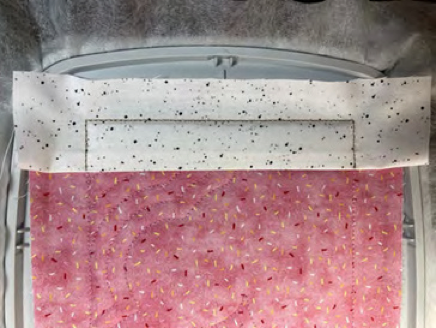
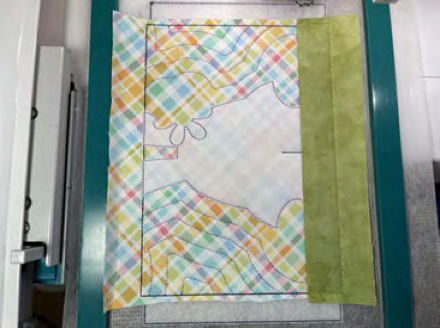
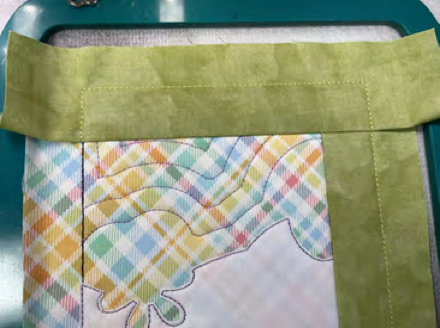
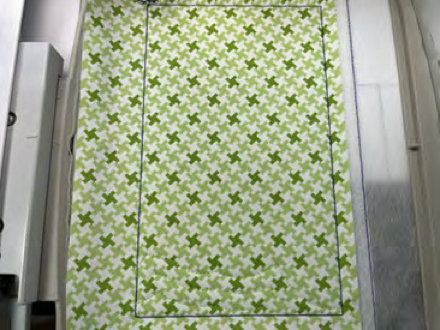
STEP 7: Repeat steps 2-6 until all 3 blocks are complete and look as shown.

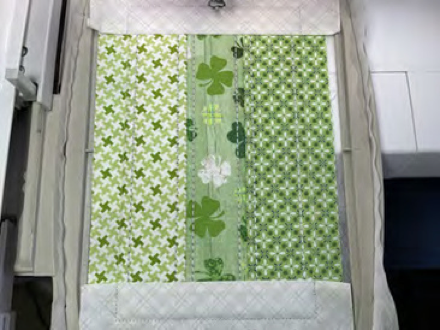
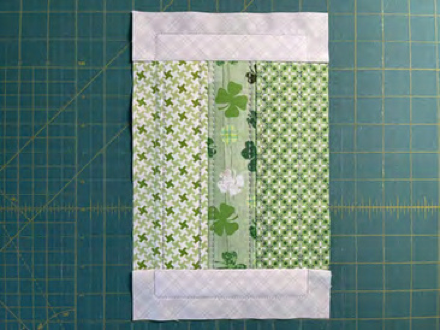
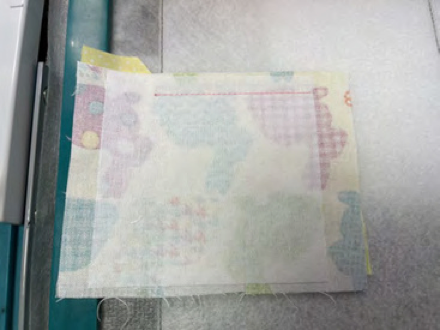
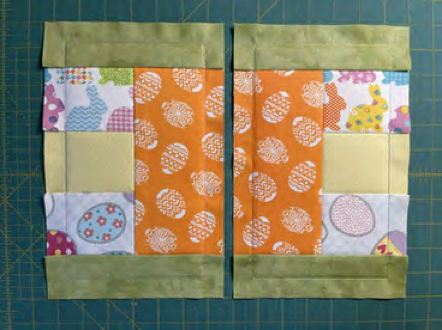
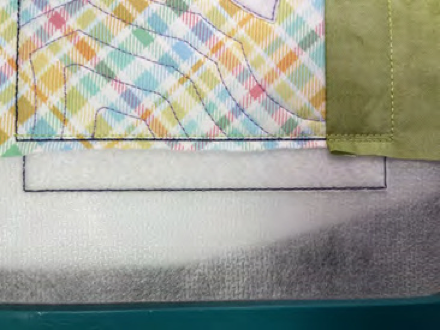
STEP 8: Remove the blocks from the hoop and trim away excess stabilizer. Trim the edges of the block so each side is 1/2” from the outer stitching line. Repeat this design 4 more times so there are a total of 14 blocks. (On the final hooping you only need to make 2.)
YOU ARE FINISHED WITH THIS BLOCK
STEP 9: Hoop a piece of stabilizer. Please load design file labeled Border Vertical Block.

STEP 10: Stitch the placement line for the batting.
STEP 11: Cover placement line with batting, making sure all sides are completely covered. Stitch tack down line. Trim the batting as shown.
STEP 12: Use the tack down line for the batting as the placement line for the background fabric. Cover placement line with background fabric, making sure all sides are covered. Stitch tack down line.
STEP 13: Stitch the zig zag line for this block.
STEP 14: Fold over fabric and tape.
STEP 15: Repeat steps 10-13 until the other block is complete and looks as shown.
STEP 16: Remove the blocks from the hoop and trim away excess stabilizer. Trim the edges of the block so each side is 1/2” from the outer stitching line. Repeat this design once more so there are a total 4 blocks.
YOU ARE FINISHED WITH THIS BLOCK
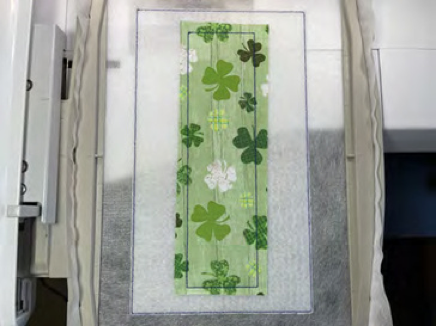
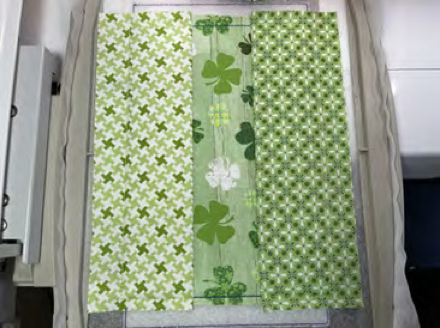
STEP 17: Hoop a piece of stabilizer. Please load design file labeled Center Stripe Block.

STEP 18: Stitch the placement line for the batting.
STEP 19: Cover placement line with batting, making sure all sides are completely covered. Stitch tack down line. Trim the batting as shown.
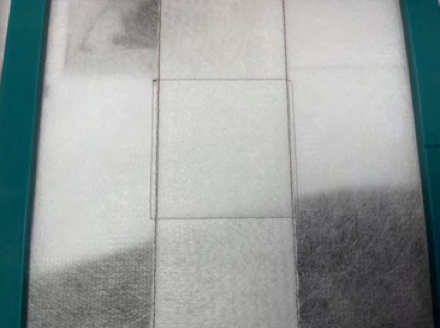
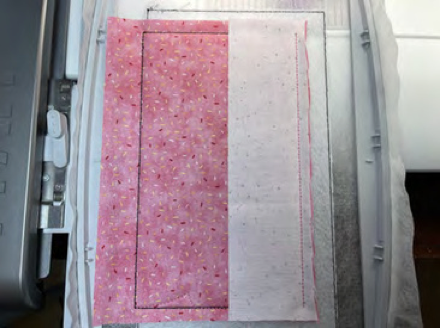
STEP 20: Stitch placement line for the center stripe.
STEP 21: Cover placement line with center fabric, making sure all sides are completely covered. Stitch tack down line. Trim the fabric.
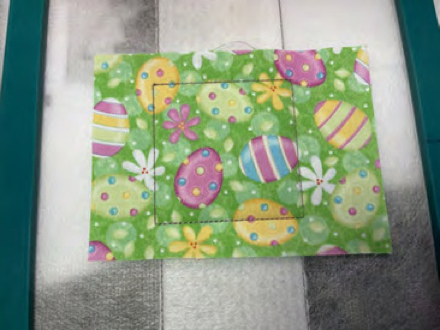
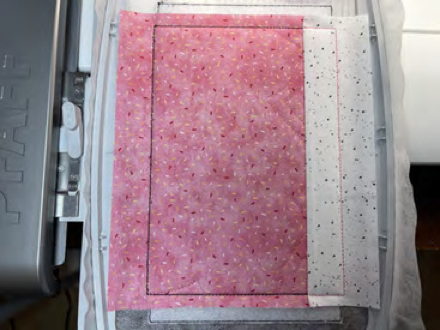
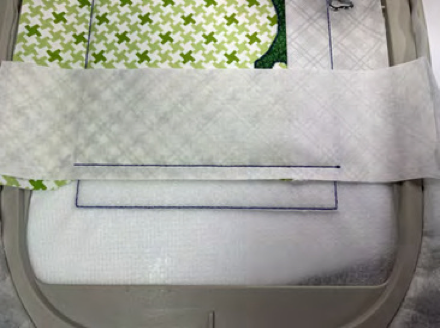
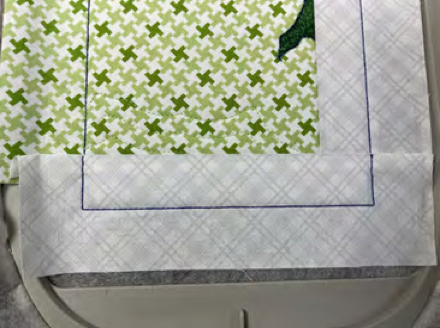
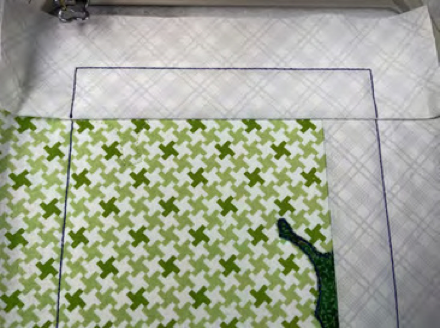
STEP 22: Stitch placement line for top fabric.
STEP 23: Position the fabric strip with right side facing down, and parallel to the placement stitch. Extend the fabric strip approximately 1/8—1/4 inch over the placement line. Run tack down stitches to secure the fabric as shown.

STEP 24: Remove hoop from machine and fold over the fabric, pressing the seam well with your fingers. Tape down to secure in place. Run tack down stitches to secure the side with right side facing up.

STEP 25: Repeat steps 22-24 to attach bottom fabric.
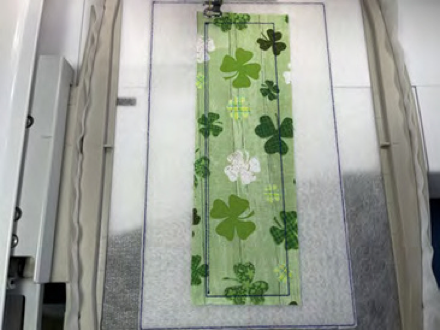
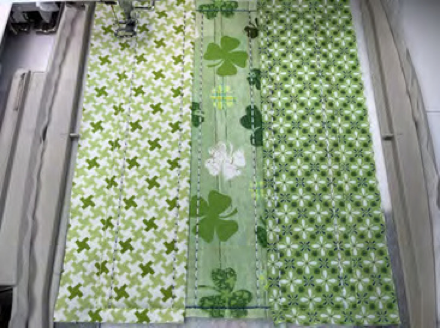
STEP 26: Stitch the single decorative lines for this block.
STEP 27: Stitch placement line for side fabric.
STEP 28: Position the fabric strip with right side facing down, and parallel to the placement stitch. Extend the fabric strip approximately 1/8—1/4 inch over the placement line. Run tack down stitches to secure the fabric as shown.

STEP 29: Remove hoop from machine and fold over the fabric, pressing the seam well with your fingers. Tape down to secure in place. Run tack down stitches to secure the side with right side facing up.
STEP 30: Repeat steps 27-29 to attach the other side fabric.
STEP 31: Remove the block from the hoop and trim away excess stabilizer. Trim the edges of the block so each side is 1/2” from the outer stitching line. Repeat this design 2 more times so you have a total of 3 stripe blocks.
YOU ARE FINISHED WITH THIS BLOCK
STEP 32: Hoop a piece of stabilizer. Please load design file labeled Center Patchwork Middle Block.

STEP 33: Stitch the placement line for the batting.
STEP 34: Cover placement line with batting, making sure all sides are completely covered. Stitch tack down line. Trim the batting as shown.
STEP 35: Stitch placement line for the middle square (fabric 1).
STEP 36: Cover placement line with middle square fabric 1, making sure all sides are covered. Stitch tack down line. Trim excess fabric on top and bottom.
STEP 37: Stitch placement line for top square (fabric 2).

STEP 38: Position the fabric strip with right side facing down, and parallel to the placement stitch. Extend the fabric strip approximately 1/8—1/4 inch over the placement line. Run tack down stitches to secure the fabric as shown.
STEP 39: Remove hoop from machine and fold over the fabric, pressing the seam well with your fingers. Tape down to secure in place. Run tack down stitches to secure the side with right side facing up. Trim top of fabric close to stitch line.
STEP 40: Stitch placement line for top border (fabric 3).
STEP 41: Position the fabric strip with right side facing down, and parallel to the placement stitch. Extend the fabric strip approximately 1/8—1/4 inch over the placement line. Run tack down stitches to secure the fabric as shown.
STEP 42: Remove hoop from machine and fold over the fabric, pressing the seam well with your fingers. Tape down to secure in place. Run tack down stitches to secure the side with right side facing up.
STEP 43: Repeat steps 37-42 to attach the other square and border fabrics.
STEP 44: Remove the block from the hoop and trim away excess stabilizer. Trim the edges of the block so each side is 1/2” from the outer stitching line. Repeat this design once more so you have a total of 2 patchwork middle blocks.
YOU ARE FINISHED WITH THIS BLOCK
STEP 45: Hoop a piece of stabilizer. Please load design file labeled Center Patchwork Right or Left Block.

STEP 46: Stitch the placement line for the batting.

STEP 47: Cover placement line with batting, making sure all sides are completely covered. Stitch tack down line. Trim the batting as shown.
STEP 48: Stitch placement line for the middle square (fabric 1).
STEP 49: Cover placement line with middle square fabric 1, making sure all sides are covered. Stitch tack down line. Trim excess fabric on top, bottom and right side.
STEP 50: Stitch placement line for top square (fabric 2).
STEP 51: Position the fabric strip with right side facing down, and parallel to the placement stitch. Extend the fabric strip approximately 1/8—1/4 inch over the placement line. Run tack down stitches to secure the fabric as shown.
STEP 52: Remove hoop from machine and fold over the fabric, pressing the seam well with your fingers. Tape down to secure in place. Run tack down stitches to secure the side with right side facing up. Trim excess fabric on top and right side of fabric.

STEP 53: Repeat steps 50-52 to attach the bottom square (fabric 3). Trim excess fabric on bottom and right side.
STEP 54: Stitch placement line for right rectangle (fabric 4).
STEP 55: Position the fabric strip with right side facing down, and parallel to the placement stitch. Extend the fabric strip approximately 1/8—1/4 inch over the placement line. Run tack down stitches to secure the fabric as shown.
STEP 56: Remove hoop from machine and fold over the fabric, pressing the seam well with your fingers. Tape down to secure in place. Run tack down stitches to secure the side with right side facing up. Trim excess fabric from top and bottom of fabric.
STEP 57: Stitch placement line for bottom border (fabric 5).
STEP 58: Position the fabric strip with right side facing down, and parallel to the placement stitch. Extend the fabric strip approximately 1/8—1/4 inch over the placement line. Run tack down stitches to secure the fabric as shown.
STEP 59: Remove hoop from machine and fold over the fabric, pressing the seam well with your fingers. Tape down to secure in place. Run tack down stitches to secure the side with right side facing up.
STEP 60: Repeat steps 57-59 to attach the top border (fabric 6).

STEP 61: Remove the block from the hoop and trim away excess stabilizer. Trim the edges of the block so each side is 1/2” from the outer stitching line. Repeat steps so you have both a Left and Right block.
YOU ARE FINISHED WITH THESE BLOCKS
STEP 62: Hoop a piece of stabilizer. Please load design file labeled Center Stipple Block.
STEP 63: Stitch the placement line for the batting.
STEP 64: Cover placement line with batting, making sure all sides are completely covered. Stitch tack down line. Trim the batting as shown.
STEP 65: Stitch placement line for the center fabric.
STEP 66: Cover placement line with background fabric, making sure all sides are covered. Stitch tack down line. Trim excess fabric on sides.

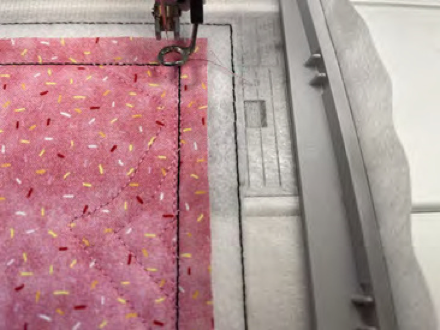
STEP 67: Stitch the stipple design for the center of the block.
STEP 68: Stitch placement line for bottom side fabric.
STEP 69: Position the fabric strip with right side facing down, and parallel to the placement stitch. Extend the fabric strip approximately 1/8—1/4 inch over the placement line. Run tack down stitches to secure the fabric as shown.
STEP 70: Remove hoop from machine and fold over the fabric, pressing the seam well with your fingers. Tape down to secure in place. Run tack down stitches to secure the side with right side facing up.
STEP 71: Repeat steps 67-70 to attach the top side fabric.

STEP 72: Remove the block from the hoop and trim away excess stabilizer. Trim the edges of the block so each side is 1/2” from the outer stitching line. Repeat this design twice more so you have a total of 3 center stipple blocks.
YOU ARE FINISHED WITH THIS BLOCK
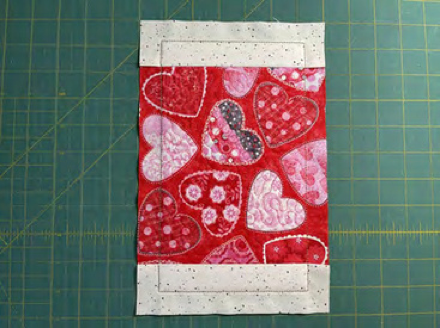
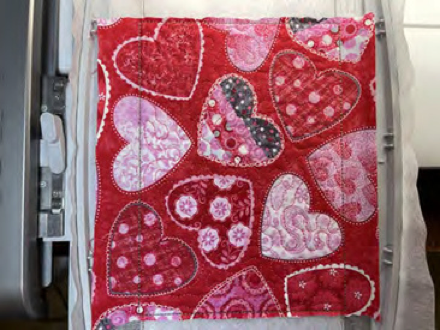
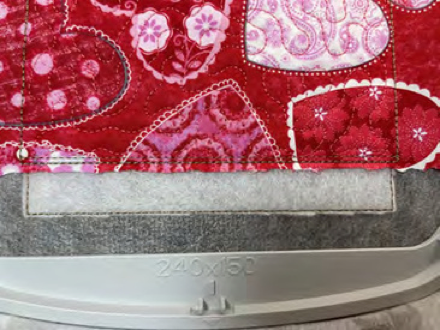
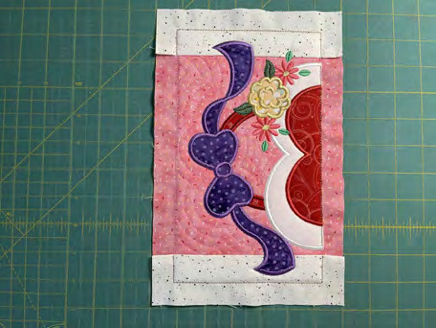
STEP 73: Hoop a piece of stabilizer. Please load design file labeled Heart Bottom Block.

STEP 74: Stitch the placement line for the batting.

STEP 75: Cover placement line with batting, making sure all sides are completely covered. Stitch tack down line. Trim the batting as shown.
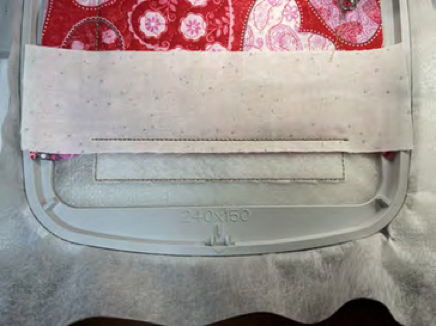
STEP 76: Stitch placement line for the top center fabric.
STEP 77: Cover placement line with background fabric, making sure all sides are covered. Stitch tack down line. Trim excess fabric on sides and bottom.
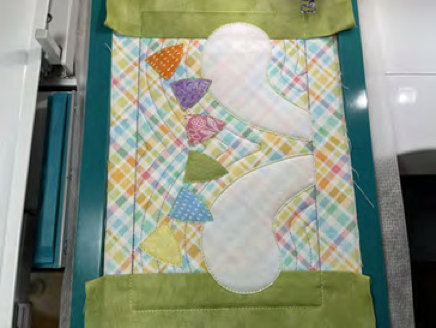
STEP 78: Stitch the quilt motif for the center of the block.
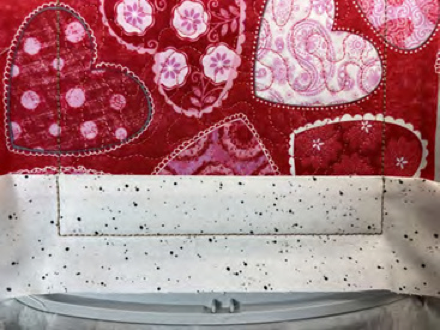
STEP 79: Stitch placement line for center bottom fabric.
STEP 80: Position the fabric strip with right side facing down, and parallel to the placement stitch. Extend the fabric strip approximately 1/8—1/4 inch over the placement line. Run tack down stitches to secure the fabric as shown.
STEP 81: Remove hoop from machine and fold over the fabric, pressing the seam well with your fingers. Tape down to secure in place. Run tack down stitches to secure the side with right side facing up.
STEP 82: Stitch placement line for left side fabric.
STEP 83: Position the fabric strip with right side facing down, and parallel to the placement stitch. Extend the fabric strip approximately 1/8—1/4 inch over the placement line. Run tack down stitches to secure the fabric as shown.
STEP 84: Remove hoop from machine and fold over the fabric, pressing the seam well with your fingers. Tape down to secure in place. Run tack down stitches to secure the side with right side facing up.
STEP 85: Repeat steps 82-84 to attach the right side fabric.
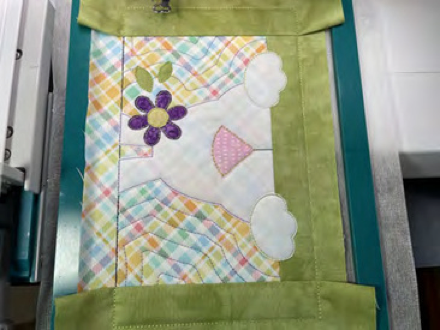
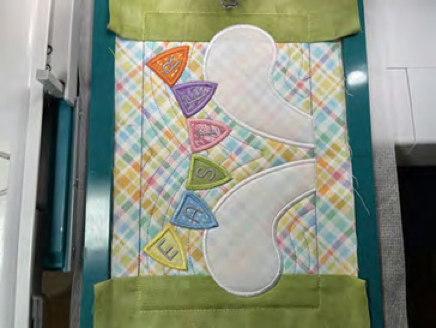
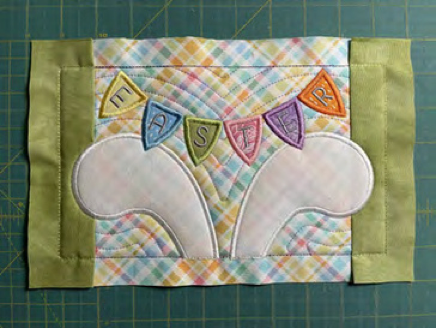
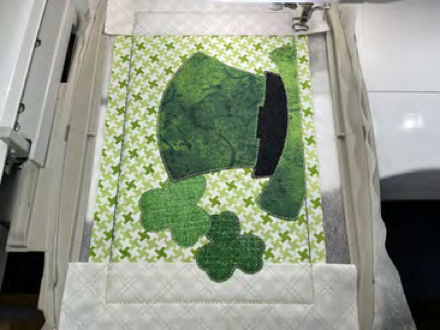
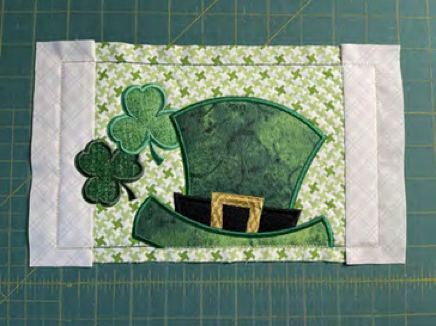
STEP 86: Use the applique method to complete the block.
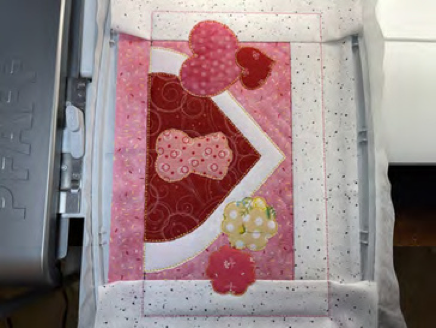
STEP 87: The next few stitching steps are the decorative and satin stitches for this block.
STEP 88: Remove the block from the hoop and trim away excess stabilizer. Trim the edges of the block so each side is 1/2” from the outer stitching line. Stitch this design once more so there are 2 of this design.
YOU ARE FINISHED WITH THIS BLOCK
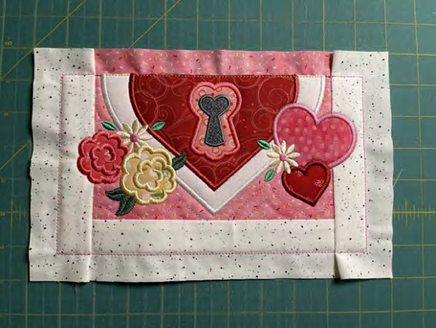
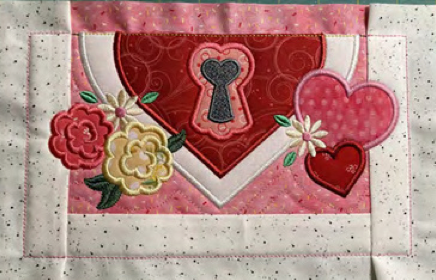
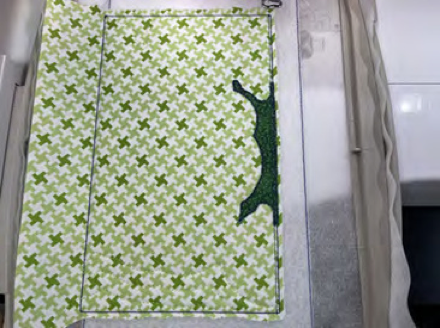
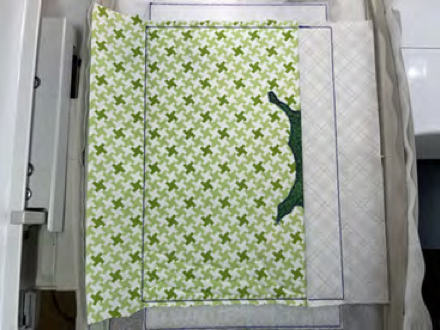
STEP 89: Hoop a piece of stabilizer. Please load design file labeled Heart Top Block.

STEP 90: Stitch the placement line for the batting.
STEP 91: Cover placement line with batting, making sure all sides are completely covered. Stitch tack down line. Trim the batting as shown.
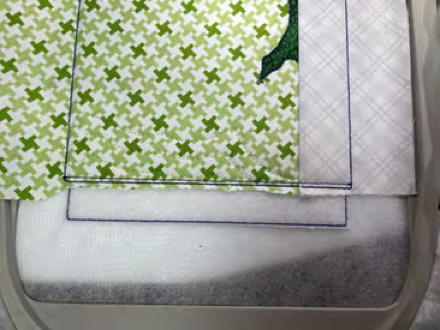
STEP 92: Stitch placement line for the center fabric.
STEP 93: Cover placement line with background fabric, making sure all sides are covered. Stitch tack down line. Trim excess fabric on top and bottom.
STEP 94: Stitch the quilt motif for the center of the block.
STEP 95: Stitch placement line for the left side fabric.
STEP 96: Position the fabric strip with right side facing down, and parallel to the placement stitch. Extend the fabric strip approximately 1/8—1/4 inch over the placement line. Run tack down stitches to secure the fabric as shown.
STEP 97: Remove hoop from machine and fold over the fabric, pressing the seam well with your fingers. Tape down to secure in place. Run tack down stitches to secure the side with right side facing up.
STEP 98: Repeat steps 95-97 to attach the right side fabric.
STEP 99: Use the applique method to complete the block.

STEP 100: The next few stitching steps are the decorative and satin stitches for this block.

STEP 101: Remove the block from the hoop and trim away excess stabilizer. Trim the edges of the block so each side is 1/2” from the outer stitching line. Stitch this design once more so there are 2 of this design.
YOU ARE FINISHED WITH THIS BLOCK
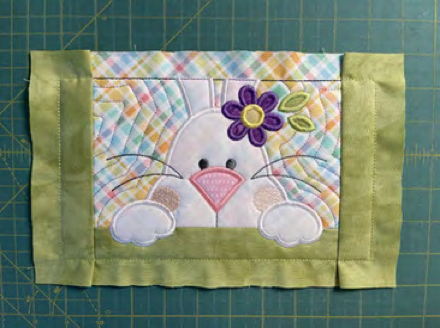
STEP 102: Hoop a piece of stabilizer. Please load design file labeled Bunny Bottom Block.

STEP 103: Stitch the placement line for the batting.
STEP 104: Cover placement line with batting, making sure all sides are completely covered. Stitch tack down line. Trim the batting as shown.
STEP 105: Stitch placement line for the center top fabric.
STEP 106: Cover placement line with background fabric, making sure all sides are covered. Stitch tack down line. Trim excess fabric on sides and bottom.
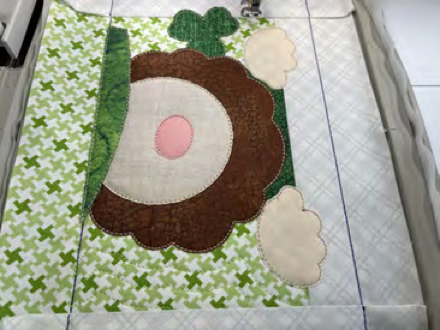
STEP 107: Stitch the quilt motif for the center of the block.
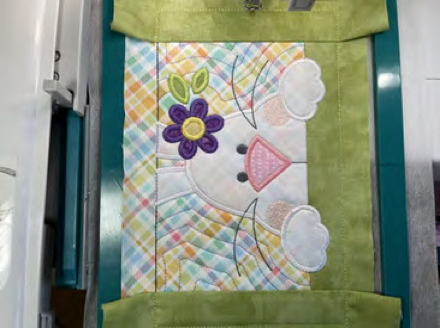
STEP 108: Use the applique method to add the bunny to the block.
STEP 109: Stitch single line for the mouth.
STEP 110: Stitch placement line for the bottom center fabric.
STEP 111: Position the fabric strip with right side facing down, and parallel to the placement stitch. Extend the fabric strip approximately 1/8—1/4 inch over the placement line. Run tack down stitches to secure the fabric as shown.
STEP 112: Remove hoop from machine and fold over the fabric, pressing the seam well with your fingers. Tape down to secure in place. Run tack down stitches to secure the side with right side facing up.
STEP 113: Stitch placement line for the left side fabric.
STEP 114: Position the fabric strip with right side facing down, and parallel to the placement stitch. Extend the fabric strip approximately 1/8—1/4 inch over the placement line. Run tack down stitches to secure the fabric as shown.

STEP 115: Remove hoop from machine and fold over the fabric, pressing the seam well with your fingers. Tape down to secure in place. Run tack down stitches to secure the side with right side facing up.
STEP 116: Repeat steps 113-115 to attach the right side fabric.
STEP 117: Use the applique method to complete this block.
STEP 118: The next few stitching steps are the decorative and satin stitches for this block.
STEP 119: Remove the block from the hoop and trim away excess stabilizer. Trim the edges of the block so each side is 1/2” from the outer stitching line. Stitch this design once more so there are 2 of this design.
YOU ARE FINISHED WITH THIS BLOCK
STEP 120: Hoop a piece of stabilizer. Please load design file labeled Bunny Top Block.

STEP 121: Stitch the placement line for the batting.
STEP 122: Cover placement line with batting, making sure all sides are completely covered. Stitch tack down line. Trim the batting as shown.
STEP 123: Stitch placement line for the center fabric.
STEP 124: Cover placement line with background fabric, making sure all sides are covered. Stitch tack down line. Trim excess fabric on sides.
STEP 125: Stitch quilt motif for this block.
STEP 126: Stitch placement line for the left side fabric.
STEP 127: Position the fabric strip with right side facing down, and parallel to the placement stitch. Extend the fabric strip approximately 1/8—1/4 inch over the placement line. Run tack down stitches to secure the fabric as shown.
STEP 128: Remove hoop from machine and fold over the fabric, pressing the seam well with your fingers. Tape down to secure in place. Run tack down stitches to secure the side with right side facing up.
STEP 129: Repeat steps 126-128 to attach the right side fabric.

STEP 130: Use the applique method to complete the block.
STEP 131: The next few stitching steps are the decorative and satin stitches for this block.
STEP 132: Remove the block from the hoop and trim away excess stabilizer. Trim the edges of the block so each side is 1/2” from the outer stitching line. Stitch this design once more so there are 2 of this design.
YOU ARE FINISHED WITH THIS BLOCK
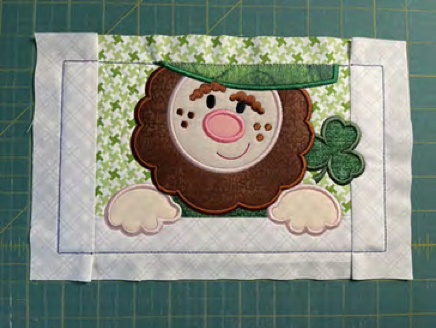
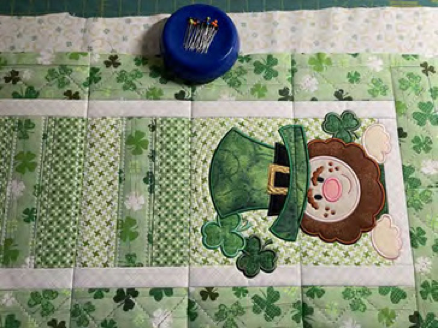
STEP 133: Hoop a piece of stabilizer. Please load design file labeled Leprechaun Bottom Block.

STEP 134: Stitch the placement line for the batting.

STEP 135: Cover placement line with batting, making sure all sides are completely covered. Stitch tack down line. Trim the batting as shown.

STEP 136: Stitch placement line for the center top fabric.
STEP 137: Cover placement line with background fabric, making sure all sides are covered. Stitch tack down line. Trim excess fabric on sides and bottom.
STEP 138: Stitch the quilt motif for the center of the block.
STEP 139: Use the applique method to add the shirt to the block.
STEP 140: Stitch placement line for the center bottom fabric.
STEP 141: Position the fabric strip with right side facing down, and parallel to the placement stitch. Extend the fabric strip approximately 1/8—1/4 inch over the placement line. Run tack down stitches to secure the fabric as shown.
STEP 142: Remove hoop from machine and fold over the fabric, pressing the seam well with your fingers. Tape down to secure in place. Run tack down stitches to secure the side with right side facing up.
STEP 143: Stitch placement line for side fabric.
STEP 144: Position the fabric strip with right side facing down, and parallel to the placement stitch. Extend the fabric strip approximately 1/8—1/4 inch over the placement line. Run tack down stitches to secure the fabric as shown.
STEP 145: Remove hoop from machine and fold over the fabric, pressing the seam well with your fingers. Tape down to secure in place. Run tack down stitches to secure the side with right side facing up.
STEP 146: Repeat steps 143-145 to attach the right side fabric.
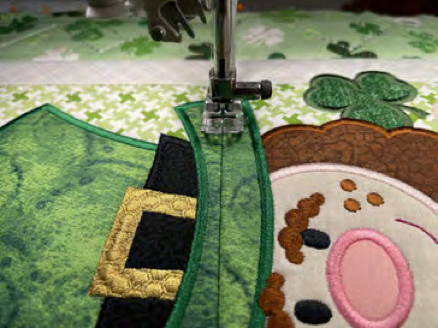
STEP 147: Use the applique method to complete the block.
STEP 148: The next few stitching steps are the decorative and satin stitches for this block.

STEP 149: Remove the block from the hoop and trim away excess stabilizer. Trim the edges of the block so each side is 1/2” from the outer stitching line. Stitch this design once more so there are 2 of this design.
YOU ARE FINISHED WITH THIS BLOCK
STEP 150: Hoop a piece of stabilizer. Please load design file labeled Leprechaun Top Block.

STEP 151: Stitch the placement line for the batting.

STEP 152: Cover placement line with batting, making sure all sides are completely covered. Stitch tack down line. Trim the batting as shown.

STEP 153: Cover placement line with background fabric, making sure all sides are covered. Stitch tack down line. Trim excess fabric on sides.
STEP 154: Stitch the quilt motif for the center of the block.
STEP 155: Stitch placement line for side fabric.

STEP 156: Position the fabric strip with right side facing down, and parallel to the placement stitch. Extend the fabric strip approximately 1/8—1/4 inch over the placement line. Run tack down stitches to secure the fabric as shown.

STEP 157: Remove hoop from machine and fold over the fabric, pressing the seam well with your fingers. Tape down to secure in place. Run tack down stitches to secure the side with right side facing up.
STEP 158: Repeat steps 155-157 to attach the right side fabric.
STEP 159: Use the applique method to complete the block.
STEP 160: The next few stitching steps are the decorative and satin stitches for this block.

STEP 161: Remove the block from the hoop and trim away excess stabilizer. Trim the edges of the block so each side is 1/2” from the outer stitching line. Stitch this design once more so there are 2 of this design.
YOU ARE FINISHED WITH THIS BLOCK
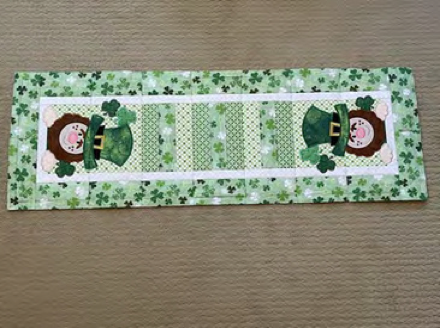
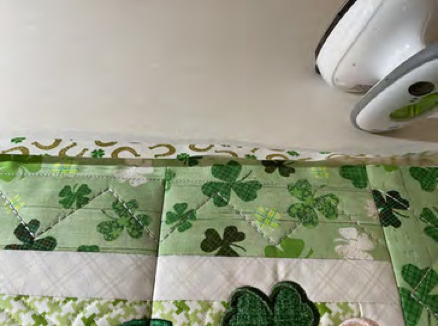
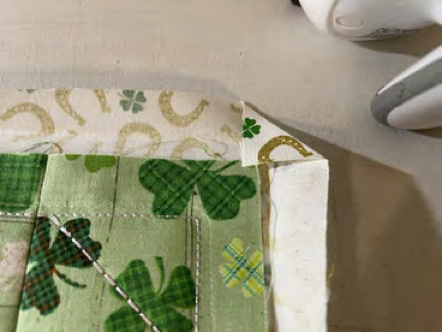
STEP 162: You now have all the blocks stitched. Lay out all the blocks in the table runner.
MAKE SURE THEY ARE LAID OUT SO THEY LOOK LIKE THIS PICTURE, WITH EACH BLOCK LAYING THE RIGHT DIRECTION.
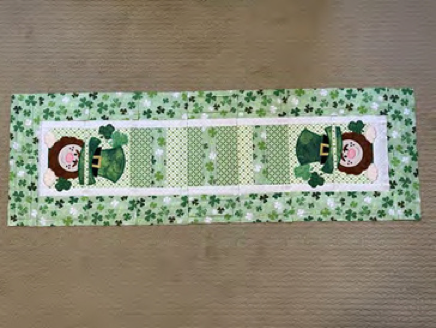
START ON THE LEFT SIDE OF THE TABLE RUNNER AND WORK YOUR WAY TO THE RIGHT, SEWING BLOCKS INTO STRIPS.
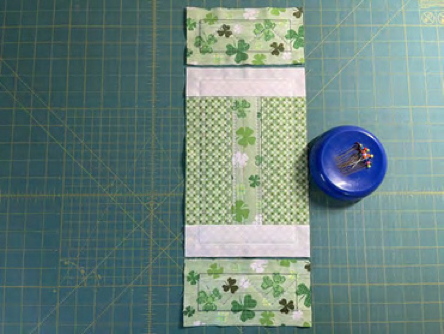
STEP 163: Lay out the first strip as shown.
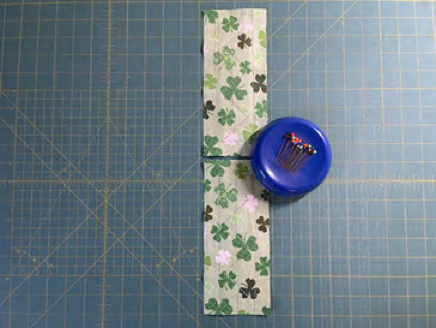
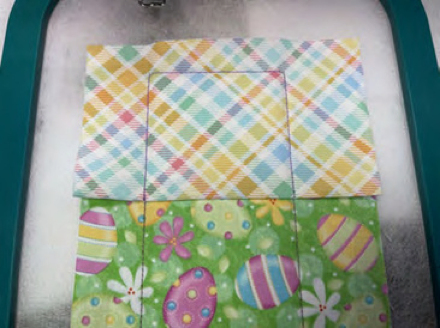
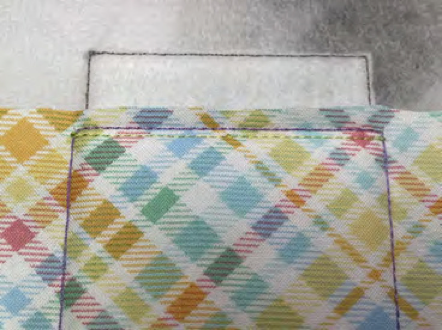
STEP 164: Flip top block onto the bottom block. Line up the blocks so the stitching line on both blocks line up. Pin or clip together. Sew the blocks together, sewing just barely inside the outer stitch line on the block. Press open seams.
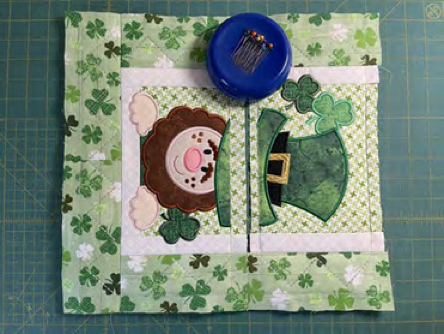
STEP 165: Next we will sew two horizontal border blocks and a bottom block. This is where you will sew the end design you have chosen, for this tutorial I will be using the leprechaun.

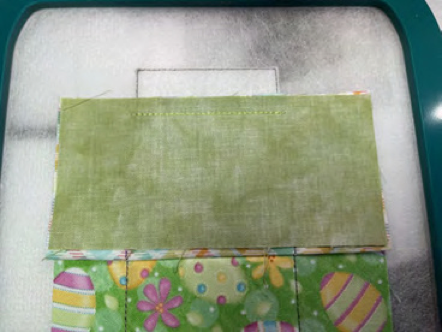
STEP 166: Flip the border blocks down onto the leprechaun block. Line up the blocks so the stitching line on both blocks line up. Pin or clip together and sew. Press open seams.
STEP 167: Next we will sew two horizontal border blocks and the top block.

STEP 168: Flip the border blocks down onto the leprechaun block. Line up the blocks so the stitching line on both blocks line up. Pin or clip together and sew. Press open seams.
STEP 169: Next we will sew the top and bottom strips blocks.

STEP 170: Flip the top block onto the bottom block. Line up the blocks so the stitching line on both blocks line up. Pin or clip together and sew. Press open seams.
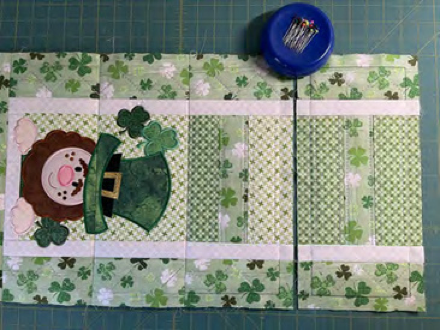
STEP 171: Next we will sew two horizontal border blocks and a center block. This is where you will sew the center design you have chosen, for this tutorial I will be using the stripe blocks.
STEP 172: Flip the border blocks down onto the center block. Line up the blocks so the stitching line on both blocks line up. Pin or clip together and sew. Press open seams.
STEP 173: Next we will sew together the center strip to the end strip.
STEP 174: Flip the center strip onto the end strip. Line up the blocks so the stitching line on both blocks line up. Pin or clip together and sew. Press open seams.

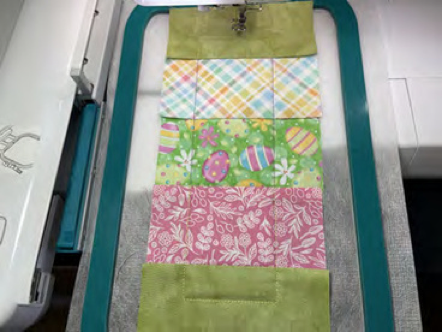
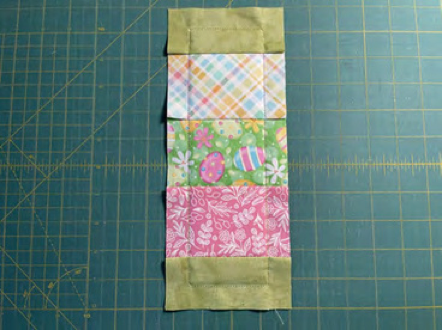
STEP 175: Repeat steps 163-174 to complete the rest of the front of the table runner. Should look as shown.
STEP 176: Cut your backing according the sizing in the cutting chart.
STEP 177: Turn the backing over so the wrong side is up. Center the sewn together blocks on the backing. Pin in place along the edges and along each seam on the table runner.
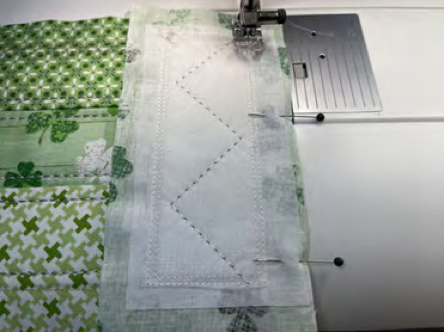
STEP 178: Use the stitch in the ditch method, and sew each seam line to the backing.
STEP 179: Trim each side of the backing so it is 1.25” larger than the table runner front. There are many methods to binding the edges and doing mitered corners. All the pictures we have used are using a method from this tutorial on YouTube. There are numerous methods and videos and you can use one of your choice.

STEP 180: Fold in each edge of the backing so it meets up with the outer edge of the front. Press with iron.
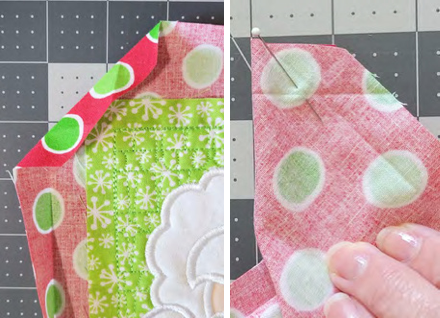
STEP 181: On each corner fold it diagonally so the fold is right at the corner of the front, as shown. Press the diagonal corner.
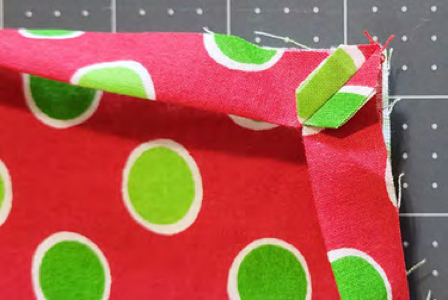
STEP 182: Trim away part of the corner, as shown. With right sides together, fold the corner so the ironing line matches up on both sides. Pin together.
STEP 183: Fold the ironed edges back in place and sew along the ironing line. Trim the seam as shown. Make sure you angle the corner at the fold, being careful not to cut past the sewing line.

STEP 184: Press the corner seam open. Repeat steps 181-184 for each corner. Pin or clip all the way around the table runner.
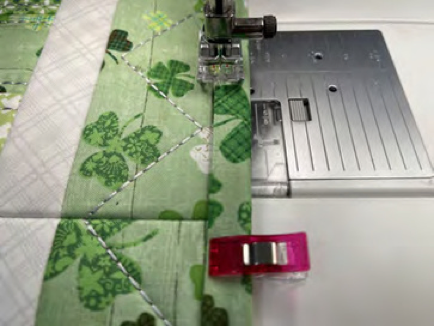
STEP 185: Next sew all the way around the binding, close to the edge.
THE TABLE RUNNER IS COMPLETE!!!!

If you make this project, please share it with us in the Designs by JuJu Embroidery Blessings Facebook group, or anywhere on social media using the hashtag #designsbyjuju. We can't wait to see what you create!