Toggle Nav
 Inspire.
Create.
Stitch.
Inspire.
Create.
Stitch.
Search
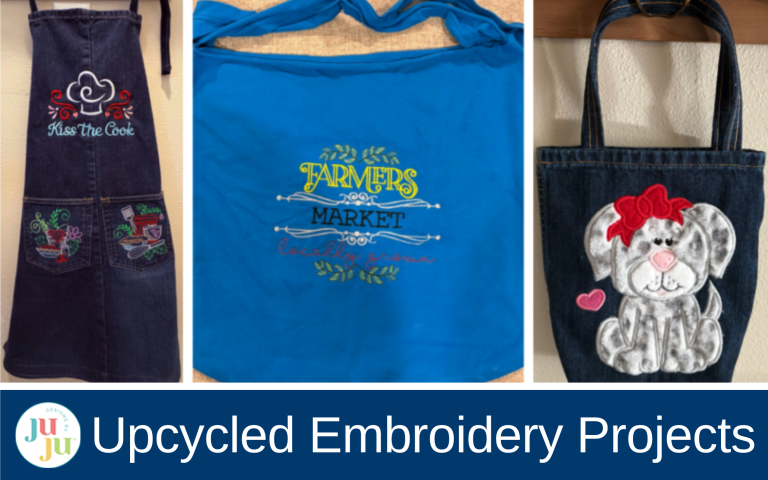
Turn worn jeans and T-shirts into fresh, embroidered creations with simple, stylish upcycling ideas you’ll love.
Upcycling old jeans and T-shirts is one of the easiest ways to turn forgotten favorites into fresh, functional pieces. With a little creativity. embroidery, and simple sewing, those worn fabrics become charming bags, aprons, and accessories you’ll love using every day.
Check out the DBJJ’s team’s favorite supplies in the Designs by JuJu Amazon store. And for all your stabilizer needs be sure to check out Designs by JuJu+.


Place the jeans on a flat surface.

Use an erasable marker to draw a straight line across the top of the pant leg. Avoid cutting into the back pockets.

Remove the back pockets using a seam ripper.

You should now have one pant leg and one or two loose pockets. Set the remaining denim aside for your straps.

Measure the usable height and width inside the pocket seam threads to determine your embroidery size. Choose the embroidery design you wish to use on the pocket. I used Floral Swirly Kitchen 3 and Floral Swirly Kitchen 1 for my two pockets.

Load the design to your machine. Hoop wash-away stabilizer, take to your machine, and find the center of your design. Mark the stabilizer and remove the hoop to sit on a flat surface.

Mark the center of the pocket with a pin or erasable marker.

Align the pocket’s center mark with the stabilizer’s center mark. Pin or use spray adhesive to hold in place.

Reattach the hoop to your machine and use the placement keys to confirm the design fits neatly inside the pocket. Check top, bottom, left, and right.


Stitch out your design.

Remove from the hoop.

Trim stabilizer, and repeat for the second pocket if needed.

Set pockets aside.

Cut off the outer seam on one side of the pant leg, leaving the inseam intact.

Your pant leg should now look like this. The bottom of the pant leg will become the top of your apron.

Fold the pant leg in half, raw edges aligned. Use an existing apron to trace your upper curve, or freehand one.

Your jeans should now look similar to this.

Fold and press the curved raw edge under ¼”.

Turn the raw edge under ¼” along the side of the apron. Press.

Baste along the edge.

Turn the edges under another ¼". Clip and stitch down.

Do this on both sides.

Cut a 2" × 7" strip from leftover denim or cotton.

Turn the raw edges under ¼" and press. Baste to hold.

Fold in half and clip. Take to the sewing machine.

Stitch down the long end close to the edge.

Slide your hardware rings onto the strap and fold it in half.

Position the strap on the top left of the apron.

Stitch across both the top and bottom to secure.

Cut another strip 2" × 24”. Fold, press, and stitch using the same steps as before.

Attach this strap to the top right of the apron.

Sew in place at the top and bottom of the strap.

Thread the longer strap through the hardware to create an adjustable neck strap.
Cut two 2"-wide strips to your preferred length.

I wanted long ties, so I stitched two 24" strips together to make a 48" waist tie.

Trim ¼” from the seam.

To turn my long edges under ¼”, I used double-sided tape. Then I turned them under again ¼”. I find this to be the easiest way.

Fold the strap in half lengthwise. Clip and stitch close to the long edge.

Pin the straps on each side of the apron as shown. Sew to secure.


Follow your previous stitch line for a clean look. Remember to back stitch to secure.

To hem the apron, turn the bottom raw edge up 1", then turn it up another 1" and pin. You’ll have extra fabric on the sides—trim it even and tuck in raw edges.


Stitch across the bottom hem, then stitch down the trimmed side edges.

Optionally add a second stitching line for detail.

Try the apron on and decide where you want your embroidery design to sit. Mark the center of the placement with a pin or erasable marker. Be sure to leave enough space above the mark so the top of your design won’t get cut off.

Choose the embroidery design and size that fits your apron. I used this cute saying from Fun Kitchen Swirls.
Because you’ll be stitching over a bulky denim seam, use a denim needle or a 100/16 for best results.
Hoop wash-away stabilizer and position the apron so the center of your mark lines up with the center of the design. Double-check that the apron is facing the correct direction before you begin stitching.
Stitch the design, remove from the hoop, and trim the stabilizer from the back.

If you prefer you can add a pocket at the top of the apron.

Try the apron on again, pin the pockets where you want them, and stitch in place. Be sure to backstitch at the beginning and end for extra durability. Press the apron, trim loose threads, and there you have it—a quick, upcycled apron (and pocket pair) made from pieces you already own.

Whether you have denim left over from your apron project or an extra pair of old jeans, you can turn a pant leg into this adorable bag in only a couple of hours.

With a seam ripper, open the inside leg seam far enough to embroider on. You will determine the final bag size after embroidery. I opened mine about 16"–20". The bottom of the pant leg will become the top of the bag, so keep that in mind when positioning your design.

Choose the design you want for the front of the bag and load it into your machine. I am using Puppy Girl Applique in the 7.80” x 6.00” size.

Create a paper template the size of your embroidery design. Place it about 1" down from the bottom hem, remembering the bottom hem is your bag’s top edge.

If you’re happy with the placement, remove the template. Fold the pant leg in half to find the center of the bag front.

Finger press a crease and mark the top, center, and bottom of the fold with pins or an erasable marker.

Hoop cut-away stabilizer. Take to your machine and mark the top of the design. Remove the hoop and place it on a flat surface.

Align the top pin mark on the jeans with the top mark on the stabilizer. Use the other pins to ensure your fabric is straight.

Pin in place or use spray adhesive.

Return the hoop to the machine. Use your Placement keys to be sure the design fits in the area.

Stitch out the design. The first stitch creates the placement line for your applique fabric.

Position your fabric over the stitch line. If using faux fur or anything with a nap, place a water-soluble topper on top.

Trim excess fabric as you go. Keep the topper on until the embroidery is fully finished.


If you’d like to add more designs in the same hooping, go for it! I added a small heart from Heart Paw Applique to complement the puppy. It’s fun to experiment using multiple designs.

When finished, remove the hoop. My little puppy needed a good brushing afterward!

Trim away the stabilizer from the back and remove the topper from the front. A damp cloth will help remove small pieces of topper.

With right sides together, clip the raw edges where you opened the seam. Sew the side back up using the original seam allowance. Zigzag the raw edges to prevent fraying.

Turn the pant leg right side out.

Decide how tall you want your bag to be. I measured 3" down from the bottom of my design and cut straight across.
To create a boxed bottom:

At the new bottom edge, cut 1" in from each side and 1" up.

Sew the bottom edge using a ¼" seam.

Stitch across raw edge.Pinch each corner so the side seam meets the bottom seam, forming a triangle.

Sew across this straight edge using a ½" seam allowance.

Trim to ¼".

You now have a neatly boxed bottom.

Turn the bag right side out.

From the remaining denim, cut four 2" wide strips.

Cut off the side seams of each strip.

Sew the strips together to create two long strap pieces.

Trim any uneven edges.

Turn the long raw edges under ¼". Clip and sew down the length of each strip.

I stitched down both sides for a more finished look.

Measure 2" in from each side of the front of the bag and mark with a pin.

Center one strap end at each mark and stitch it in place.

Repeat on the back of the bag with the second strap. Double-check that straps are even before sewing.

For added strength sew across the top and bottom of the strap.

Your upcycled denim bag is complete. Sturdy, practical, and completely unique. It’s a perfect way to use up jean scraps and show off a fun embroidery design.

Do you have old T-shirts taking up room in your drawers? Instead of tossing them out, turn them into adorable, eco-friendly market bags! This quick and satisfying project gives your favorite shirts a second life while reducing waste—and you can customize each one with machine embroidery to make it extra special.

Choose a design and size that fits your shirt, and load it to your machine.

Hoop cut-away stabilizer and take it to the machine. Find the center of the design and mark it on the stabilizer.

Place the shirt wrong side out on a flat surface. Fold in half. The top of the shirt becomes the bottom of the bag.

Cut off the neck and sleeves, either straight or curved.

On the inside of the shirt, fuse SF101 where the design will stitch. This helps prevent puckers and keeps the shirt fabric from stretching. For a market bag, scrap pieces work perfectly!

Turn the shirt right side out and mark the center with an erasable marker.

Match the shirt’s center mark with the mark on the stabilizer. Pin carefully, avoiding stretching. A light spray adhesive can also help.
I find a wash-away topper adds stability and helps reduce wrinkles on knit fabric. This is optional but helpful.

Embroider, then remove the hoop and detach the shirt. Trim the stabilizer.

If you used a topper, peel it away. Any leftover dissolves with a damp cloth or in the wash.
We’re creating a modified French seam for a clean, durable finish.

With the shirt right side out, lay it flat and pin the bottom.

Sew a ¼” seam across the pinned bottom.

Turn the bag inside out. Sew a ½” seam across the bottom.

Turn right side out. Your seam is now neatly enclosed.

Place the bag flat with the hem at the top. Pin or clip to hold it together.

Fold the bag in half and measure 2½” down from the top edge. Mark the center.

Open the fabric and draw a 14” horizontal line, centered. This becomes your handle slit. For a wrist-style bag, draw a shorter 6” slit.

Cut the slit and give the entire bag a good press.
Your market bag is ready! Just like that, your old T-shirt is now a sturdy, charming, and reusable market bag. Perfect for groceries, farmers market finds, craft fairs, or everyday grab-and-go errands. Once you make one, you’ll want to start transforming every T-shirt in the drawer!
Please share your upcycled projects with us in the Designs by JuJu Embroidery Blessings Group on Facebook, or anywhere on social media using the hashtag #designsbyjuju. As always, we love to see what you create!
