Toggle Nav
 Inspire.
Create.
Stitch.
Inspire.
Create.
Stitch.
Search
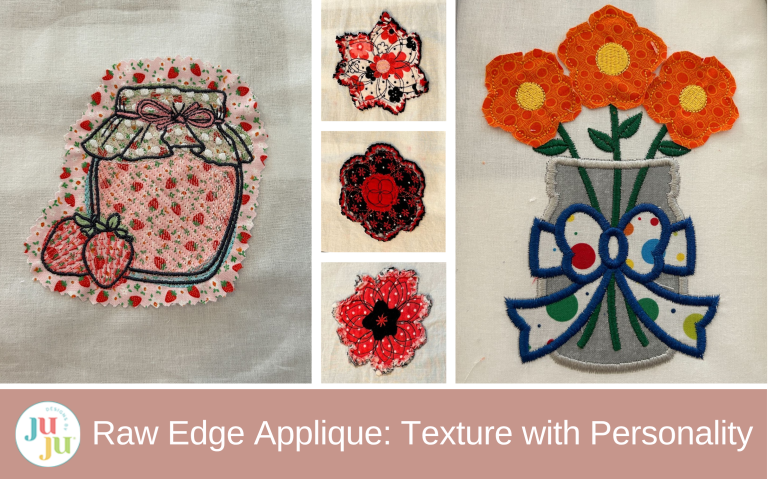
Fray in a fabulous way! Learn how raw edge applique adds cozy texture and whimsy to your machine embroidery projects.
If you’re looking for a way to add some personality and charm to your embroidery projects, consider raw edge applique. Raw edge applique is a beginner-friendly technique that showcases a playful and whimsical style. It’s as easy as regular applique, but finished out with a slightly frayed finish that can add texture and a handmade look to everything you create. It can be done on quilts to totes to T-shirts and is only limited by your imagination.
Today I’ll show you some techniques to make the fray manageable and the projects successful!
Check out the DBJJ team’s favorite supplies in the Designs by JuJu Amazon store.

For our first foray into raw edge applique I chose the Raggedy Flowers Applique design. This one is formatted to have a raw edge. I’m using flannel for my flowers as this will maximize the ragged edges, especially after it’s been through the wash. Let me show you how it’s done.
First we will hoop our stabilizer and backing fabric for our project and stitch the placement line.

Now we will place the flannel over the placement line. For this project I’m going to use three layers of flannel for an extra fluffy look.

Then I’m adding a contrasting fabric for the second layer.

And then I place the third layer of flannel. This is the one that will be seen the most so it’s my “pretty” piece.

Stitch your tack-down stitches through all three layers of flannel.

Generally now we would trim the fabric, but for this specific design we do not need to at this point. We can just stitch out the decorative stitches next.

Next we will stitch the placement line for the center of the flower. Some designs have another applique piece and some have just decorative stitching. Follow your stitch chart for the center of your flower. After stitching the placement line for the center, cover with another piece of flannel.

Stitch the tack-down.

Again we don’t need to trim this yet so we can go on to the decorative stitches.

We can now remove from the hoop and trim the back side.

And remove excess stabilizer. I used a tear-away, but you can trim close if you used a cut-away.

Now comes the fun part. In regular applique we will try to trim as close to the stitches as we can so they are covered by the finishing stitches. But in raw edge applique we cut farther away to enhance the fraying.
I like to trim the edges about ¼” around the stitches. (In the monsters section below we will explore different lengths of edging). I don’t measure, I’m not precise, and oftentimes my cuts are a little square around the round edges. The nice part is it doesn’t matter much! So trim your design around the edges.

Then do the same to your flower. I try to make sure I’m cutting through all three layers at one time. You could do it individually, but since it doesn’t need to be precise, I just do it all at once.

Then we will go around the edges and clip in toward the stitches. This will help it fray more. I try to space my snips about ¼” apart.

One of the biggest rules in applique is don’t clip the stitches! Well this time I was going quickly with my scissors as I was clipping into them, and I clipped a stitch. If this happens, don’t panic. If by chance your project is still in your hoop, or you have the ability to line things up in your machine to restitch over that area, you can do that. If you don’t have those options, you can use a small dot of Fray Check on that area like I did here.

Don’t forget to do the back side too.

Now that your fabric is trimmed and clipped, use your fingers to fluff up the edges.

And your design is done. I attached some other flowers to this one and I love how they coordinate with each other.

If you want to embrace that frayed look, throw them in the washer and dryer and see how fluffy they get!

The trio looks great together!

Can we adapt a regular applique project to have a raw edge look? Yes, we can! It takes a few tweaks but they are simple to do. For these flowers in a mason jar, I wanted to do regular applique on the jar and bow, and just use the raw edge for the flowers.
Start by hooping your fabric and stabilizer and stitching out the placement stitch for the jar.

Continue through the regular applique steps, with placement stitches for the jar and trimming. Then continue on to the bow and do the same thing.

Finish the bow and trim the edges.

The next step is to stitch the placement stitches for the flowers.

This is where we will change things up a bit. In regular applique we would place the fabric, tack it down, and continue with finishing stitches. Looking at the stitch chart, the stems would stitch and then the finishing stitches for the flowers. Since we will be having a raw edge fabric, we will need to stitch anything that is “under” the flowers before we place the fabric for the flowers. So I’m going to skip the tack-down stitch for the flowers and stitch the stems first.

Once the stems are stitched, we can go back to the tack-down stitches and stitch the flowers. For these three flowers I want to use three separate pieces of fabric to make sure I have the excess fabric around the edges to leave for the raw edge. They stitch all at once, so I will just stop my machine after each one completes. I tacked down the first flower and taped the excess fabric out of the way before adding the second flower.

Cover the next flower with fabric and stitch its tack-down stitches.

Fold and tape that fabric out of the way and place the fabric for the third flower. Stitch the tack-down stitch.

Once we have all the flowers tacked down, we can trim them. I trim them about ¼” from the stitches. The tack-down stitches in JuJu designs are a double stitch, so they will work great to hold the fabric. This is all done in the hoop. We will still have stitches to add after this.

I clipped in toward each petal to give it more of a dimensional look.

Now we will just skip past the cover stitch for the flowers and will move to the decorative stitches. These will be the stitches on the top of the flowers, and then the stitches around the jar and the bow.

I wanted to show how trimming the edges can affect the look of your finished project. This time I’m making some monsters that we will finish four different ways. These are regular applique designs, so we will stitch all the stitches that are “under” the fur first, and then do all the stitches on the top of the monster after. Let’s take a look.
We will start by doing a short trim for the monster. I like to prepare my fabric for a short trim. I use Heat-n-Bond Lite. This helps the short stitches to not fray as much.

Fuse it to the wrong side of the fabric.

Peel off the backing and set aside.

We will hoop our stabilizer and fabric and stitch out the placement stitch for the fabric.

We will now stitch everything that is “behind” the fur. In this case that is the arms, legs, and the antennae.

Now we will place the piece of fabric with the Heat-n-Bond Lite on it face up and stitch the tack- down stitch.

Skip the cover stitch around the fur. Finish the decorative stitches on top of the fur—the spots, face, and cheeks.

Now we can take it out of the hoop, remove the stabilizer, and trim up the threads.

For a short trim, I trim right up next to the stitches. This is similar to what you would do for a regular applique.

When it’s done, because it is so short I will press the design to have the Heat-n-Bond Lite help hold things in place. I use a pressing cloth to protect the stitches.

Now the short-trimmed monster is done.

For a medium trim, I omit the Heat-n-Bond Lite and continue through the same steps as above for the embroidery. When it comes time to trim, I trim him about ¼” away from the edge.

And this is how the medium trim finishes out.

For a long trim, I trimmed a large circle around the edge of the stitches, and then I clipped in toward the stitches.

Fluff the fur edge with your fingers.

Your long-trim monster is now done.

What if we did stitch the cover stitches on our monster? Would that work? It does! It gives it a different look. Just remember to stitch the things behind the fur first, then stitch the tack-down stitch, don’t trim the fabric, finish the decorative stitches, and stitch out the cover stitch.
The cover stitch starts with a double stitched zigzag. On half of the monster I left those stitches and didn’t continue with the cover stitch. On the other half I completed the whole stitch. They both give it a different look, so you can choose the one that you like for your project. After they have stitched out, trim your fabric to the length you desire.

Here are our four completed monsters! Use these as an example to decide how to finish out your project.

We can even turn a sketch design into a raw edge applique! For this look I wanted to use this cute strawberry fabric with the strawberry jam sketch design. I hooped my background fabric and stabilizer.

Cover the design area with your fabric.

Then stitch out your design.

When this was done I used pinking shears to trim the fabric around the design. This gave it a design element that I liked but also helped limit the fray on the raw edge.

Do you ever have a beautiful piece of fabric that you’d like to embroider on but you feel that the design will get lost in the busyness of the fabric? Using raw edge applique with a sketch design can help set it apart from the fabric.
Hoop your stabilizer and the fabric.

I am fusing a piece of SF101 interfacing behind my white fabric to help stop the background fabric from showing through my white fabric. Fuse it to the back side of your white fabric.

Cover the design area with the white fabric.

Then stitch out the sketch design.

When the design is stitched, trim stitches on back.

And remove stabilizer.

Trim the front fabric close to the design. You can choose your length based on the look you’d like. I tried to keep this one semi-close.

And you then have your sketch design that shows up on your busy background fabric.

I hope that today I have inspired you to think outside the stitches a little bit and you can embrace the fray of a raw edge applique! We would love to see what you come up with for your raw edge applique projects. Share them with us in the Designs by JuJu Embroidery Blessings Facebook Group or tag us with #designsbyjuju anywhere on social media!
