Toggle Nav
 Inspire.
Create.
Stitch.
Inspire.
Create.
Stitch.
Search
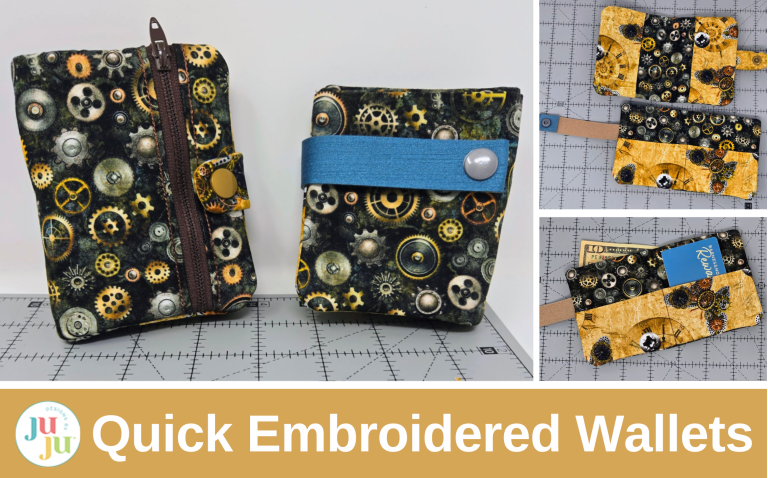
Make a wallet with your embroidery machine—perfect for kids, gifts, or just for fun!
In-the-hoop (ITH) wallets are a playful way to create something both practical and personal with your embroidery machine. I usually make cute projects for my granddaughters, but this time I stitched up something special for my grandsons using fun gears and gizmos fabric. I think they’re going to love them—and I think you will too!
Find the DBJJ team’s favorite supplies in the Designs by JuJu Amazon store.
Let’s gather our supplies, download our format to our USB, and get started!
The directions that come with this design are very good and have lots of pictures. My only problem was the measurements were all in centimeters, so I needed to convert them to inches using the calculator on my phone. I always round up, so some of my pieces were a bit larger, but it didn’t matter because everything gets trimmed in the end.

After you have done your conversions, go ahead and cut out your pieces. Be sure to alphabetically mark them. I did fuse SF101 to my outside pieces to give my wallet a little more stiffness since I am using a quilter’s cotton fabric. Instead of the called-for wadding (batting), I used flannel scraps left over from another project. I cut a scrap of Pellon 987F for the tab because I felt this would be similar to wadding and give the desired support to the snap.
Hoop your stabilizer and let’s head to our machines!

There are two files for the Pocket Wallet, which means there will be two hoopings. Embroider the tab first.

Remove from the hoop and gently remove the tear-away stabilizer. I used my small scissors to trim the Pellon 987F close to the stitching. Then I used my pinking shears to trim around my tab. This helps to remove bulk and make turning easier.

Once your tab is turned right side out, give it a good press. This will adhere the 987F to the tab and also flatten it.
Now we will hoop our second piece of stabilizer and go back to embroider the rest of the wallet. Follow the directions to embroider placement lines on the stabilizer and tape the zipper in place. I like using a longer zipper so that I am sure the pull and metal stops are completely out of the way.

At this point I like to slow my machine down and also increase the height of the foot. We will be going over multiple layers and the tab from here on out, and we don’t want the foot to get hung up. I set my foot height at 0.100”.

Continue following the embroidery steps as directed. When you get to the step to place the tab, center it in the placement guide lines. Tape it well and make sure to go slow and watch that your foot doesn’t catch on it.

Make sure you’re following along with the full instructions that come with your design files, as not every single step is detailed here in the blog. One especially important step—after Step 8 and before Step 9—is to open your zipper halfway. If you skip this part, you won’t be able to turn your wallet right side out later.
The last steps will place the wadding (flannel) on top of everything and tack it down. Then add the lining to the back of the hoop. This step will leave an opening for turning your wallet. (It doesn't matter which side of my flannel is up, as it will never be seen.)

Remove your wallet from your hoop and tear away the stabilizer as close to your stitching as you can. Trim the outside edges, leaving a ¼” seam allowance. Trim across the corners to reduce bulk.

Turn through the turning opening left in the embroidery on the lining side. DON’T PANIC! It will look all inside out and the zipper backwards. This is the way it should look! Do not worry about poking out the corners, we will do that in the next step. Remove the stabilizer from the back of your zipper and open your zipper.
I used a needle and thread to whip stitch the opening closed. You could also do this at your sewing machine. It doesn’t matter as the closing stitches will never be seen.

Now we are going to turn our wallet right side out through the zipper. I think this is genius! Work your corners out with a point-turning tool. Flip the pockets to the inside, and the zipper is on the outside. Give your wallet a good press.


Our final step is to attach the snap. I used a plastic snap set and setting tool. You could use a metal snap and tools as well.

The Easy Peasy Wallet comes in two sizes. Print your directions and add your chosen size and machine format to your USB. I chose the 5x7 size and added it to the same USB drive I used earlier.
Follow the pattern for cutting the size of your fabric pieces. I did fuse SF101 to the back of my outside pieces and the large pocket to give my wallet a little extra support.
Hoop your stabilizer.
Follow the pattern to make the snap tab. Since I used faux leather, I did not need to fold it twice, so my cut size was ¾” x 5”. I folded it once, and added my snap.

Once again, the directions and accompanying pictures are great. I zoomed through this one so fast I forgot to take any photos until nearly the end. Just follow the steps in the directions.

Trim around your wallet following the directions. I used my pinking shears to help eliminate bulk. Remember to trim the corners too.

Turn through the opening gently. You have the option to sew the turning opening closed or not. I chose to do a quick hand stitch to sew it closed.

Once you stitch (or not), flip the pocket to the other side and finish working out the corners. Give your wallet a good press. If you used faux leather, do not touch it with your iron!

The cash pocket fits wonderfully. I did have a little trouble getting my cards in the card pockets. I decided it works better with them sideways. Maybe it is because I used the SF101? Or because it is the smaller wallet? I am not sure, but I do love the body the SF101 gives the wallet.


I hope you try making these wallets. Both are super easy with great directions. They would make a wonderful gift for birthday or graduation. Does your college bound or high school student need a little wallet in their backpack? These would be perfect.
Please be sure to share your projects in the Designs by JuJu Embroidery Blessings Facebook Group, or use the hashtag #designsbyjuju anywhere on social media. We all love to see what you create!
