Toggle Nav
 Inspire.
Create.
Stitch.
Inspire.
Create.
Stitch.
Search
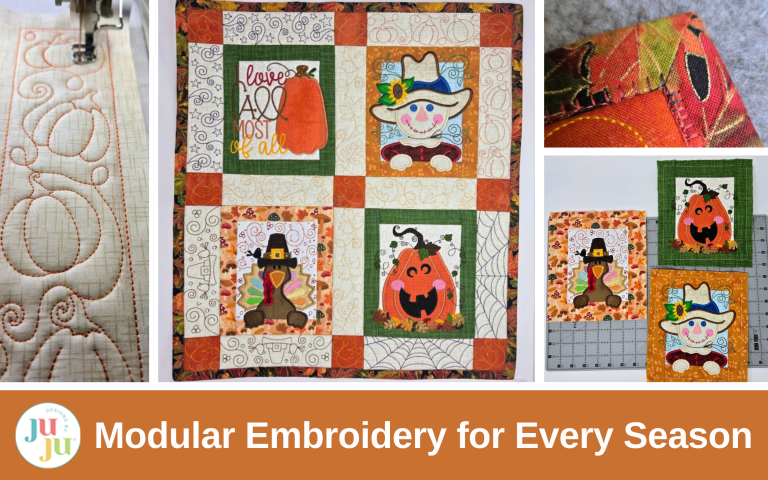
Bring your table to life with modular embroidery designs you can mix, match, and customize for any season!
With the modular table runner and placemat designs, the creative possibilities are endless. You can combine different motifs, borders, and word art to create one-of-a-kind, fun and exciting new projects. Make something entirely different for your next celebration and be uniquely you!
Find the DBJJ team’s favorite supplies in the Designs by JuJu Amazon store.
Today I am using the modular placemat designs and making a fall wall hanging. I chose the turkey, scarecrow, and jack-o'-lantern to represent the family celebrations we do in the fall. But I needed one more design, and didn’t want to repeat a holiday. Word art to the rescue! From Fall Fun Word Art 2 I chose the “I love fall most of all” design. I was all set!
Print out your design instructions and load your preferred design format to a USB stick. Cut your fabric pieces according to the directions provided with each placemat design. I am doing the alternate 7x12 size. This design can also be made with 5x7 and 6x10 hoops; you would just need to do it in extra hoopings. It is all explained in the instructions that accompany the designs.
Begin by fusing the SF101 to the back of your center background fabric as per the placemat instructions.

If you have been embroidering a lot lately and don’t remember the last time you changed your needle, change it now. I sometimes get so involved in my embroidery I forget, so when starting a new project it is a good idea to begin with a new needle. I also always use my little hoop screwdriver when putting stabilizers in my hoops. I am always amazed that I can tighten them more turns than I could by hand, and it really holds the stabilizer well. (It is the little gray piece in the photo above.)
Embroider the turkey, scarecrow, and jack-o’-lantern according to the instructions you printed from the design files. When stitching applique designs, I stitch down as many appliques as I can before removing my hoop to trim. This saves me time. Here is Jack with the pumpkin outline, his mouth, and the top border all stitched before I need to remove my hoop to trim. I am always thinking ahead, trying to save myself a bit of time.

All three placemat centers are embroidered and trimmed.

For the word art, I used the same frame design that the placemats use, but left out the placemat design. Instead, I skipped the applique steps so only the frame remained in my hoop. Don’t take it out of the hoop!

Then I pulled up the word art I wanted and embroidered it in the same hoop right on top of my background. The 6x10 design size fit perfectly.


Once I finished embroidering the main blocks, I decided I wanted borders in my wall hanging. I went back to the three placemat files and pulled a center horizontal border design and a vertical end border design. I used the 6x10 vertical design size since I made the alternate files in my larger hoop. The horizontal design is labeled 5x7. No matter which hoop you used for your centers, the size of this piece stays the same. The instructions that come with each placemat design do a good job of explaining this.

When making a placemat, you need more than one of each border design, so the designs come in sets of two. For my purposes, I only need one vertical design and one horizontal design. I put the designs I wanted on my USB. (There are a lot of options for each placemat, and they can be used interchangeably—zigzags, double zigzags, and other designs.) I chose my favorites and followed the placemat instructions for the placement and tack-down of one design.
A little tip to ensure your fabric is centered for your design is to fold it back and check that you have an equal amount of fabric on each side of your batting.

I chose the Stars & Swirls design from the Witch Feet Placemat to go outside my Word Art block. I stitched one of the 6x10 vertical designs. Leaving everything in my hoop, I got out of that design without embroidering a second one. Then I pulled up the 5x7 horizontal design, advanced the stitching using the arrow buttons until I was on the right side of the hoop, and stitched one 5x7 design in the same hooping.


Repeat this process to make a large and a small border for the pumpkin and turkey placemat blocks.


For the scarecrow, I wanted something with more embroidery than the zigzags and I did not want to repeat a design from the other placemats, so I went to my library and found the Pumpkins & Swirls Quilting Backdrop—the sashings are perfect! My scarecrow can be in a pumpkin field! I chose the horizontal 2x7 and vertical 2x8 sashing sizes. Choose the QAYG (Quilt As You Go) files and you will get the placement and tack-down portions for your batting and fabric.

Since the pumpkins are a quilting design, they are less dense than the placemat border designs. The placemat borders were done in a triple stitch. I wanted my pumpkins to stand out as much as my other borders, so I left everything in the hoop and stitched each design twice.
First I loaded my two design sizes, spacing them about an inch apart using the Move arrows on my machine.

After the left one finished embroidering, I went back and re-stitched the center again. You can do that with the same button you use to set your stitches back, this time setting it one color back instead of a number of stitches. I did the same for the right-side design. As long as it is in your hoop, you can stitch over the previous stitching, making it stand out more.

This is a comparison of a unit stitched once, and another with the pumpkins stitched twice. Can you see the difference?

I laid out my blocks and borders and decided that I wanted some sashing in the center between my blocks. Autumn 3 Quilting Backdrops provides the perfect leaf designs. I chose a 2x7 horizontal design and a 2x8 vertical design. I needed to stitch each twice. Remember to choose the QAYG files so you have the placement and tack-down stitching. I did not stitch over these twice as I wanted them to be more subtle.


Finally, I needed cornerstones to complete my wall hanging. I chose a 2x2 leaf from the same Quilting Backdrop files. I needed nine, so I added six to one 6x10 hooping, then went back and stitched three more. I also double stitched each leaf like I did for the pumpkin borders.

I kept adding to my layout until everything was in place. I love it!

Now it is time to sew my wall hanging together. The placemat instructions give great guidelines on how to piece the parts together. Sew the blocks, borders, sashing, and cornerstones into rows. Press all seams open. I use a dry iron, my wool mat, and a wooden clapper to get nice flat seams.


Continue to follow the placemat instructions to add a backing and quilting. I also did my binding like the placemat was done. I chose a machine blanket stitch to stitch my binding down. The placemat instructions also tell you how to make a nice mitered binding corner.

I absolutely love my new wall hanging!! It measures approx 20” x 22”. I am ready for the cooler temperatures, pumpkin fields, lattes, and fall!

Now it is time to get your creative mind buzzing! Think about using a placemat design on a denim jacket, or make treat bags for the littles with the witch feet or jack-o’-lantern on one side and the crazy patch center on the other. How about decorating a towel? An apron? Or a garden flag? These designs are definitely not only for placemats, and since they are all the same size, you can mix and match to your heart’s content!
Please be sure to share your projects in the Designs by JuJu Embroidery Blessings Facebook Group, or use the hashtag #designsbyjuju anywhere on social media. We all love to see what you create!
