Toggle Nav
 Inspire.
Create.
Stitch.
Inspire.
Create.
Stitch.
Search
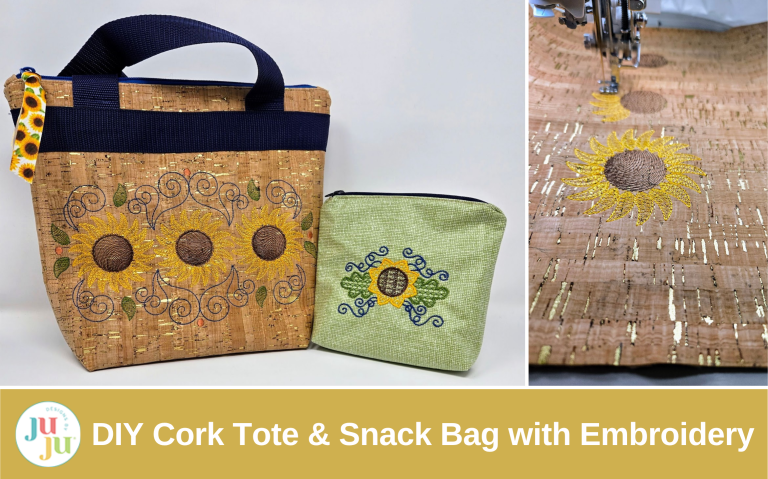
Embroidering on cork is so fun and hassle-free! It is so very versatile that endless possibilities exist. The laminated food-safe fabric makes an excellent lining and an eco-friendly snack bag.
Cork fabric is a textile made from thin sheets of cork that are harvested from the bark of the cork oak tree. This process does not harm the tree, but is quite labor-intensive. The harvested cork is processed into very thin sheets. It is then bonded to a backing material, normally a cotton or polyester. Cork is naturally water-resistant and stain-resistant, which makes it ideal for bags and totes—easy to brush off or wash with a wet cloth. You can also find it dyed in many colors. Let’s get busy and make a cork tote that doubles as a lunch bag, along with a little snack bag.
Find the DBJJ team’s favorite supplies in the Designs by JuJu Amazon store.
Sewing and embroidering on cork is just like using vinyl: pins will leave holes and holes are permanent, so remember to use clips. We also cannot hoop cork, so it has to either be floated or used with a magnetic hoop. It does have a bit of stretch, depending on the backing fabric the manufacturer used. To totally eliminate that, I use a sticky-back tear-away stabilizer. I also float a piece of medium-weight stabilizer under the hoop for added stability. I find a 75/11 needle works well, and I slow my machine down to about 800 spm. Finally, always choose an open design. Just like with vinyls and faux leathers, if you use a dense design or satin stitch on cork, it can (and will) perforate.
Choose your designs. I really like the sketch look of the sunflower designs. Load the format you need for your machine to your USB stick.
From your cork, laminated fabric, and Insul-Bright, cut two 12½” squares of each.

Draw a 2” square on the bottom two corners of each piece and cut out. Save the 2” squares; we will need them later.


I hooped the sticky-back tear-away stabilizer in my 6x10 hoop. Remember that the shiny paper side should face up in your hoop. Use a pin to score the paper and tear it away from the sticky back.

I measured 6” down from the top edge of my cork and made little pencil marks on each side. I lined those marks up with the center lines at the top and bottom of my hoop, centering the cork in my hoop. With your hands, press the cork to the sticky stabilizer. Cut a piece of tear-away to float under your hoop and let’s go embroider on our cork.

Put a new 75/11 needle in your embroidery machine. I love starting a new project with a new needle. Slow your machine down to 800 spm, and embroider your design.

After your design is finished embroidering, remove it from the hoop. Gently tear away the first layer of tear-away stabilizer on the back. It does not need to be torn all the way to the stitches—in fact, it is better if you leave a half inch around your embroidery to further stabilize the cork. After the first layer is trimmed, do the same with the sticky stabilizer. Gently pull it up and cut it away around your embroidery.

If desired, repeat the above steps to embroider the second piece of cork.
I wanted my tote to have the design on both sides and I wanted to try a little experiment. So for one side of my bag, I did as above with the sticky-back tear-away stabilizer and floating the medium-weight tear-away. For the other side, I hooped a medium-weight tear-away and floated a second piece below the hoop. With the two layers of tear-away, my embroidery was a tiny bit bubbly. It didn’t lay completely flat. I think it was a successful experiment and cemented in my mind that using the sticky-back tear-away was the right choice. Don’t be afraid to experiment and learn.

For the next steps, we need our sewing machine. When sewing with cork, increase your stitch length to 3.0 mm. I used an 80/12 sewing needle. Always backstitch at the ends when sewing.
First baste the Insul-Bright to the back and front of your tote ⅛” from the edges. Set aside.

Take your two yards of strapping and cut two 13” pieces. Cut the remaining strapping in half. Each of these pieces should measure about 24”and will be the handles of your bag. I gently melted the cut edges with a match to keep the strapping from unraveling. You could also stitch along each cut edge.

Take one of your embroidered cork pieces and one handle and measure 2½” from the edge and 2” down from the top and clip the handle to the bag top. Without putting a twist in your handle, measure and clip to the other side as well.

Measure down 1” from the top of your tote and draw a chalk line on the strap. Next sew along both sides of the strap, beginning at the end of the strap up to the 1” line, across the 1” line, and back to the end on the other side. Remember to backstitch at the ends. Use a ⅛” seam on the sides of the strap. Repeat for the left-hand side of the tote and strap.

Center the 13” piece of strapping 1¼” from the top of the tote. A small amount will hang over each side. Clip the ends to hold in place and sew along both long edges. This covers the edges of your handles without adding bulk.


Repeat the above steps for the other side of the cork tote, first sewing the handle ends down and then adding the strapping to cover them.
Take two of the 2” corner pieces you cut from the cork earlier. Trim your #5 zipper to 11¼”. This will trim off the metal ends of a 12” zipper, or if using zipper-by-the-yard, add one pull and trim the tape to 11¼”. Place a 2” square of cork against the right side of your zipper end. Sew a ¼” seam, backstitching.

Flip the cork away from the zipper, finger press, and topstitch ⅛” from the fold.

Using your ruler and rotary cutter, trim the cork along the sides flush with the zipper tape. Trim the end so ½” of cork is left.

Repeat the steps for the other end of the zipper.
Once both zipper ends have a cork tab, it is time to put our tote together.
Change to a zipper foot on your sewing machine. I have kept my stitch length at 3.0 mm for the entire tote. Center your zipper, right sides together, with the top of your tote. Push the handles down out of your way. Use clips to hold in place if you need to and sew a scant ¼”, attaching the zipper to the tote top. If the zipper head gets in the way, stop with your needle down, raise your presser foot, and move the zipper pull behind the foot.

Now take your lining piece and place it on top of the zipper, right side of lining to wrong side of zipper. You are making a zipper sandwich. Clip in place and sew with the lining to the bed of your machine. This way you can see your previous zipper seam and sew a full ¼”, or just to the left of your previous stitching. Sew just to the ends of the zipper tabs. Remember to backstitch at the beginning and end.


Gently finger press the cork and lining away from your zipper. I like to fold my lining up over the cork on the bottom of the tote front and clip in place to keep the lining taut.

Keeping the handle out of the way, topstitch along the cork, ⅛” from the fold of the cork. Remember, if the zipper pull gets in the way, stop stitching, lower your needle into the tote, lift the presser foot, and gently move the pull to the back where you have already sewn.
Repeat the above steps for the other side of the zipper and lining.

Next, open your zipper all the way. (Do not skip this step!) We are going to sew our tote together, and we need to have the zipper open for turning.
Lay out your tote so the lining pieces and cork pieces are right sides together. Clip the edges, matching the strapping along the sides and the top cork and lining pieces together.

Sew both long edges, still using your zipper foot so that you can get close to, but not stitch through, the zipper tabs. Stitch the bottom of the cork from corner to corner, backstitching at ends. Stitch 1” from the corner on each side of the lining bottom, leaving the rest open for turning your tote.

Now you can remove your zipper foot and go back to your ¼” or regular foot.
Before we turn our tote, we need to box our corners. Fold the opening so the bottom seam matches the side seam. Sew with a ¼” seam, backstitching.


Repeat for the other cork corner and both lining corners.
And now it is time to reach through the opening in the lining and turn your tote right side out. Go slowly and work gently. It will come through the open zipper, into the lining and out the opening.


Once you have your tote turned right side out and the corners gently pushed out on the cork, it is time to stitch the lining opening closed. Turn both seam allowances to the inside and stitch close to the folded edges. Remember to backstitch.


We will follow all the same steps as the tote, with the exception of the zipper. Be sure to change to your zipper foot when sewing the zipper to the bag and lining.
Cut four 7” x 7” squares of laminated fabric. You will use two of the 2” corners you cut from the tote lining and your 7” zipper.
Trim your zipper to 6”. This removes the metal at both the top and bottom of the zipper. Stitch the open ends of the zipper together to hold them in place. Fold a 2” lining piece around your zipper so the open ends meet at the back, right sides together. Stitch with a ¼” seam. Do this to both ends of the zipper.

Gently pull both ends of the lining over the zipper ends.Topstitch ⅛” from the fold on both tabs. Set the zipper aside.

Add your chosen design to your USB stick and let’s embroider one of the 7” squares. Hoop your sticky-back tear-away stabilizer and float a piece of tear-away as we did with the tote. Once the design is embroidered, remove the stabilizer in layers, first the tear-away and then the sticky tear-away. Again, no need to tear too close to the stitches.
Now trim a ¾” square from the bottom two corners of all four laminated snack bag pieces. Two of these pieces will be the outside of your snack bag and two will be the lining. Go ahead and embroider both outside squares if you wish.

Attach your zipper foot. Center your zipper over the top of your embroidered square. The ends will extend past the front of the snack bag on each side. Sew in place with a scant ¼” seam, sewing all the way to the ends. Make a sandwich with one of the laminated pieces; this will be the lining piece.
Sew and topstitch both sides of the zipper as we did for the tote, sewing all the way to the ends of the zipper tabs. Finally, trim the tabs even with the sides of the snack bag. The reason I do zippers like this in snack bags is because this ensures no opening left by the zipper end for any spilled liquids to leak out. It may not be super pretty, but it is effective.

Open the zipper. (Do not skip this step!) Clip the right sides of the lining together and the right sides of the snack bag, like we did for the tote. At the zipper, push the tab and zipper to face the outside of the snack bag.
With a ¼” seam allowance, sew the long edges.
Sew the bottom of the front, and sew the lining just 1” from each corner, leaving an opening for turning.
Box all four corners, same as we did for the tote.
Turn right side out through the opening in the lining. Sew the lining opening closed.


You are finished! Add some M&M’s, cookies, fruit, etc. to your snack bag and enjoy! Your tote and snack bag can be wiped off with a wet cloth if any spills occur. The snack bag can be hand or machine washed and air dried for any bigger messes. Happy snacking!
Please be sure to share your projects in the Designs by JuJu Embroidery Blessings Facebook Group, or use the hashtag #designsbyjuju anywhere on social media. We all love to see what you create!
