Toggle Nav
 Inspire.
Create.
Stitch.
Inspire.
Create.
Stitch.
Search
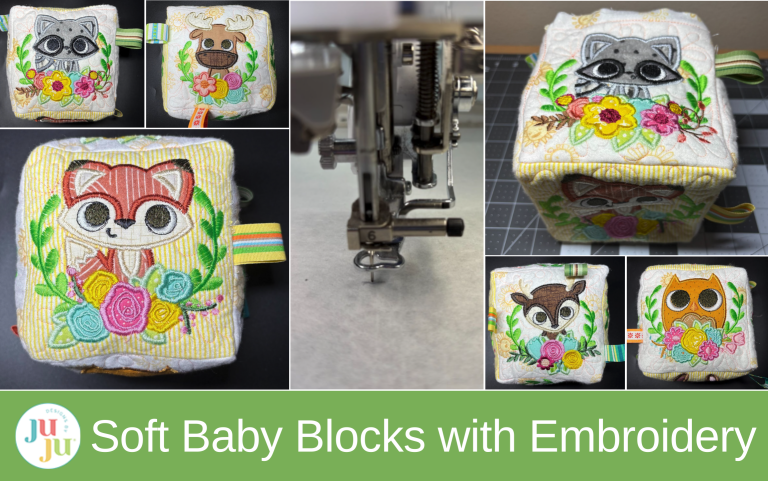
This DIY soft baby block is quick to make, perfect for scraps, and a sweet handmade gift for babies to love and play with.
Soft baby blocks are a timeless handmade toy, and this DIY version is the perfect way to combine sewing and machine embroidery into one meaningful project. Each side of the block offers a chance to showcase embroidery designs, playful fabrics, and gentle textures that babies love to explore. Whether you personalize it with letters, animals, or simple shapes, this soft baby block is an excellent way to use embroidery creatively while making a keepsake that's both beautiful and baby-safe. It's an approachable project that works well for gifts, craft fairs, or adding a handmade touch to a nursery.
Check out the DBJJ team’s favorite supplies in the Designs by JuJu Amazon store.
For all your stabilizer and batting needs don’t forget to visit Designs by JuJu+.

You will need six squares to complete the block. For each side of the block cut two squares, each measuring 7" x 7", one from cotton or flannel and the other from cotton batting.

Hoop stabilizer. I am using tear-away stabilizer, but you could use wash-away or cut-away.

Find the center of your 7" x 7" squares. Mark with an erasable fabric marker or a pin.

Open the Shapes menu on your embroidery machine and select the square shape. You'll want to create a 5" x 5" square.

Load the square onto your machine, select the Edit button, and resize your square as close to 5" x 5" as possible. My machine is a Brother Stellaire; your screen may look different.


Select the Add button, then choose your Quilting Backdrops design files. I am using the Daisy Chain Quilting Backdrops Design.

Select Square Blocks.

Choose a size that fits within your 5" x 5" square.

Add to your screen. It should fit nicely inside your square.

Load the embroidery design of your choice into your machine. I am using the Baby Woodland Laurels design.

Select the smallest design size and add it to your screen.

Using the Edit button, rotate the design 90° to the right if needed. To enlarge the design, click the Edit and Size buttons to set the design to its maximum compatible size.

Select Embroidery, and you are ready to begin.

Find the center of the design.

Mark the center of your design on the stabilizer. Remove the hoop and place it on a flat surface.

Align the marks on the fabric and batting with the marks on the stabilizer. Pin the fabric to the hoop, making sure the pins are out of the stitching area. Take the hoop to the machine.

Start with the square outline. This will not only serve to tack your fabric down but also to guide your seams when sewing your block together. Stitch out the square.

Next, stitch out the quilting only design. Once that is complete, proceed to the applique. The first step of the applique is a placement stitch for the fabric.

Place your scrap fabric down fully covering the stitches.

The next step is the tack-down stitch. Remove the hoop from the machine and place it on a flat surface.

Trim around the fabric piece.

Continue with each applique piece in your design. Remember to trim each piece before beginning the next one.

Once all appliques are in place, finish with decorative and satin stitches.

After completing the design, remove it from the hoop.

Trim the stabilizer and batting close to the stitches on the back.
Repeat for the remaining five squares.


Trim ½” from the outer square stitches on all four sides.

You should now have six completed squares. Arrange your squares in a cross shape as shown in the picture.

Cut assorted ribbons 4" in length. These will be used for the tags.

Place the ribbons around your blocks; they don't have to be centered and can be placed anywhere you prefer. You can add as many or as few as you like.

Fold each ribbon in half. Pin or clip the raw edges of the ribbons to the fabric's raw edge. You want the ribbon's fold to face the inside of the square.

Place the top and second squares with right sides together. Ensure the top square is facing downward. Begin stitching at the square stitch line, and do not stitch beyond that ½” line on either side. Stitch just inside the stitch line to keep it hidden when turning right side out. It is very important that you only stitch between the square stitch lines and not past them to the edges—this will allow you to create the box shape.

Continue this process, adding blocks to create one long vertical strip of four blocks.

Sew the two side squares to either side of the second square, maintaining the ½-inch seam allowance. Your project should now look as shown.

Pull the two side squares up and clip the tops to the sides of the first square.


At the sewing machine, stitch down the sides again, keeping the ½" in and just inside the stitch line. Do not stitch past the stitch line.

Your block should now look like this. Bring up the last square and sew to the side squares following the same process.

After securing all four sides, attach the top square.

To do this, clip or pin three sides of the top. Stitch, taking care that your raw edges and corners match up.

Make sure to leave one side open for turning and stuffing the block with Poly-fil.

Once the three sides are sewn and one side is left open, turn your block right side out. Ensure that all corners are well-turned and your tags are caught in the seam allowances.

Stuff your block with Poly-fil® to your desired fullness.
Finally, tuck extra fabric in on the open side and hand-stitch to close your block.

Enjoy your completed quilted block with applique!


Handmade toys have a special way of becoming cherished keepsakes, and these soft baby blocks are no exception. With every stitched detail and carefully chosen fabric, you create something both playful and meaningful for little ones to enjoy. This project is a wonderful opportunity to use your favorite Designs by JuJu embroidery designs, try new textures, and turn small scraps into something truly special. Whether you’re making one block or a whole set, these soft baby blocks are sure to be treasured for years to come. Make them in multiple sizes, and you can even add a rattle or crinkle paper to the inside.
We’d love to see your finished soft baby blocks! Share your project in the Designs by JuJu Embroidery Blessings Group on Facebook or use the hashtag #designsbyjuju anywhere on social media so we can celebrate your creativity and you can inspire others to start stitching too!
