How to Make In-the-Hoop Key Fobs with Snaps: Quick & Easy Machine Embroidery Projects
Stitch up some fun with these colorful, snappy key fobs—quick, cute, and perfect for gifts or just showing off!
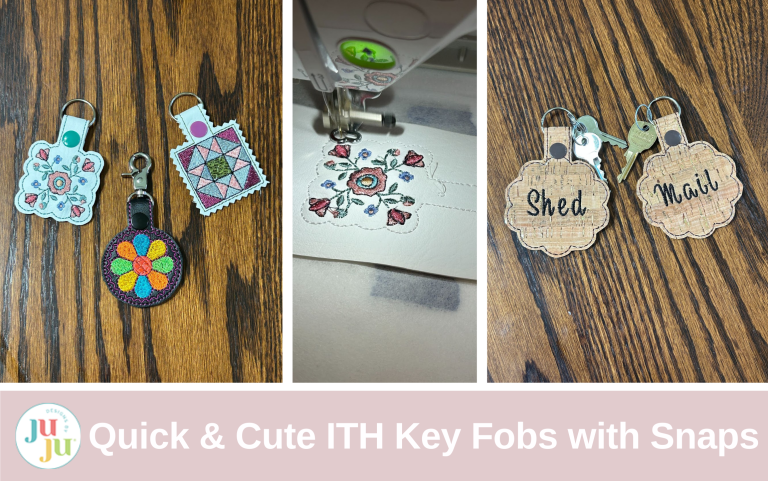
DBJJ has quite a few designs for these quilt block key fobs. I love them for personalizing my keys, purse, or as gifts to give to like-minded friends. Today I’ll show you how to make them and how to use KAMsnaps® to close them. I’ll also show you how to use a blank key fob to personalize in any way you’d like it.
Let’s get embroidering!
Supplies
Don’t forget to check out the DBJJ team's favorite supplies on Amazon.
- Designs by JuJu+ tearEZ Tear-Away Stabilizer
- Marine vinyl or fabric-backed cork
- Thread
- KAMsnaps and setting tools
- Painter’s tape
- Sharp precision scissors
- Key ring hardware
- DBJJ designs used in this project:
Load your design and hoop some tear-away stabilizer.
Stitch your placement line.
Cover the placement stitches with a piece of marine vinyl and run your tack-down stitch.
The next few steps are design elements. They will be different depending on the design that you have chosen. Use your color chart and move through them changing thread colors as you go.
Once all the stitches have stitched out, remove the hoop from the machine and trim up the back threads.
With the back of the hoop still facing up, place a piece of marine vinyl on the back side of the design. Ensure it covers all the stitches. Tape it in place.
Run the last step. This stitches the front and back vinyl pieces together. This will create a sandwich that finishes the stitching of the key fob. I initially stitched it in white, but went back and did it in a sage green thread to add a bit of a contrasting design to it.
Trim the threads on the back side of the fob.
Remove the design from the hoop and tear away the stabilizer from between the vinyl layers.
Cut out the key fob. Using sharp scissors and leaving a small, consistent margin around the key fob, cut through both layers of marine vinyl.
Now it’s time to get our KAMsnaps ready. Gather the four pieces you need for a complete set. This will look like two pieces with a push-pin look (these are the caps) and one snap piece that sticks out and one snap piece that has an opening. Pair the caps with the snap pieces.
Punch holes where the marked circles on the tab are. I used an awl, but a Crop-A-Dile Big Bite works well too.
Using the setter, apply the KAMsnaps. If you align it so the caps are on the same side as your design it will have the tab fold backwards when you’re finished.
Add the ring to the tab and snap the snaps together. Now you’re ready to add your keys!
You can also use pinking shears to trim the edges of your designs for a different look.
If you’re using hardware with a clasp you will want to install the KAMsnap closest to the design, and then add the clasp before you place the second KAMsnap.
And don't limit yourself to white marine vinyl. Using black for this one helps the design pop!
I also wanted to try some of the key fobs with fabric-backed cork. I tend to have a bunch of keys that are for things we don’t often use and it’s easy to forget what they are for! So using a design from the Blank Shapes Key Fob 5, I decided to create some fobs that were also labels.
I took my design into Embrilliance and added the labels I wanted with the Amelia Embroidery Font. In this case it was for the keys to the shed and the keys for the mailbox.
Stitching them is the same as the ones before. Remember to stitch the word labels before removing the design from your machine and adding the backing. Before you know it you will have cute key fobs that will help keep all your keys organized.
These seriously stitch up in only minutes. Depending on your hoop size you can even do more than one at a time. They are fun to personalize to fit your style and make sure everyone knows which keys are yours!
I love the one on my purse to let everyone know of my love of embroidery!
That’s it! Now go make another, because these are so easy and totally addicting. Share with us your creations in the Designs by Juju Embroidery Blessings Facebook Group or anywhere on social media using the hashtag #designsbyjuju. We love to see how you make these designs your own!


