Toggle Nav
 Inspire.
Create.
Stitch.
Inspire.
Create.
Stitch.
Search
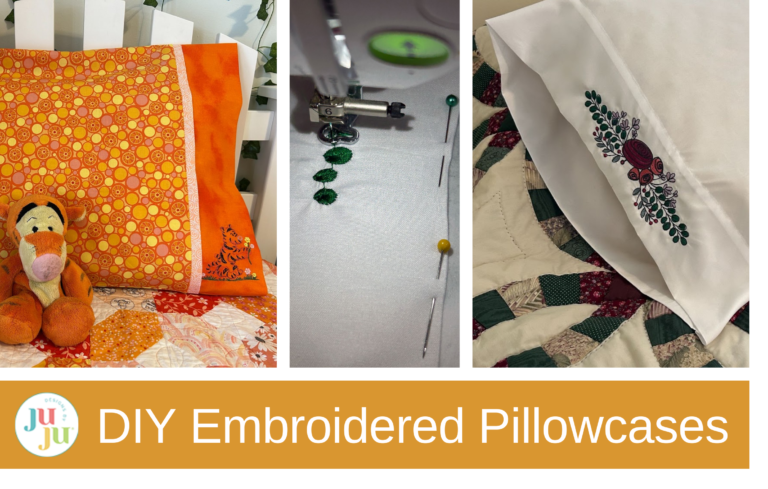
Easily embroider pillowcases with floral designs or fun characters like Pooh and Tigger!
Looking to add a personal, handmade touch to your bedding? In this tutorial, I’ll show you how to transform simple pillowcases into beautiful, embroidered accents that match your style—whether you’re stitching elegant floral borders or playful characters like Pooh and Tigger. With just a few supplies and your embroidery machine, you can create cozy, custom pieces perfect for your home or as heartfelt gifts!
I think an embroidered pillowcase makes my bed look so put together. Today I’ll show you a couple of ways to embroider store-bought pillowcases to help them match your decor, and I’ll show you how to make one of your own to personalize.
Let's get started!
Check out the DBJJ team’s favorite supplies in the Designs by JuJu Amazon store.

I wanted to embroider this design on the cuff of the pillowcase. So I needed to hoop everything so it would line up straight. To do this I measured the cuff of my pillow and found it was 4 inches wide and 20 inches long. I found the center at the 2-inch mark and the 10-inch mark, and I marked this with a water-soluble pencil.

Now you are going to hoop. I placed the stabilizer behind the band of my pillowcase, making sure that the other side of the pillowcase was out of the way, and positioned my fabric and stabilizer in my hoop. Using the guide that came with my hoop, I lined up the center position with the center of my guide (which for my model is a little off center in my hoop) and made sure it was straight up and down in the hoop. Then I tightened my hoop so it was secure.

Next you need to secure the unhooped edge. If you have a machine or software that does a basting box around your design, you can do that. I do not have that option on my machine, so I pinned the edge down securely. If you do this, make sure your pins are out of the way of your stitching area.

Once you are securely hooped, you will start stitching out the design.

Continue through the steps following the color chart, trimming your threads as you go as needed.

When finished stitching, take a moment to admire your design. My center mark was covered by stitching, but if yours is still visible go ahead and remove it.

Then remove from the hoop. Peel away excess stabilizer.

Trim your back threads.

Press your design to remove the hoop marks. I always use a pressing cloth to protect the stitches.

Then enjoy your embroidered pillowcase.

Alternatively, you could position your embroidered design in the middle of your pillowcase. If you do that, the sleeping surface will be covered with stitches, but these add a beautiful decorative touch on your bed!

Now let’s make our own custom pillowcase. My measurements below are for a standard size pillow. You would need to adjust for king-size pillows.

I like making these pillowcases to match quilts I make. This one is for a quilt I made that had an orange Tigger print in it. We will place all the fabrics on our cutting board and cut off the selvages. Since fabric width varies between prints, I also trim them to the same width.

This is how your pillow will look going forward.

Now we can set aside the main body piece and accent piece. We will be embroidering on the cuff. I iron it lengthwise and use the pressed line to see where my hoop needs to be placed. The band will be folded in half when we are finished, which will also encase the back of our stitches.
The accent piece will cover some of the cuff piece so when I found the center of my cuff I moved it closer to the fold. I wanted this design at the bottom of the cuff, but you could center it on the fabric.

Hoop a piece of stabilizer with the pillowcase cuff, positioning the cuff where you want to have your design.

Stitch out your design on the cuff.

Remove it from the hoop and trim your threads.

Remove excess stabilizer.

You can now set the cuff aside and sew the pillowcase. For the main body you will sew one short side and one long side, with right sides together. I use a serger to finish the edges, but using any stitch that finishes the edge of your fabric will work.

Now you will do the same for the short edges of the cuff and accent. Make sure the cuff is open, and fabrics have right sides together. Sew the short edge with a finishing stitch.

Now we will iron the cuff in half, wrong sides together, lining up the raw edges.

Do the same for the accent piece.

Now I like to lay the pillowcase out the way I will sew it.

First, place the accent band overlapping the body of the pillowcase with raw edges together. I like to line up the seams on one side.

Then do the same for the cuff piece. Remember to have the piece that is embroidered on the inside, facing the body fabric. At this point I pin or clip the fabrics together.

As you sew, you will be sewing through five layers (one body, two accent layers, and two cuff layers).

Take the pillowcase to your sewing machine and stitch around the raw edges. I allow myself a ½” seam allowance, but check your embroidery design and make sure you have room for it all to be seen.

Turn it right side out and check how everything looks.

Iron the seam so you get a nice, finished look.

Enjoy your personalized pillowcase! They are comfy enough to sleep on but nice enough to display!

If you make embroidered pillowcases, please share with us in the Designs by JuJu Embroidery Blessings Facebook Group, or anywhere on social media using the hashtag #designsbyjuju. We love to see what you create!
