Toggle Nav
 Inspire.
Create.
Stitch.
Inspire.
Create.
Stitch.
Search
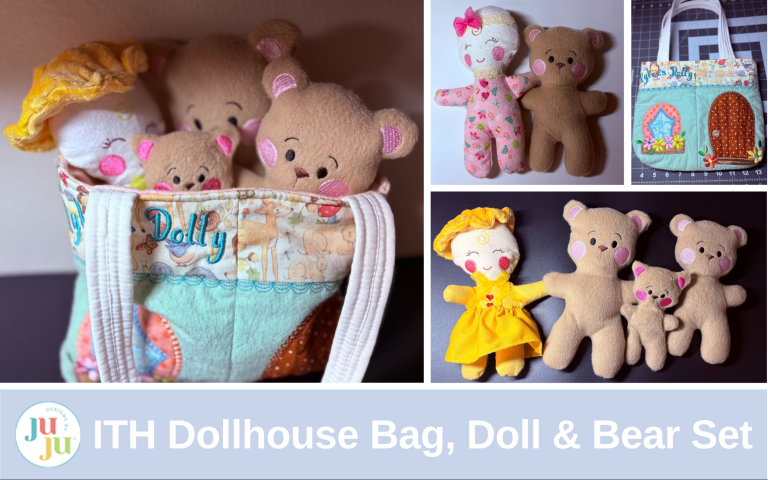
This set will inspire the imagination and make playtime fun. Create a world of make-believe your little one will love.
Check out the DBJJ team’s favorite supplies in the Designs by JuJu Amazon store.


This bag is constructed using four hoopings with either a 6x10 or 7x12 hoop. First, two panels are sewn together to create the front of the bag, and then two additional panels are sewn together to form the back. We will add a lining to the bag, and you have the option to make your own straps or use store-bought strapping. I will be making the 6x10 size.
You can personalize your bag using embroidery software, or directly at the machine—whatever works best for you.
To begin, let's start with the My Dolly panel.

If using software, upload the correct design and size to your computer. Choose the font you wish to use. I am using the Such Is Life Embroidery Font in 1”.

Once you are satisfied, save your design directly to your machine or a USB stick.
If you don't have any software, don't worry. You can still personalize your bag.

Choose the My Dolly design size that works best for you and upload to your screen. My machine is a Brother 8500; your screen may look different.

Select the Add key and bring up the font you will be using.

Add each letter one at a time by using the Add button.

When you have all your letters added to the screen, use the Move button to arrange them on top of the My Dolly letters. Layering them on top will help in spacing them correctly across the design area. If desired you can use the Rotate button to angle them.

I angled my letters 10° to the left and right. Try playing with different options available on your machine. You will be surprised what you can accomplish without software.

Once you are satisfied with your letters, you can begin stitching out the design. Remember to skip over the My Dolly stitches. I find it useful to save this to my machine or a USB stick in case I want to make another bag in the future.

Load the correct design size. Hoop the cut-away stabilizer and take it to the machine.

Begin by running the placement stitch for the cotton batting. Once finished, place the batting over the stitches. Next, run the tack-down stitch. After this step, remove the hoop and place it on a flat surface.

Trim the batting close to the stitches. Return the hoop to the machine and run the placement stitch for the bottom section of the bag. Remove the hoop and place on a flat surface.

Place the bottom bag fabric over the stitches, leaving at least ½” on the sides and bottom for trimming later.

Take the hoop back to the machine. Run the tack-down stitch.
The next two steps involve adding a decorative stitch on top and the placement stitch for the bag’s upper section. Complete these steps, then remove the hoop and place it on a flat surface.

Choose your fabric for the top of the bag.

Place the fabric right side down, extending ¼” beyond the placement line. Ensure there is at least ½” on the top and sides for trimming later.

Return the hoop to the machine. Run the tack-down stitch.

Turn the fabric right side up and finger press flat over the stitches.

The next step is the tack-down stitch for the top fabric. These steps will be the same for all four panels.

Three of the panels have applique. To begin an applique, run the fabric placement stitch.

Place the fabric over the stitches. Be sure to cover all the stitching. Run the tack-down stitch. Remove the hoop and place on a flat surface.

Using a sharp pair of applique scissors, carefully trim the fabric close to the stitches. I used dark thread here for demonstration purposes, but I recommend using light thread or one that matches your fabric. Once you’ve finished trimming, return to the machine to continue with the next steps.

Always remember to trim the fabric after each addition before moving on to the next step.


This panel is embroidery only. No applique.

When finished you should have four panels.

Trim the stabilizer close to the stitches on the back side of each panel. For best results, do not include the stabilizer in the seam allowance.

On the front side of each panel, trim ½” from the stitching line. Do this on all four sides.

Take the front two panels and position them with the right sides facing each other. Line up the sides and corner stitch lines.

Take extra care to line up the top section with the bottom section.

Take the panels to the sewing machine. You will see two lines of stitches: the inner line is for tacking down the batting, while the outer line is for tacking down the fabric. Be sure to stitch between these two lines. Designs by JuJu has made it easy to achieve a perfect stitch line. With a ½” seam allowance, sew the panels together.

Remember to backstitch at the beginning and end, and check to ensure that the top and bottom seams line up.

Repeat with the back panels.

Press the seams open on both the front and back panels.

With right sides together, align the front and back seams and clip or pin the sides and bottom. If you are not going to box your corners, sew a ½” seam down both sides and along the bottom. Remember to backstitch at the beginning and the end.

If you want to box your corners, sew along the ½” seam allowance as illustrated. Remember to backstitch at the beginning and end.
At this point, you can either keep your bag as it is and move on to the straps, or you can box the corners.

Adding boxed corners will create more depth and help the bag stand upright.

To box the corners, open the bottom and place the side seam right in the center.

Measure 1” up from the bottom and draw a line.

Sew along this line, then repeat on the opposite side.

Turn the bag right side out.

The outside section of the bag is complete.

For the straps, cut two cotton strips 3” x 20”. Cut two batting strips 2” x 20”.

Fold in ¼” on the long raw edges of the cotton strips and press. Repeat this step on both sides of the two strips.

Place the batting down the center.

Bring the folded edges to the center and slightly overlap one side onto the other. Clip to hold in place, then take it to the sewing machine.

Sew along the center, ensuring you catch the overlap in the stitches. Then sew down both sides of the center stitching. Repeat this for the second piece. Set the straps aside.


With the bag inside out, measure horizontally from raw edge to raw edge.

Do the same vertically. My bag measures 12” across and 10” down.

Cut two pieces of lining fabric the same size as your bag.

With the right sides of the fabric together, pin or clip the two lining pieces. The lining should be slightly smaller than the bag to ensure a better fit once sewn to the inside. Measure ½” in from both sides and then measure ⅝” up from the bottom. Mark these measurements with a fabric pen; these will serve as your seam allowances.

Take the fabric to the sewing machine and sew down ½” from one edge. Stop stitching ⅝” from the bottom; do not sew all the way to the end. Next, sew across the bottom, maintaining a ⅝” seam allowance. Stop ½” from the opposite side edge. Remember to backstitch at the beginning and end of each seam.

Stitch down ½” on the opposite side leaving a 6” opening. This will be the opening for turning the bag later.

If you are boxing the corners, align the seams as we did for the bag. Measure up 1” and stitch across. Repeat this on both sides.

Trim across ¼” from the stitches. This will reduce bulk. Your lining is complete.

Start by attaching the straps to the outer bag. Measure an equal distance from the center of the bag, then mark this spot on both sides with a fabric pen. From the center bag seam I measured 2½” over on each side. Repeat this on both the front and back of the bag. Center the straps over these marks and pin them in place, ensuring that the straps are not twisted and align properly on both the front and back of the bag. Take the bag to the sewing machine and stitch across the straps with a ½” seam. Don’t forget to backstitch at both the beginning and the end of your seam.

Before continuing, check the straps. Are they lined up? Are they the length you want? If necessary make any changes now before continuing.

Locate the top center on each side of the lining and mark it with a fabric pen. The centers will be matched with the exterior seams of the bag.

With right sides together, insert the bag into the lining.

Ensure the straps are tucked inside. Align the center marks on the lining with the center seams on the bag. Clip them in place. Align the side seams.

Continue clipping around the bag, ensuring that both the outer fabric and the lining remain flat and aligned. Then, take the bag to the sewing machine and stitch a ½” seam completely around the top. Finally, pull the outer bag through the opening in the lining.

Your bag should appear as shown. Before closing the lining, ensure that everything is stitched correctly.

If you are satisfied, sew the lining closed and give the lining a nice press.

Tuck the lining inside the bag and clip together at the top. Then, take it to the sewing machine.

Topstitch completely around the top of the bag. I prefer a stitch length of 3.5mm when working on a topstitch.


Your bag is complete!

This adorable handmade doll is like a pocket-size friend. With her soft fabric, whimsical design, and friendly expression, she invites endless storytelling and playful interactions. She makes an ideal companion for both quiet moments and exciting adventures.
Being handmade, she is perfectly imperfect and truly one of a kind, adding to her special charm. No batteries or flashy lights are needed; all she wants is a cozy spot, a snuggle, and a bit of imagination. With just a spark of creativity, she can transform into anything your child dreams up, whether that's a lovely princess or a daring pirate. This precious doll is ready for all sorts of adventures with your little one!

Upload the arm design to your machine and complete these steps first, as they will later be added to the doll design. The arms come in two sizes, so be sure to select the correct size to match the doll you are making. You will need two pieces of fabric, each cut to fit a 4x4 hoop.
Hoop the stabilizer of your choice into the 4x4 hoop. Then take it to the machine and run the first step.

This is the placement stitch for your fabric.

Place the fabric down with the right side facing up. Ensure that the stitches are completely covered. Leave a 1” margin at the top to facilitate easier attachment of the arms later.

Begin with the fabric tack-down step. For demonstration, I'm using a dark thread. However, to achieve the best results, I suggest choosing a light color or a thread that closely matches your fabric. This will help ensure a clean and professional finish.

Place the second piece of fabric with the right side facing down on top of the stitching. Then, return to the machine to complete the final step. Finally, remove the arms from the hoop.

Trim close to the stitches. Leave 1” of fabric across the top.

Turn the arms right side out and stuff with Poly-fil.

Stuff only to the top stitch line. Set aside.
The design download provides instructions for creating the doll body in a single hooping. The front head and front body are made from two separate pieces of fabric, while the back of the doll is crafted from a single piece of fabric. In this tutorial, I chose to create my doll using two hoopings. This approach allows the doll's head to match on both the front and back, as well as ensuring that the body and arms are coordinated. You can decide whether to make your doll using one hooping or two, depending on your preference.


Doll made in two hoopings.

Choose either the 6x10 or 7x12 doll body and load the design onto your machine. Hoop your choice of stabilizer; I am using cut-away. Run the first step, which is the placement for the doll head fabric.

Place the fabric for the doll head over the stitching, ensuring at least 1” or more extends beyond the stitches along the top and sides. Proceed with the next two steps.

This is the tack-down stitch for the head and the placement stitch for the body fabric. I am using a dark thread for demonstration purposes, but I recommend using a thread that matches your fabric.

Place the body fabric, right side down, ¼” past the placement line. Run the tack-down stitch.

Fold the fabric down over the stitch line and run the body tack-down stitches.

If you are doing two hoopings for the doll, the first hooping will serve as the back. After you finish this step, remove it from the hoop and set it aside. Next, repeat the previous steps to create the front of the doll. Once you reach the steps for the face, continue with the tutorial.

If you are doing one hooping, continue with the next steps. These will be the face stitches.

After embroidering the doll face, you will attach the arms. Begin by running the placement stitch for the first arm. Then, remove the hoop and place it on a flat surface.

Align the arm stitches with the body stitches and secure them in place with tape or pins. Then, take it to the machine and run the tack-down stitch. Repeat this process on the opposite side.

You are now ready to attach the back of the doll to the front. If you are using a single hooping method, place your fabric right side down and run the final step.

If you are using the two-hoopings method, position your body back and align it with the front, right sides together. Start at the neck, ensuring that the two seams match up perfectly. To secure everything in place, use pins or tape at the top.

Continue to line up the seams.

The hands will create bulk so you may need to stop and readjust as you stitch the front and back together.

Reduce your machine speed. I recommend 350 spm. This will give you more control in keeping the front and back seams lined up. Always be aware of the needle and keep fingers at a distance.

Completed, your doll should look like this, with an opening on one side for turning. Remove the hoop from the machine and the doll from the hoop.

Trim ⅛” from the stitches. Leave ½” of fabric at the opening.

Snip curves at the neck and legs, being careful not to cut into stitches. Turn the doll right side out.

Stuff to desired fullness. Hand stitch the opening closed.

Your doll is finished!

Dress her up with lace around the neck and a headband if desired.
I absolutely love this little bear! It comes in two sizes, and the best part is that you can complete it in just one hooping, which is super convenient. For this tutorial I’m working with the 6x10 size.
You can have so much fun with this project because you can choose from a variety of fabrics. Whether you prefer cotton for a classic look, faux fur for something cozy, fuzzy fleece for that extra softness, or even regular fleece like I’m using, there’s something for everyone. Just a little tip—if you go for fur or fleece, be sure to use a water-soluble film topper, like the New brothread Light Weight Clear Wash Away - Water Soluble …, to keep the stitches on top of the fabric.

For my bear, I chose to use regular fleece.

Hoop cut-away or tear-away stabilizer and run the first step. This is the placement stitch for the fabric.

Place the fabric right side up covering the bear outline. Leave at least ½” completely around to trim later. If you are using a fabric with a nap make sure it is lying in the correct direction. Napped fabrics have raised fibers on the surface that fall in one direction.

If needed, place the film topper over the fabric. Take to the machine. The film topper will keep the stitches from sinking into the fleece or fur fabric. If you are using cotton there is no need for the topper.

Stitch out the bear. Remove the hoop and place on a flat surface.

Remove the film topper.

Place the second piece of fabric right side down on top of the hoop, making sure that the nap of the fabric is aligned correctly. Once you have done this, return the hoop to the machine and continue with the final step.

This attaches the back of the bear to the front. Remove the bear from the hoop.

Trim around the bear close to the stitches, approximately ⅛” all around. Snip close to the stitches between the legs and under the arms and around the neck. Leave ½” at the opening. This allows more fabric to work with when hand-stitching the opening closed.

Turn the bear right side out. Round out the corners.

Stuff the bear to your desired fullness. Turn the excess fabric at the opening to the inside and hand stitch the bear closed.

This fun set is just what your little one needs to spark their imagination and bring magic and joy to playtime. It opens the door to a magical world of make-believe that they won’t want to put down!

Unlock your imagination and creativity! Consider resizing and embroidering three bears in varying sizes to bring the enchanting tale of "Goldilocks and the Three Bears" to life during storytime.

This hands-on approach can make the experience more engaging and memorable. Take storytime with you wherever you go.
If you have twins in your life, why not create matching twin dolls for them? This thoughtful project can strengthen their bond and inspire imaginative play. They’ll love having their own special toys to play with together.
We can’t wait to see where your imagination takes you. Please share your creations with us in the Designs by JuJu Embroidery Blessings Group on Facebook, or use the hashtag #designsbyjuju anywhere on social media. Happy stitching, and happy creating!
