Toggle Nav
 Inspire.
Create.
Stitch.
Inspire.
Create.
Stitch.
Search
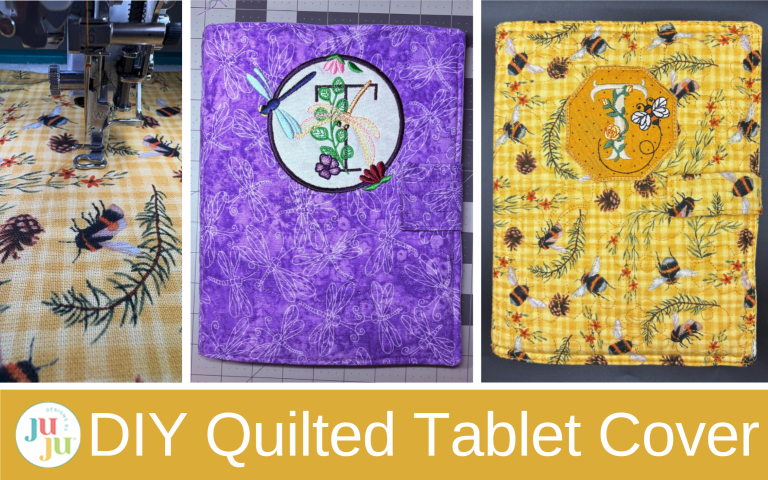
Create a stylish quilted tablet cover with this easy step-by-step tutorial. These are perfect for gifts or everyday use!
Looking for a fun and functional project? This quilted tablet cover is the perfect blend of creativity and practicality. You’ll learn how to quilt as you go, customize the size to fit your device, and end up with a beautiful, padded cover that keeps your tablet safe in style. Let’s dive in and start stitching!

Since Kindles and tablets come in multiple sizes you will want to measure yours before beginning.

Measure the height. This tablet measures 8” tall.

And 5½” wide.
In this tutorial, I’ll be using these measurements as my guide. But don’t worry if your tablet is a different size! Just add 1½” to the height and 2” to the width to get the perfect fit. So if your tablet measures 7” x 5”, your front and back pieces will be 8½” x 7”. Easy peasy!
Check out the DBJJ team’s favorite supplies in the Designs by JuJu Amazon store.
To give you an example of how you can customize your tablet cover, I made this cover for a 10” x 7” device.


I used a circle shape from my machine with the satin finish. It's always fun to experiment with different designs! Instead of adding a patch, I appliqued the circle on, then stitched my designs directly onto the front cover. If you’d like to try this too, stitch them out after quilting but before adding the foam.
I’ve put together these measurements to give you a clear idea of what I mean when adding 2” to the width and 1½” to the height. It makes adjusting your own size super easy.
(Instructions given are for my 8” x 5½” tablet. The process is the same for any size device.)

Let’s start by creating the quilted outer cover for your tablet sleeve. Be sure to adjust your fabric sizes as needed to fit your specific tablet measurements. Remember every device is a little different.

Cut two pieces of fabric, each measuring 10" x 10".

Upload the Quilt as You Go design of your choice to your embroidery machine. Be sure to select the quilting files only for this step.

Select Square Blocks.

Choose the largest design size that fits your hoop. Depending on your hoop size, you may need to hoop your fabric more than once to complete the full quilting pattern.

Hoop cotton batting. No additional stabilizer is needed; the batting will act as your stabilizer. Take the hoop to your machine.

If you’re doing one hooping, find the center of your fabric and mark it with an erasable pen or pins. If you’re doing multiple hoopings, start in the upper left corner and work your way across.

Center the fabric on top of the hoop and stitch out the quilting design. Once finished, remove the hoop from the machine and take the fabric out of the hoop.

Trim the batting close to the stitching. Repeat these steps with the second fabric piece.

Cut one quilted square to 9½” x 7½”. If you’re using directional fabric (like stripes, prints, or patterns that have a top and bottom), place your tablet on the fabric first to decide which way it should face. This ensures your design will sit the right way when finished.
From the remaining fabric, cut a strip measuring 1” x 9½”. This will be the spine. If you do not have enough quilted fabric for the spine, use the 2” sashing blocks from your Quilting Backdrops design and quilt an extra piece.

Cut the second quilted square to 9½” x 7½”. You should now have three pieces for your outer cover.

With right sides together and using a ¼” seam allowance, sew the 1” spine piece between the two cover pieces.


Press the seams open, and set the outer cover aside.

We are going to use the existing shapes in our machine to create a patch for the front cover. My machine is a Brother Stellaire. Your available shapes may be different. Refer to your manual if needed.
The sizes in this tutorial are the ones I used for teaching purposes. Feel free to make your patch any shape or size you like. The steps will be exactly the same.
Step 1

Open the Shapes menu on your machine and you’ll see a variety of options. Any of these shapes can be used to create a fun, custom patch.

For this tutorial, I’m using an octagon shape. Remember, your measurements may vary slightly if you use a different one.

From the Shapes menu, select a simple single stitch outline design, then add it to your screen.

Tap the Set key.

Next, we’ll adjust the size of the shape. From this screen, select Edit.

Now tap the Size key.

Use the size adjustment arrows to resize your shape to 2.77” x 2.77”, and press OK when you’re done.

Finally, select the Memory key to save your design.

Choose your preferred storage location—I like to keep mine on a USB stick for easy access, but you can save yours wherever works best for you.
Step 2

Open the Shapes menu again. This time, we’ll choose a satin stitch finish for our patch outline.

Select Set, and just like before, go to Edit, then Size. Resize the shape to 2.90” x 2.90”, then tap OK to confirm.

When you’re finished, press the Memory key and save this design in the same location where you stored the first one.
Step 3
Now it’s time to add your embroidery design! I’m using the Busy Bee Monogram from Designs by JuJu to complement my fabric. It's such a cute and versatile set, perfect for adding a personalized touch.

Load your chosen design and select the 2” size.

Select your initial and load to the screen. Use the previous steps to size.

Following the same steps as before, tap the Size key.

Resize your monogram to 2.32” x 2.02”, then press OK and Memory to save it.
Now it’s time to bring everything together! Load all three designs—your outline shape, satin stitch shape, and monogram—one at a time onto the screen. We’ll combine them to create the front cover patch for your tablet cover.
Step 4

Start by positioning the outline shape in the center of your screen.

Next, layer the satin stitch shape on top of the outline and use the move keys to center it perfectly. You shouldn’t see any of the outline from the octagon. The satin stitches should sit neatly in the center, completely covering the outline. This will serve as your beautiful finishing border when stitching out the patch.

Changing the colors of your design layers can make it much easier to line them up perfectly. For example, I used black for my single stitch and pink for my satin stitch. Seeing the two colors together helps confirm that everything is centered and aligned just right before stitching. This trick is especially helpful when layering shapes. It gives you a clear visual guide and helps prevent any surprises once you start your final stitch-out.

Once you’re happy with the placement, add the monogram on top. Use the move keys again to center it so it sits nicely inside the border. Depending on your monogram, your size may differ from mine. Resize if needed.
Double-check the alignment of all three layers; all the elements should be centered and evenly spaced. Once everything looks perfectly aligned, you are ready to stitch it out. If this is your first time layering shapes, consider running a practice stitch on a scrap first. It’s much easier to adjust sizes and placement on a sample than on your finished cover.

Hoop two layers of tear-away stabilizer. Center the 5” x 5” fabric on top of the hoop. Take the hoop to the machine and stitch out the outline stitch. Remove the hoop and trim close to the stitches.

Return the hoop to the machine and stitch out the satin stitch design. Finish with the monogram stitches. Remove from the hoop and tear away the stabilizer.

Do not sew the patch to the front just yet. Set both the cover and patch aside for now.
Let’s make the tab that will hold your cover closed.

Start by cutting a strip of fabric 2” x 8”. This piece will need to be turned after sewing. If turning small pieces drives you a little crazy (we’ve all been there), cut it 3” x 8” instead. It’s much easier to handle.
Add the stabilizer:

Cut a piece of fusible stabilizer 1” x 7½” and center it on the wrong side of your fabric strip. Press it in place to fuse. (Pellon 731 Fuse-N-Shape Heavyweight Stabilizer or any medium- to heavy-weight stabilizer will work perfectly.)

Fold the strip in half lengthwise with right sides together, matching up the three raw edges. Sew down the two long sides using a ¼” seam allowance.
Turn the strip right side out. A turning tool makes this step much easier. Once it’s turned, give it a good press to smooth everything out.

Cut a 2” strip of hook-and-loop tape. Pin or clip one half to the folded top end of your fabric strip.

Sew ¼” around all edges of the strip, making sure to catch the hook-and-loop tape in your stitches. This gives your tab a nice, clean finish and adds a little extra strength where it counts.


If your tab is a bit too big to catch the hook-and-loop tape when topstitching, you can sew it down in a few evenly spaced vertical rows.

Now it’s time to put everything together! Gather your outer cover, patch, the tab you just made, and the other half of your hook-and-loop tape.

Start by adding the hook-and-loop tape that will hold your tab in place.
Find the vertical center of your front cover and mark it with a straight pin. Then, measure ½” in from the raw edge and draw a line using an erasable fabric pen. Place one short end of your tape strip just to the left of that line and sew it in place. Take your time lining it up straight, since this helps the tab sit nice and even when your cover is finished.

Attach the tab to the hook-and-loop tape you sewed onto the front cover. This will help you position the patch exactly where it needs to go. The photo above shows an example using a 3”-wide tab; yours may look a little different depending on the size you cut.

Position and pin the patch to the front, and head to your sewing machine.

Sew the patch in place.
Next, let’s give your cover some structure.

Place the foam on the wrong side of your outer cover, making sure there’s about ½” of clearance around all four sides for your seam allowance.
Using a hot iron and a pressing cloth, fuse the foam in place with the fusible side down. If your foam isn’t sticking as firmly as you’d like, a light mist of basting spray can help keep everything smooth and secure while you press.

Now that your foam is fused in place, it’s time to define the spine of your cover.

On the outside of the cover, stitch in the ditch along both sides of the spine. This gives your cover a crisp, professional look and helps it fold neatly when finished.

Take your time here and stitch slowly. Keeping your stitching right in that seam will make your spine look beautifully clean and even.

Next, let’s prepare the lining so everything aligns perfectly when you sew it together.
Using pins, mark the center of your lining piece. This is shown in black in the photo. Then, on the top, bottom, and both sides, mark a ½” seam allowance. Repeat this on both the right and left sides of your lining. Set aside but do not remove the pins.

Now let’s make the inside piece that will hold your Kindle in place. This is one 17” x 6½” piece of fabric.

Fold the fabric in half so the short ends meet at the top, then clip or pin to hold it in place. Leave a 2” opening at the top. This will be used for turning the pocket right side out later.

Sew a ½” seam allowance down both long sides and between the opening at the top. Don’t forget to backstitch at the beginning and end to help keep your seams secure when turning.
Trim the seam allowance to ¼” all around, but leave the fabric at the opening untrimmed. This will be tucked in later.
Clip the corners carefully to reduce bulk. Be careful not to cut through your stitching; trim the excess fabric so the corners lie flat when turned.

Turn your fabric right side out through the opening. Press it carefully, folding the untrimmed section neatly to the inside so it’s ready for stitching in place. Use the tip of your pressing tool to gently push out the corners for a crisp, professional look.

For the elastic, measure 1½” in from each corner of your fabric and mark these points with an erasable pen.

Center the four pieces of elastic over the markings, then tape them in place.

Flip the fabric over to the back and tape down the elastic there as well to keep everything secure.

Take your fabric to the sewing machine. To hold the elastic in place, run a long basting stitch approximately ¼” in around the entire piece of fabric. Use a contrasting thread so it’s easy to see and remove later. Once stitched, remove all tape from both the front and back.

Now, place your tablet on top of the fabric and pull the elastic around the corners. Your tablet should fit snugly, resembling the picture.
Before moving on, check the fit carefully. If any adjustments to the elastic are needed, make them now so your tablet sits perfectly.

Remove your tablet and center the fabric between the marks you made on the right-hand side of the lining earlier with the pins. Pin the fabric in place so it doesn’t shift while sewing. Double-check that everything is centered before stitching. It's much easier to adjust now than after it’s sewn!
Take the piece back to your sewing machine and stitch around the entire perimeter again, this time close to the edge and using a regular stitch to hold the fabric and elastic permanently. Make sure the elastic is evenly stretched at each corner so your tablet fits perfectly without puckering the fabric.

Remove basting stitches.
Repeat the previous steps (minus elastic) with the second 17” x 6½” piece of fabric.
Center this piece on the left side of your lining, then stitch the top, left, and bottom edges. Leave the right side open to create the pocket. Ensure the pocket is aligned straight and even with the first piece so your lining looks neat and professional.

For added stability, stitch ¼” from the edge of the pocket first. Then, go around the three stitched sides again ⅛” from the edge. This extra stitching helps the pocket hold its shape and gives it a professional, durable finish.
You are now ready to sew the lining to the cover.

With right sides together, clip or pin the outer cover to the lining.

When you sew the lining and outer cover together, be sure to leave an opening on the left side. This opening serves two purposes: it’s where you’ll turn the cover right side out, and it’s also where the tab will be sewn in. Make the opening about 4”–5” wide, with the hook-and-loop section centered within that space.

Mark the opening with pins or an erasable pen before sewing so you don’t accidentally close it up.

Sew all the way around the cover using a ½” seam allowance, taking care to backstitch at the beginning and end for extra strength. When you reach the corners, slow down and pivot your fabric with the needle down to keep your corners crisp and professional-looking.
Trim the seam allowance to ¼” all the way around, but leave the fabric at the opening untrimmed. This will make it easier to tuck in and stitch closed later.
Carefully clip the corners to reduce bulk, then turn the cover right side out through the opening. Use a turning tool to gently push out the corners for a nice, crisp finish.

Insert the tab into the opening on the left side of your cover.

Place your tablet inside the cover, close it, and attach the hook-and-loop pieces to check the fit.

Everything should be snug and lined up nicely.

When you’re happy with the placement, run a long basting stitch to temporarily hold the tab in place. Recheck the fit one more time. A quick test now saves time later!

Once you’re satisfied, pin the tab securely and remove the basting stitch.

Now, topstitch around the entire cover, first ⅛” from the edge and then again at ¼”. This not only secures the tab but also catches the foam in the seams for a clean, sturdy finish.
Stitch slowly and carefully around the corners. A smooth curve here will make your lining look professional and tidy.


To complete the look, stitch down the spine one last time. This gives the inside a beautiful, polished finish.

Give your cover a final press to smooth out any wrinkles, and admire your work.
Your custom tablet cover is complete, beautifully padded, perfectly fitted, and made entirely by you! Isn’t it amazing how a few simple steps can turn fabric and stitches into something so polished and practical?
Once you’ve made one, you’ll want to make more. Try different fabrics, colors, monograms, and embroidery designs to make it truly your own!
We’d love to see your finished tablet covers. Share your creations with us in the Designs by JuJu Embroidery Blessings Group on Facebook, or anywhere on social media using the hashtag #designsbyjuju. Your project might just inspire someone else to start stitching!
