Toggle Nav
 Inspire.
Create.
Stitch.
Inspire.
Create.
Stitch.
Search
Stitch up spooky style with a clever project that turns a placemat into festive, functional kitchen decor!
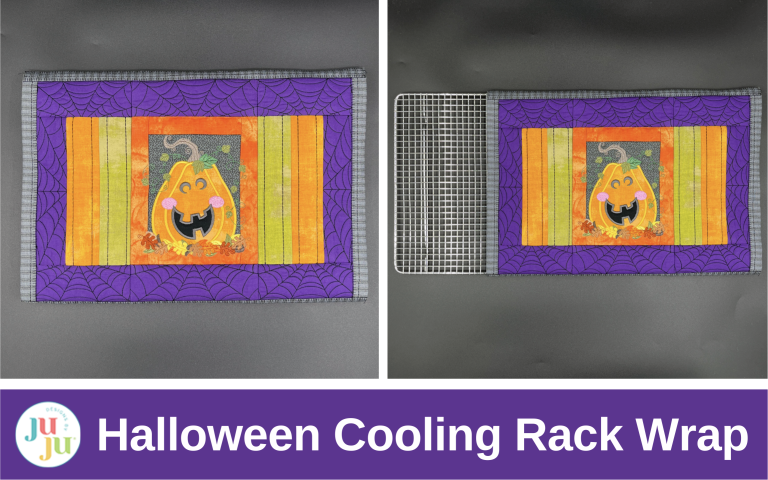
Our In The Hoop Modular Jack O’ Lantern Placemat just got a clever twist—you can turn it into a custom cooling rack wrap that protects your countertops and doubles as festive decor! With vibrant quilting backdrops, a mix-and-match block design, and plenty of room to showcase your favorite Halloween fabrics, this project is as enjoyable to stitch as it is to display. Whether you’re baking up treats for a party or simply want to keep the autumn spirit alive in your home, you’ll love how quick, practical, and totally unique this embroidery adventure is!
Check out the DBJJ team’s favorite supplies in the Designs by JuJu Amazon store.


Gather your favorite embroidery notions and your threads—it’s time to create something fun.
The modular placemats from Designs by JuJu have one finished size (approximately 12” x 18”) and all standard blocks fit in a 5x7 hoop! The general layout has a “main” design in the middle, “side” blocks on the left and right sides of the main design, and then it is finished with horizontal and vertical “border” blocks. For machines with larger stitch fields, BONUS combined blocks are included to minimize hoopings.
Additional modular placemats are available, sold separately. You can mix and match blocks from different placemats to create your own unique placemat!
Fuse Pellon SF101 to the wrong side of the background fabrics.
Complete the front of the modular placemat according to the instructions provided with your download, stopping once you have the placemat front assembled.

Layer backing fabric wrong side up, Insul-Bright, and assembled placemat right side up.
Note: Insul-Bright does not have a right or wrong side.

Quilt using the stitch-in-the-ditch method. This will secure your layers. Then trim the layered placemat so each side is ¼” from the outer stitching line.

Measure width and height of cooling rack (not length as we are using the placemat length for that measurement).
My cooling rack is 12” wide and the height is ⅝”. We will need to double the height so that we have enough quilted fabric to wrap around the cooling rack. I’m also going to add 4” so that I have enough extra for hooping and quilting using the 10x16 Halloween 2 Quilting Backdrop. This equals 17¼”. Feel free to round up or down as you like. I’m always about “embroidery insurance” so I will round up to 18”.
The length of the placemat is 18” and I’m going to add 1” to each side, giving us a total of 20”. This makes the back loop fabric cuts 18” x 20”. I’m using a solid fabric, but if you are using a directional print be sure your cuts are the direction you like. You will need two of these back loop fabric cuts.
You will also need to cut one layer of Insul-Bright the same size. I’m going for all-around heat protection, but you may substitute batting here if you like. I gently steamed the Insul-Bright to reduce the creases from it being folded in the package.
I am using the same fabric for both sides of the back loop and I have enough yardage, so I’m going to cut one piece, 36” x 20”. Place the back loop fabric right side down. Position the Insul-Bright on one half of the fabric and fold the other half over on top.

I will be using a 10⅝x16 hoop and will stitch just one hooping of the 10x16 quilting backdrop. This will quilt almost all of the back loop that is needed, leaving a small border of fabric that is not quilted. Not enough for me to be concerned with. If you are not using this large of a hoop, quilt the back loop with as many hoopings as you need depending on the hoop size you choose. You will not need any stabilizer in your hoop. The Insul-Bright and fabric are enough to stabilize the quilting backdrop.

Remove the project from the hoop and press.
Trim the back loop to the same width as your cooling rack. Mine is 18”. DO NOT trim the other two sides yet.
Here’s where you will ask, “What is he doing?” Stick with me.
Cut the quilted back loop in half down the middle. This creates two 9” x 20” pieces.
Arrange the placemat and quilted back loop pieces with the right sides up, as shown. Ensure the quilted back loop pieces are positioned with the quilting and/or fabric print the intended direction.
Join the placemat and quilted back loop pieces with a multi-step zigzag stitch. A walking foot or dual-feed foot is helpful.

Create double-fold binding.
Be sure the finished width of your strips covers the outer stitching line on the placemat. I cut my fabric strips 3” wide, resulting in ¾”-wide finished double-fold binding.
Clip or pin the binding strips to the sides.

Sew the strips to the sides.

I used a simple triple stitch combined with a blanket stitch. This is a great time to use some of those fun decorative stitches built into many machines.

Trim the side binding even at the edges.

Create single-fold tape.
Cut two 1½” x 20” strips of fabric. Fold each long edge to the center and press, resulting in ¾”-wide strips. Fold and press 1” of each end to the back to create finished ends and strips that are 18” long.
Position the strips over the seams where we joined the placemat to the back loop pieces. Tape or pin in place.

Sew the strip to the rack wrap. I used the same stitch combination as the side binding along both sides of the strips.

On each back loop panel, measure 7⅛” from the edges of the single-fold tape that was just applied.

With a rotary cutter, trim on those lines. The wrap now measures 27½”.

With the two 20” double-fold binding strips, open the ends, fold ½” and press. Fold another ½” and press. Then fold and re-press the binding. This will result in two 18” binding strips.
Clip or pin the binding strips to each end of the rack wrap. Sew the binding strips to the wrap. Once again, I used the same stitch combination.

Position the hook-and-loop tape strips at the inside edge of the binding strips at the ends, and clip or pin to secure. Be sure one is on the front of the wrap and one is on the back.

Sew along each edge of the hook-and-loop tape.

Wrap around the cooling rack and secure with the hook-and-loop tape.


The sides are left open so that you can slide the cooling rack in and out.

I now know my new countertops will be well protected, and when not in use it makes a nice decoration in the kitchen. Now that we have completed our fun cooling rack wrap, it’s time to do some baking.

Be sure to share your projects in the Designs by JuJu Embroidery Blessings Group on Facebook, or anywhere on social media using the hashtag #designsbyjuju. We love seeing your creativity in action and hope to see these for every holiday and occasion!