Toggle Nav
 Inspire.
Create.
Stitch.
Inspire.
Create.
Stitch.
Search
Your DBJJ wall hanging is done and ready to bind—let’s plan how to hang it up!
Before you finish binding, think about how you’ll show off your creation. Let’s explore a few easy and creative ways to hang it up.
Check out the DBJJ Amazon store for a few of our favorite hangers.
If you need a binding refresher, check out this blog post: Binding 101.
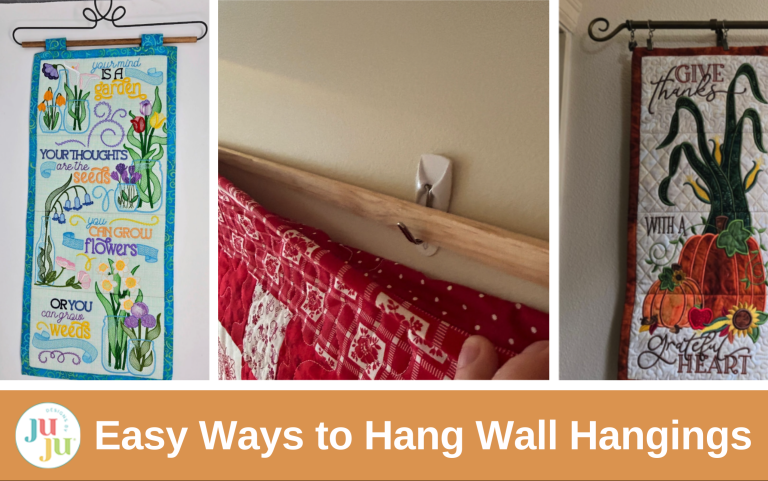
The easiest way to hang a wall hanging is to invest in a wall-mounted bar with clips. I have had this one for years and love that it extends so I can adjust it to the size of my projects by sliding the smaller bar in or out. Below is the ITH Harvest Wall Hanging next to a small quilt I made a few years ago.

Another option is hanging tabs. I use these for the smaller wall hangings, and I have a special hanger. This is the ITH Mind Garden Wall Hanging Project.

There are many ways to make tabs, but my favorite is this quick and easy way. First, determine how far you want each tab to extend above your wall hanging.Take into consideration the size of the wire or bar going through the tab. I wanted these tabs to extend 1” above my wall hanging so the wooden bar would easily slide through. Also, consider the bar width. My bar is about ½” wide, so I need to double that for the front and back of the tab. Finally, think about how your tabs are sewn to your project: into the binding? On top of the binding? This wall hanging is bound by bringing the back to the front, so I added 1”. I would also add 1” if sewn into the binding because the tab is folded in half in both instances.
Let’s do the math! Double the measurement you want your tabs to extend above your bar (1”+1”= 2”); this accounts for the front and back of the tab. Next, add 2” (one for the bar width and one for the binding width when the hanger is folded in half). That means I need to cut the fabric for the tabs 4” long.
Decide how many tabs you need; some wall hangings need three tabs. For this one, two was sufficient.
Next we need to figure the width of our tab. For this wall hanging, a 1½” width was perfect. I cut my fabric double that, or 3” wide.
So, for this wall hanging I cut two tabs 3” x 4”. I fused Pellon® SF101 to the back of the tab fabric to give them more stability.

Then I pressed the long outside edges to the middle.

I stitched approximately ⅛” from the folded edges. I would normally use a matching thread, but this is an example so you can see my stitching.

Since this wall hanging has a binding where I folded the back to the front, I cannot attach the hangers in the binding this time, so I pressed one short end under ¼”. Slip the other short end into this fold. You can baste it or clip it at this point. Then clip into place after your binding is ready to sew down. I sewed the tabs down at the same time I stitched the binding in place.


Your tabs will extend up for hanging. Pin or clip in place where you want them and topstitch the binding down from the front, catching the tabs on the back.

If you are not binding your project but still need tabs, you can make them the same way, but place them between your top and backing as you sew around your wall hanging. Here I made the tabs a bit smaller, but they still extend an inch above the top of the wall hanging. Measurements to consider are how high you want the tabs to extend above your wall hanging and how much is needed in the seam, then double that amount since the tabs are folded in half. Wall hanging seams are usually ½”. I wanted about an inch extending above, so I double those two measurements and my length would be 3”. I made these a little slimmer so my width was cut 3” as well. If your hanging bar is thicker, or even a branch, you would make the tabs longer and wider.

Here is the ITH Jolly Wall Hanging.

The third way to hang a wall hanging is by corner triangles and a dowel. This is a quick and easy way to add a hanger.
Cut two 4½” or 5” squares of fabric. Fold each in half diagonally with wrong sides together and press.

Fit them in the corners of your trimmed and quilted wall hanging. I like to baste them in place to make sure they don’t move when adding the binding.
Many thanks to fellow blogger Melanie for sharing pictures of her Redwork Garden Blocks and Free Redwork Garden Block quilt.


Wooden dowels, either round or flat, can be found at hardware stores and hobby/craft stores. If you are specifically looking for the flat wooden strips, a hardware store may be your best bet.


A little more involved way to hang your wall hanging is with a hanging sleeve. If you plan to enter your wall hanging in a show, the show might require a hanging sleeve. Some even tell you how wide they need to be to fit their hangers, so check with your show organizers before making one.
Generally, a sleeve extends the length of your quilt or wall hanging and is wide enough for a hanging rod to go through it. Quilt shows usually require a 4”- or 5”-wide sleeve, meaning you would cut it 9” or 11” wide (to account for the part under the binding) plus the length of your quilt/wall hanging.
In this example the hanging rod was small, so a small sleeve was needed. I cut my rectangle twice as wide as needed plus 1”. The hanging rod will fit in the sleeve and not touch your quilt. Hem both short edges. Then fold your sleeve in half with wrong sides together. Baste the raw edges together and then clip or pin to the back of your quilt. When the binding is sewn on, your sleeve will be sewn to the quilt. To finish, hand stitch down the fold. Again, check with any show coordinators for this type of hanging. Rules vary and can be quite strict. A sleeve might not even be required for a wall hanging of specific dimensions. I must admit, I very rarely use a hanging sleeve.

I did not extend my sleeve the entire length of this quilt because I want my little hook hangers to be behind the quilt, not showing at the ends.
There are lots of ways to hang your wall hangings. Choose what is right for you and your wall space! If you are short on wall space, but have a metal door, sew magnets into the corner triangles. This works for lighter-weight pieces.
I hope you found these suggestions helpful and will consider hanging your wall hangings with any of the above ways. It is so easy to add triangles or tabs as you are adding bindings. If you feel more comfortable basting them before adding your binding, go for it! There are no wall hanging police here!
Please be sure to share your projects in the Designs by JuJu Embroidery Blessings Facebook Group, or use the hashtag #designsbyjuju anywhere on social media. We all love to see what you create!
