Toggle Nav
 Inspire.
Create.
Stitch.
Inspire.
Create.
Stitch.
Search

Summer will be here before we know it! Time to have fun using JuJu’s designs to personalize some summer gear.
Follow along with me as I embroider beach towels for my granddaughters and a beach bag for their parents to tote their belongings to their favorite beaches.
Check out the DBJJ team’s favorite supplies in the Designs by JuJu Amazon store.
Make sure you wash and dry your towels first. They will get a lot of use during the summer and you don’t want the towels to shrink and distort your embroidery.
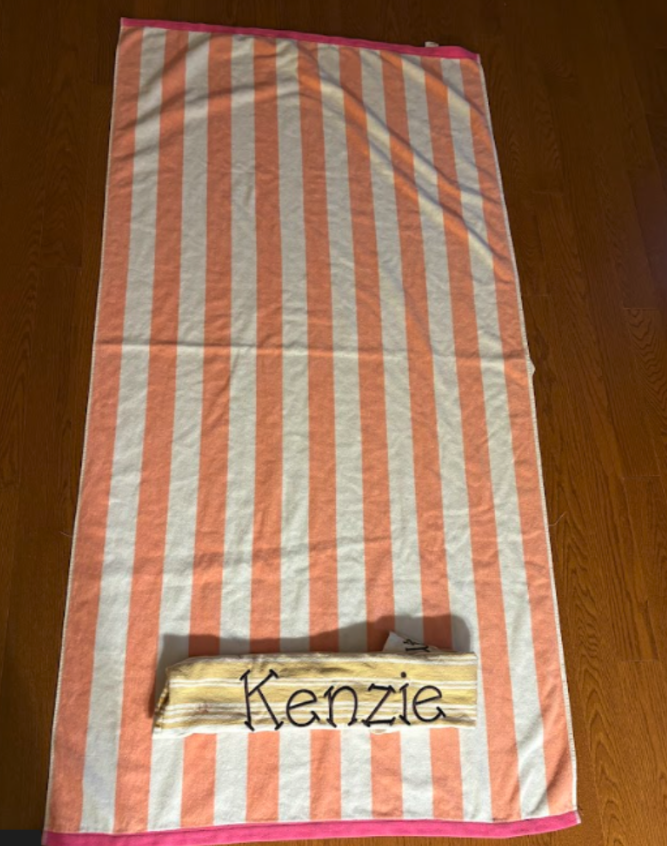
I’m using very large beach towels, which means the names require large embroidery fonts. While I thought Tippy Toes at 4” would be a good size, I decided to stitch out Kenzie’s name on one of my old practice towels so I could see what it looked like. (Don’t get rid of a shirt or towel if you botch something up. Save it for doing a practice stitch-out like I did here.) The 4” size looked great, so next I needed to determine how far from the bottom edge the name should be placed, settling on 5½” from the bottom.
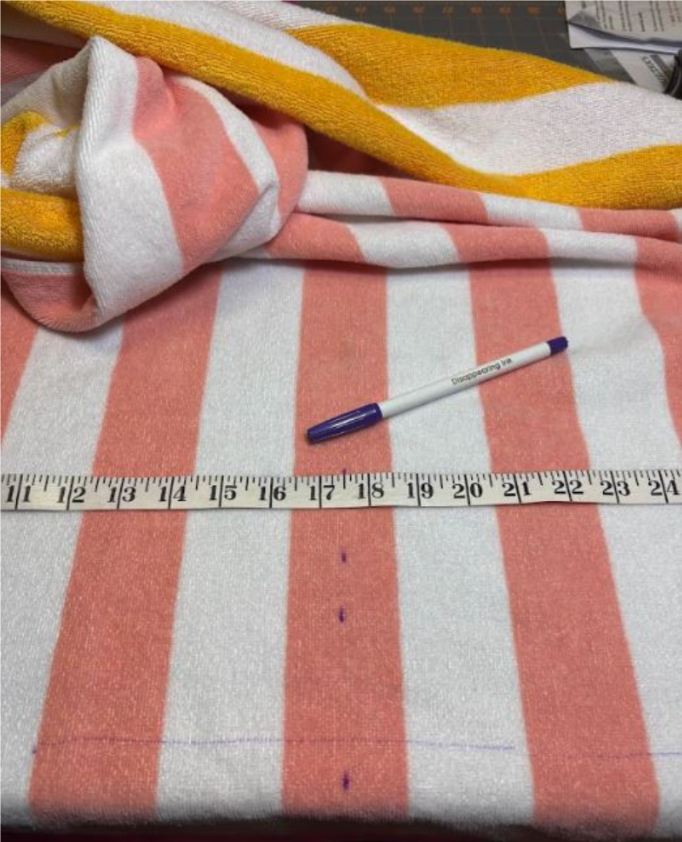
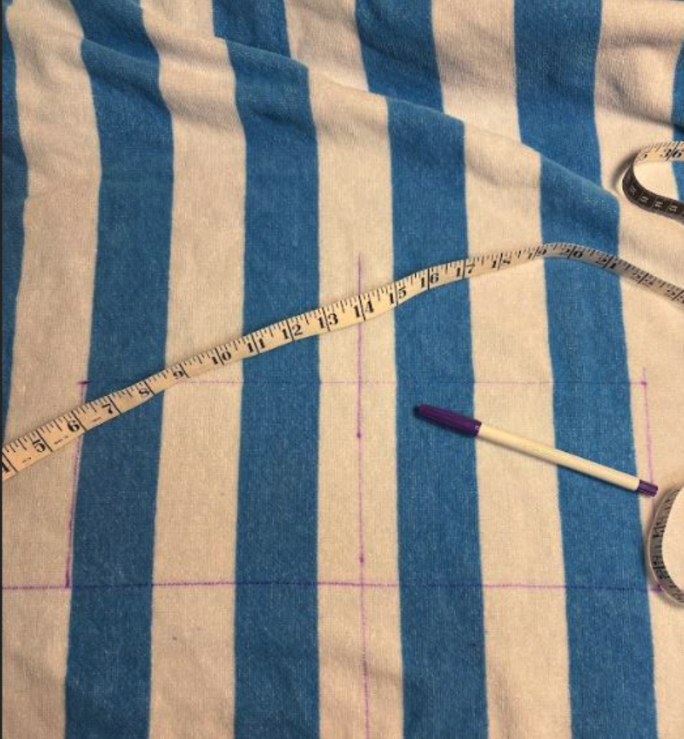
One of my top ten favorite embroidery tools is the Dritz Disappearing Ink Marker which you can find in the Designs by JuJu Amazon store. I use this because I like to get things as centered and straight as I can, and whatever lines and marks I make to accomplish this will disappear in a day or so or when the item is washed. For this project, I used the marker to draw a straight line 5½” from the bottom hem and another line marking the middle of the towel. I also penciled lines on the tear-away stabilizer once it was in the hoop so I could match up the lines on the towel with the lines on the hooped stabilizer.
Using temporary adhesive spray, I floated the towel in my 9.5x14 hoop, the largest hoop I have. Be sure to use a water-soluble topper like you see I have pinned below, as this will help keep your stitches from sinking into the fluffy towel texture.

Once the towel was hooped, I carefully supported the weight of it while I loaded the hoop into my machine. Then I checked my centering and the stitch area. Good thing I used the trial key on the machine—I didn’t have the topper covering the whole stitch area!

I made sure the towel was supported while it stitched, especially since it was floated and there was a lot of excess towel to the side. I think I will use a basting box on the second towel.
Once the name was all stitched out, I gently removed the water-soluble topper and the tear-away stabilizer.
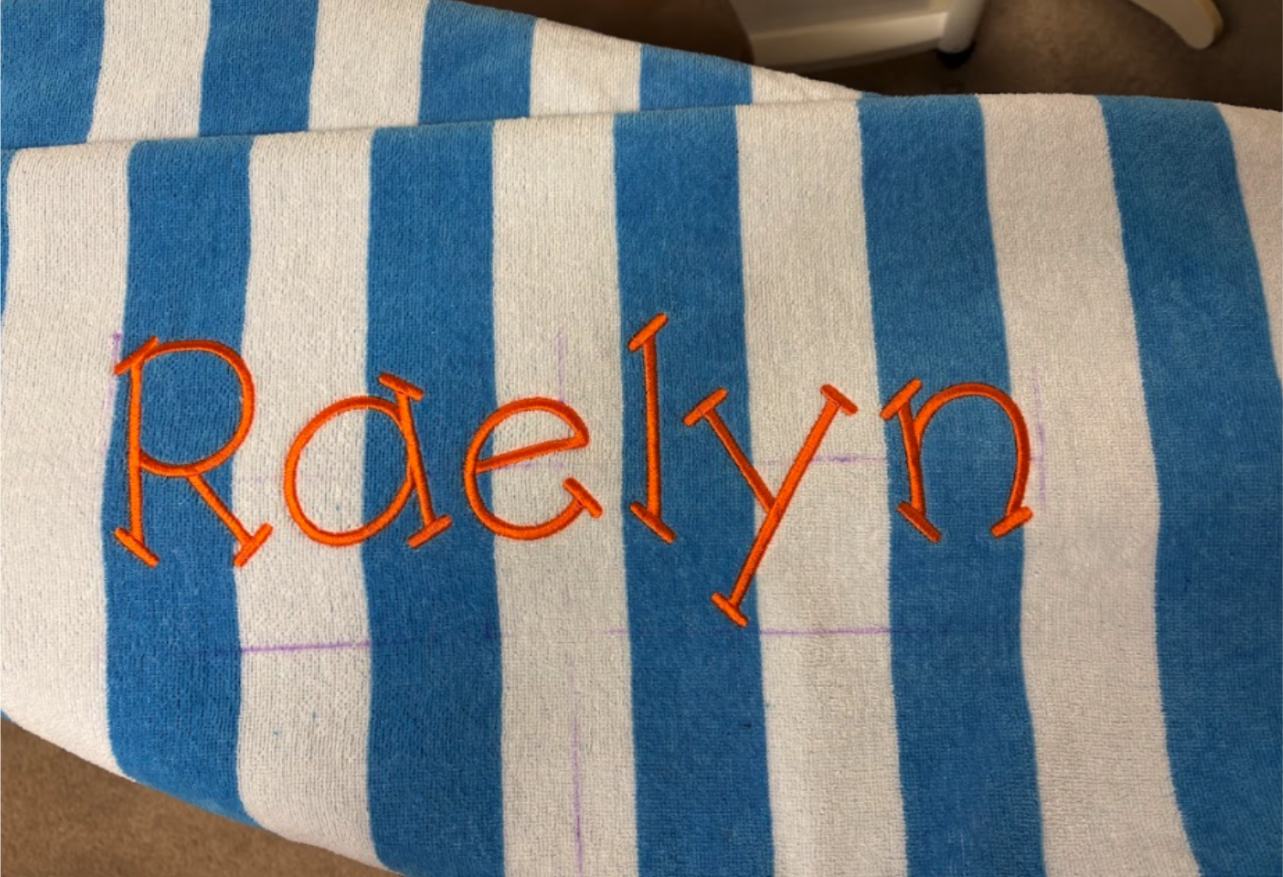
Raelyn’s towel threw a challenge at me, because while it is spelled with six letters like Kenzie’s name, the stitch-out was too long to do as a single hooping even with my 9.5x14 hoop. I learned this by loading the design into my machine, which made a sad face at me and said it wasn’t possible to do.
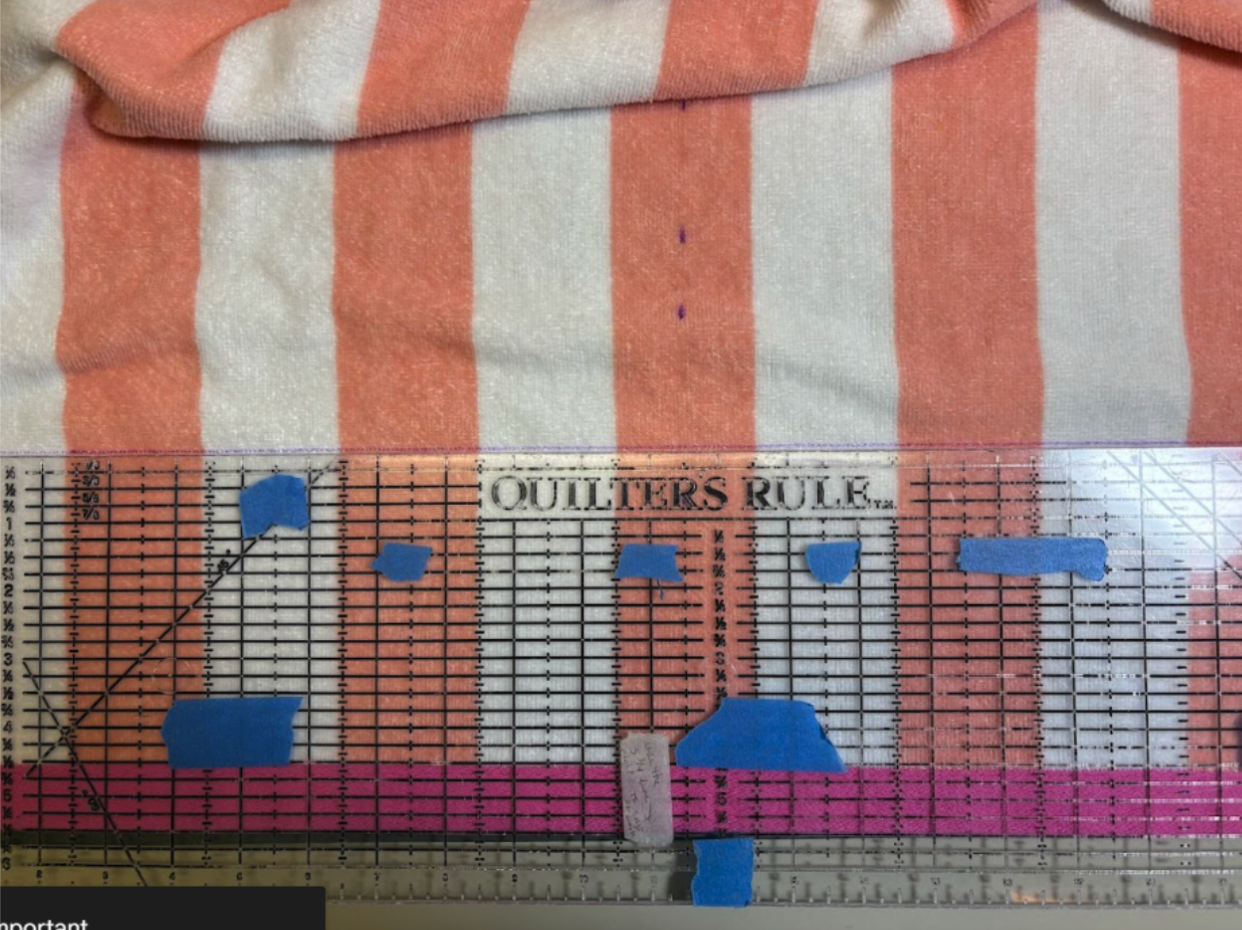
This meant doing Raelyn’s name in two hoopings. My goal was to make sure all the letters looked straight and consistent when done. To do this,I went to town with the Dritz marker and drew a rectangle the dimensions of the name. First, I drew a line 5½” from the bottom edge of the towel and then also marked the center of my towel.
I went back to my design in the Embrilliance program to find the dimensions.
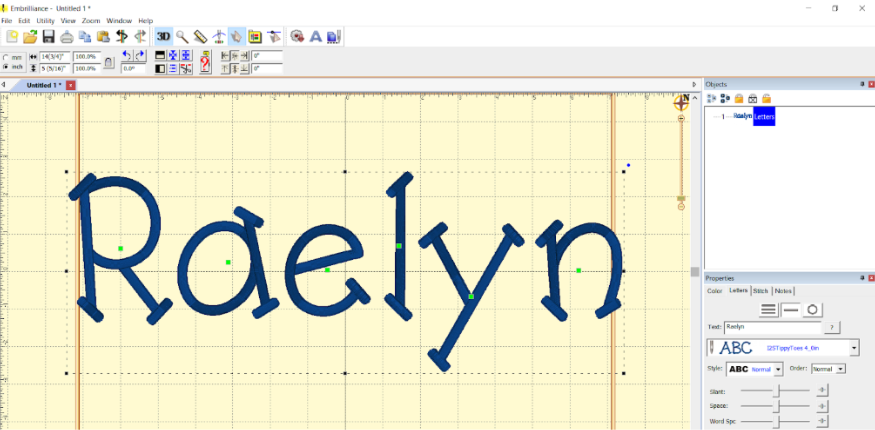
I drew a rectangle the size of the name, using the line I drew at 5½” from the edge of the towel as the base of the rectangle, and made sure the center of the rectangle was the center of the towel.
(OOPS! I also drew a line showing the middle of the 5 5/16” measurement but forgot to take a picture.)
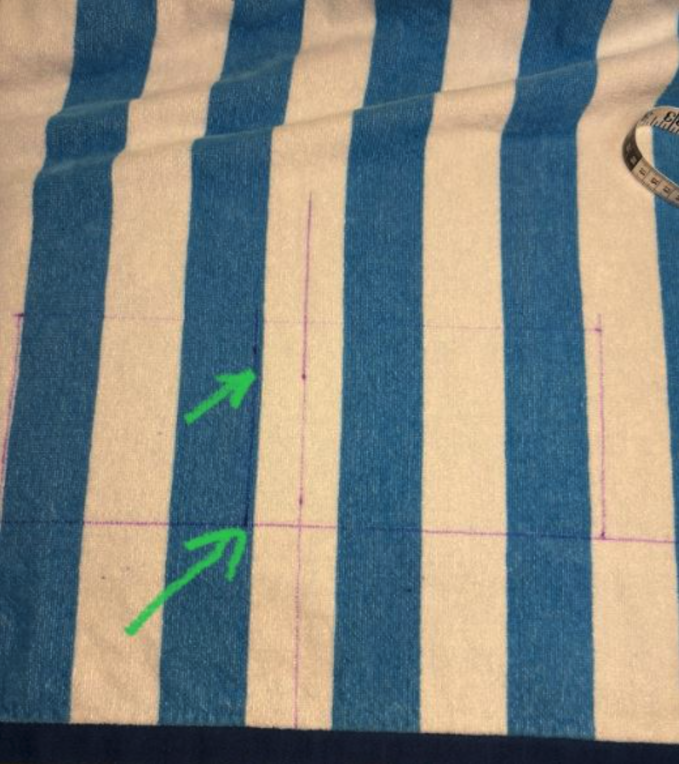
Now that I knew exactly where all six letters of Raelyn’s name would go, I changed the name in Embrilliance to “Raely” for my first hooping. The length of “Raely” is 12⅛”, half of that is 6 1/16”. I made a line at 6 1/16” off of the left side of my rectangle, so when I laid it in the hoop, that line would be my middle. Unfortunately, the line doesn’t show up that well in the photo below because it’s on the blue stripe. I used that line centering in the hoop. I found it pretty easy because I floated the towels with the 505 adhesive spray.
I hooped and stitched “Raely” using the placement lines I made with the water-soluble marker. Once it was done, I removed it from the hoop and gently tore away the water-soluble topper and the stabilizer.
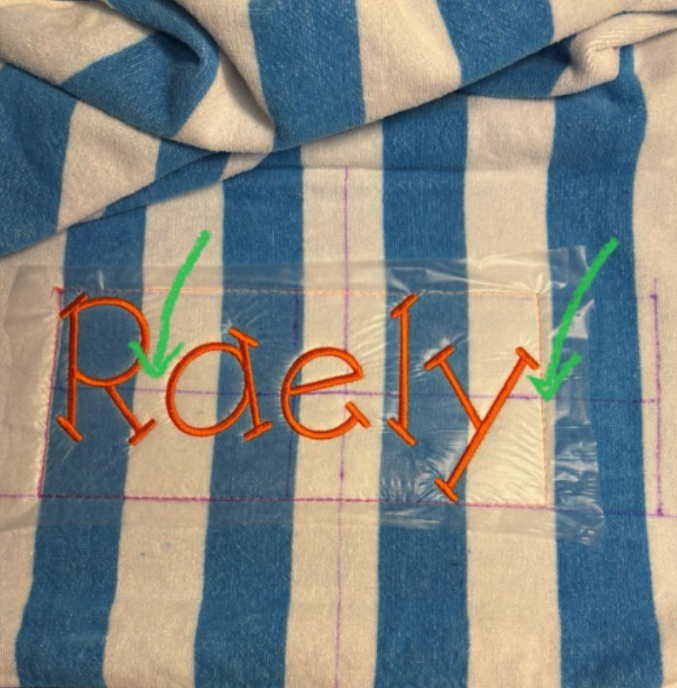
I rehooped the towel to make the “n”, this time able to use a smaller hoop. I chose to use my 5x7 hoop, even though the 4x4 would have worked also. I carefully made sure that the midline that I’m pointing to above was straight in the hoop. Then I used the trial key and kept moving the “n” until the midline was spot on and the right side of the “n” was close to the right side of the rectangle line I’d drawn.
After the “n” was stitched, I unhooped the towel and removed the topper and stabilizer.
While it took several minutes, it was time well spent making all the marks and lines so that I could make sure the name was straight on the towel, and even though it took two hoopings, the letters are all consistently aligned. If you need to do this in two or more hoopings, you should plan on doing the name all in one session. Even though I find it takes a couple of days for the marks to fade (unless I mist them with water), I’ve seen some people say they fade quickly. I guess it depends on the humidity in your sewing area.
I did have an oops moment when I embroidered Raelyn’s towel. Since JuJu didn’t mind sharing that she wished she’d moved the duck design lower when she made her hooded towel video, I’ll share that I forgot to take into account the drop down of the “y” in Raelyn’s name when I wanted the names at 5½” from the bottom of the towel. It’s not a big deal, I’m just annoyed because I’d even written a note to remind myself.

As soon as I saw this tote bag in Target, I knew it was a perfect opportunity to use DBJJ’s beach designs to personalize it.
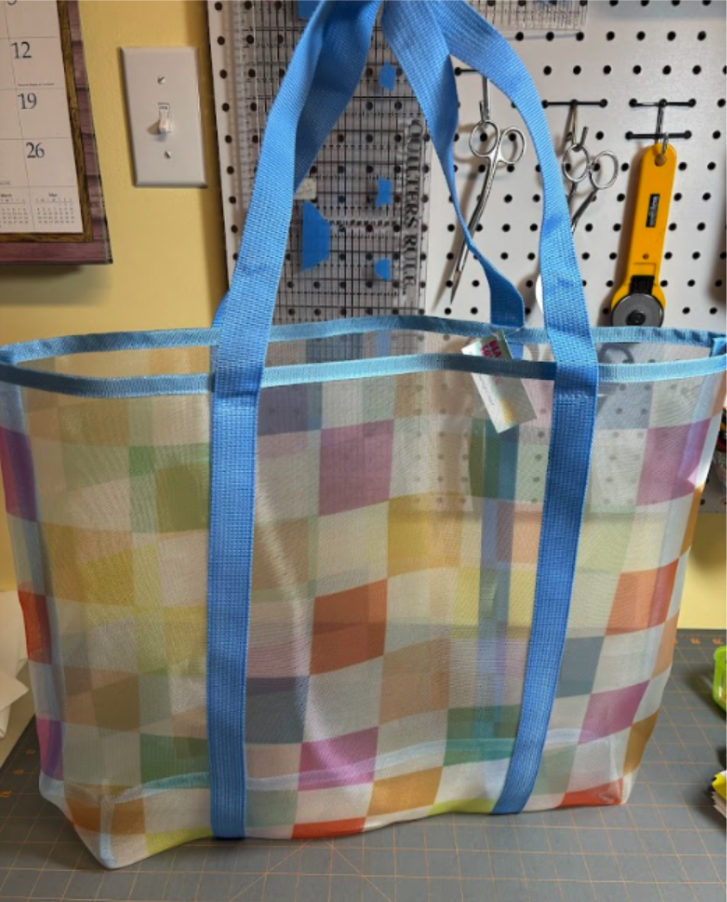
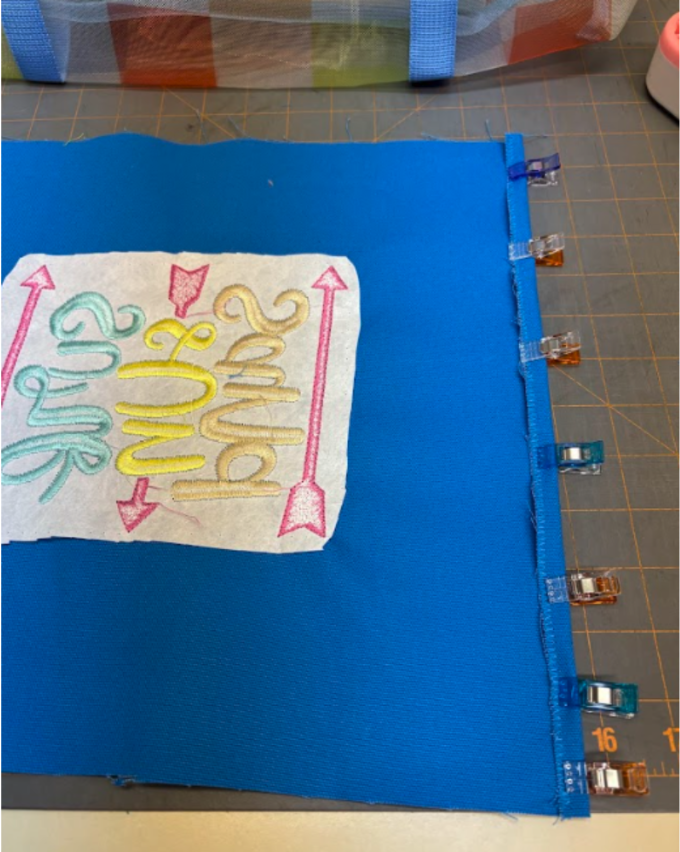
I’m going to embroider and sew panels onto the two straps. In one of the photos below I drew dotted lines to show you where I’ll be sewing those attachment stitches. I measured the distance between the two outer strap edges, then added a few more inches to account for shrinkage from the embroidery and seam allowance for turning the edges.
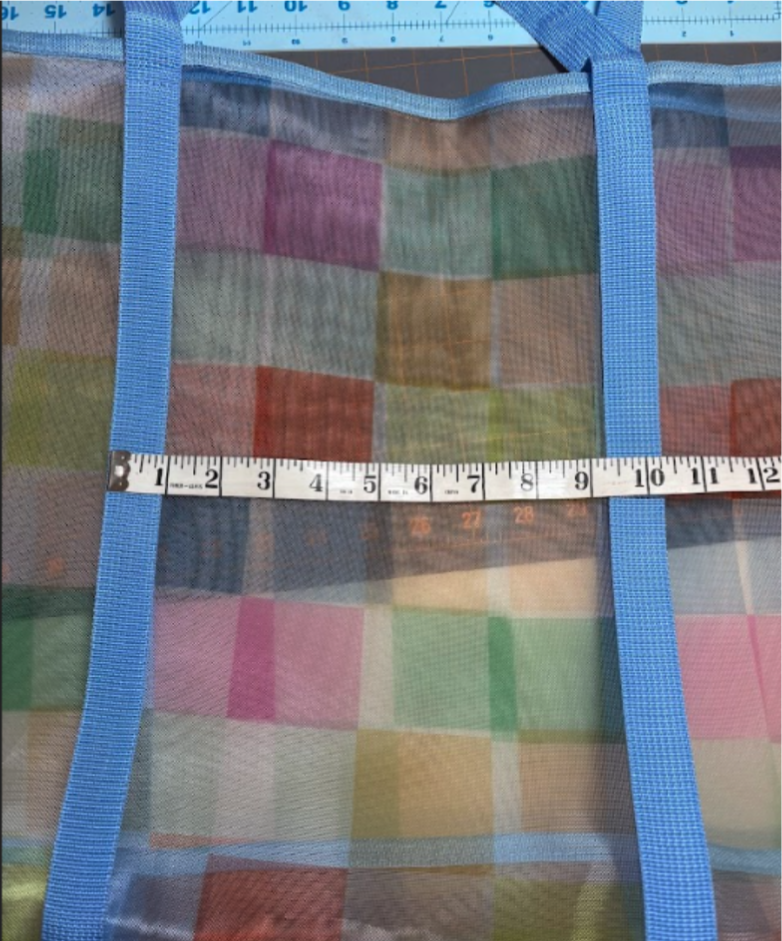
The finished size of the panels is about 10½”. I cut out rectangles from duck cloth that were about 13½”, allowing room for shrinkage from the embroidery and for the seam allowances and a little extra just in case.
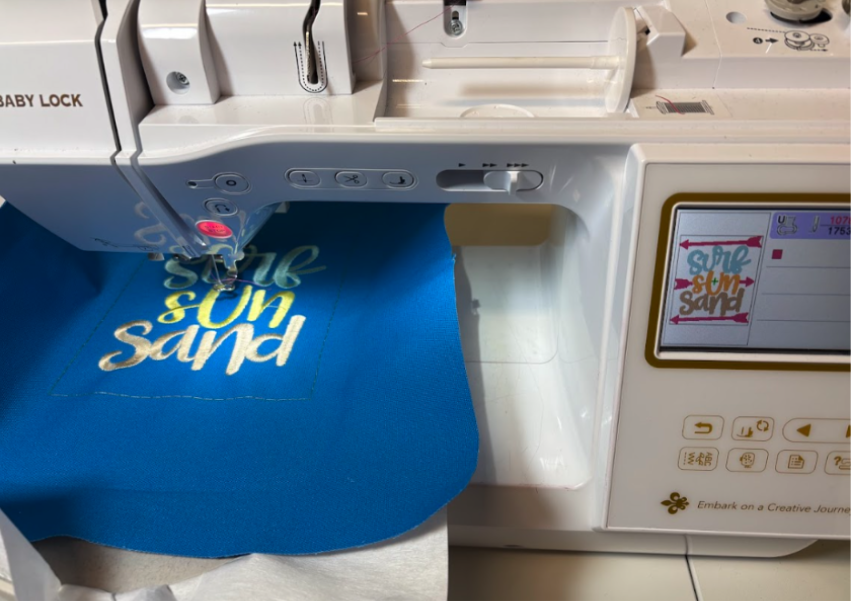
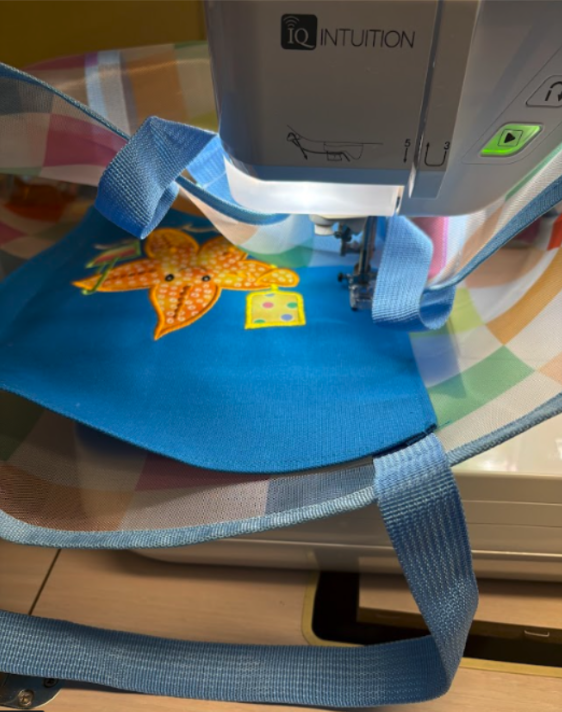
The first panel was embellished with “Surf, Sun, Sand” from DBJJ Beach Word Art 4. I chose a cut-away stabilizer for a little more stability. After hooping the stabilizer, I floated the blue rectangle. Because the duck cloth is stiff, I added a basting box to the design so the rectangle was firmly held down.
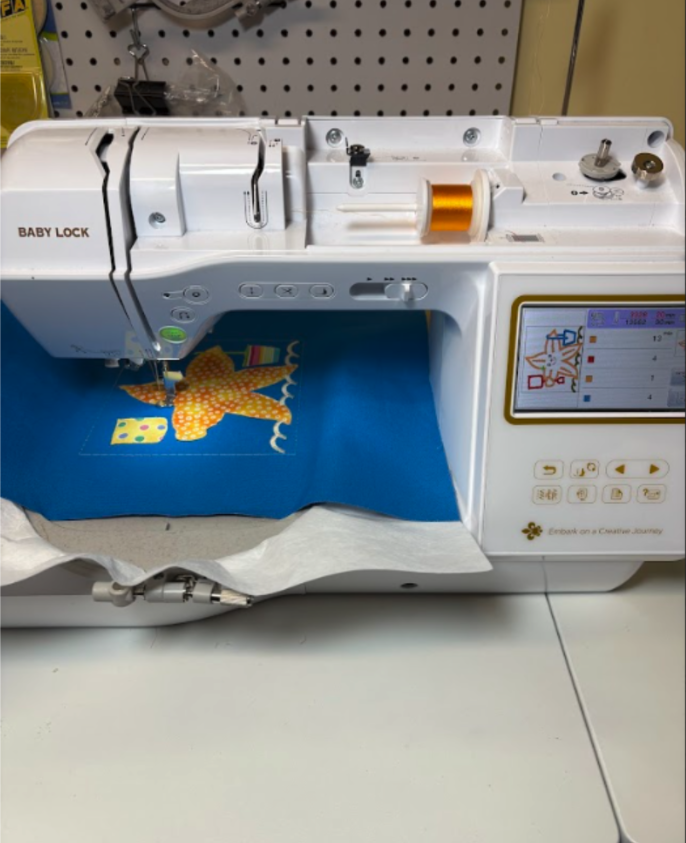
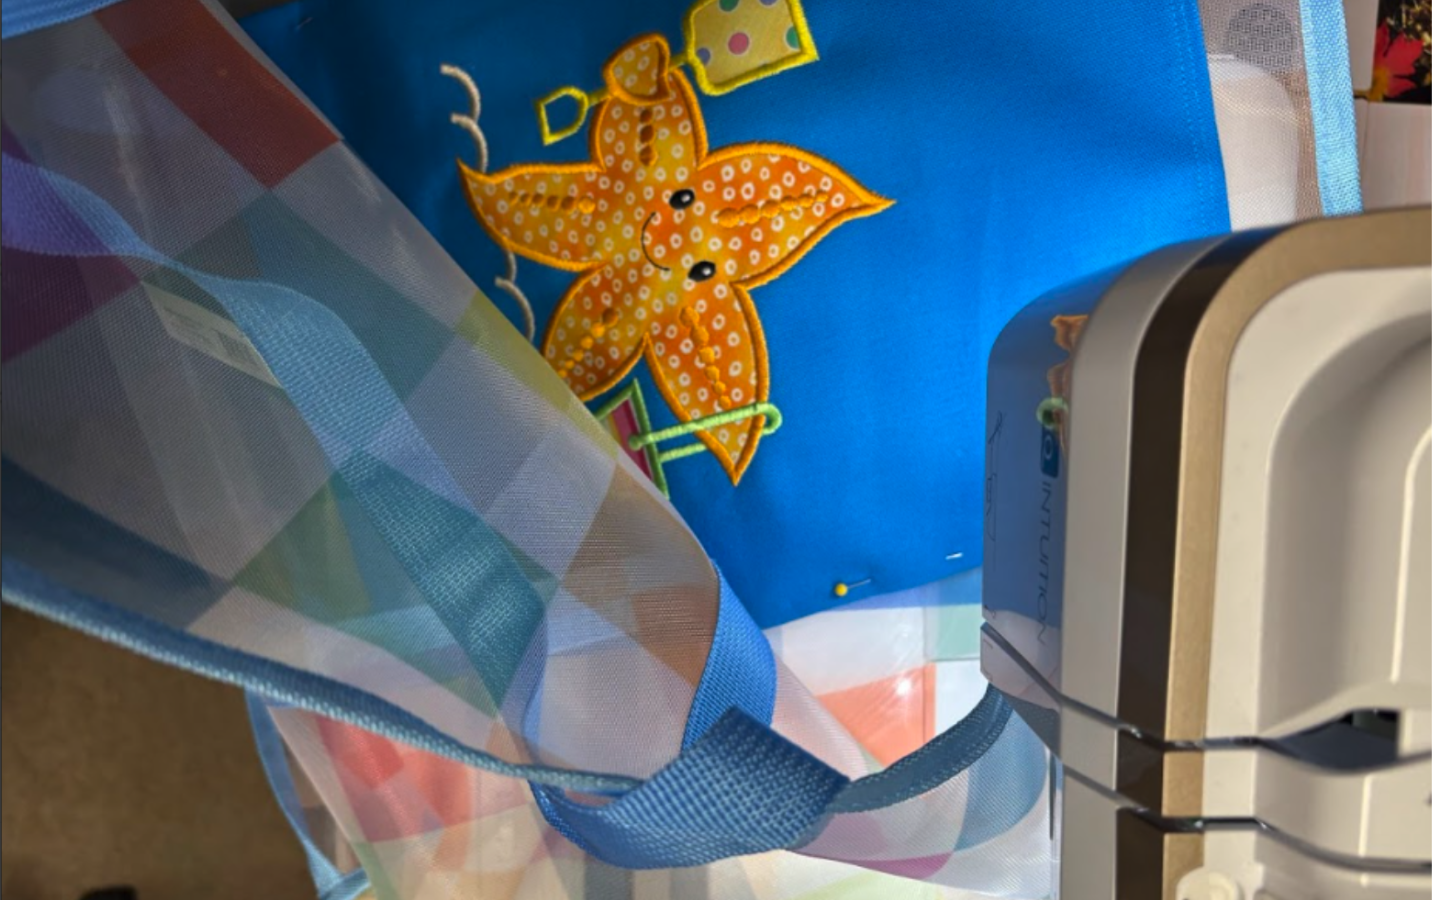
The second panel is going to sport the Beach Starfish Applique.
Once both panels were embroidered, I zigzagged their top and bottom edges, turned them under ⅜”, pressed, and sewed two lines of top-stitching. I didn’t want to turn the edges over twice because of the thickness of the fabric.
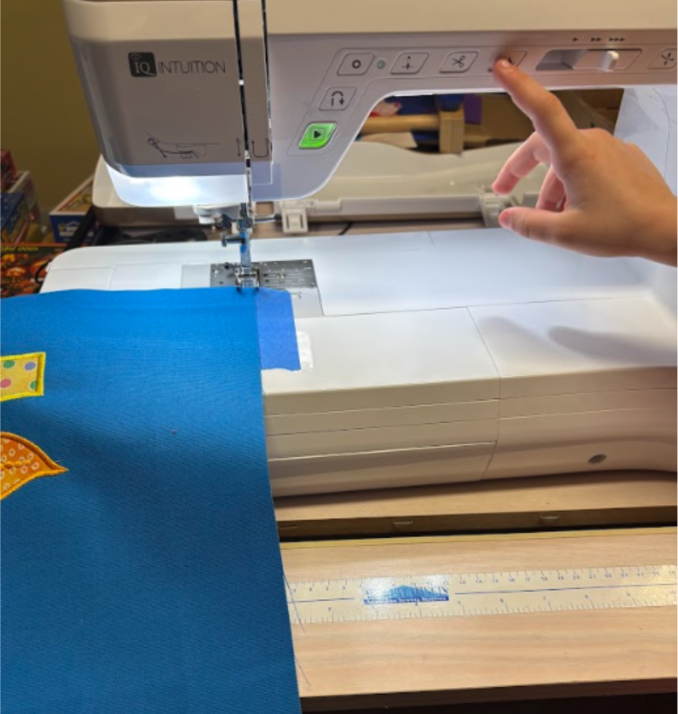
I didn’t zigzag the raw edges of the sides because once turned under and sewed to the straps they won’t be visible. I turned under the left and right sides so that the panel was just a skosh bigger than the span between the two outer edges of the straps so the straps wouldn’t be seen at all. After pinning well, I turned the bag inside out and sewed a line close to the edge of the panel—but on the strap—and another about 6/8” from the first.
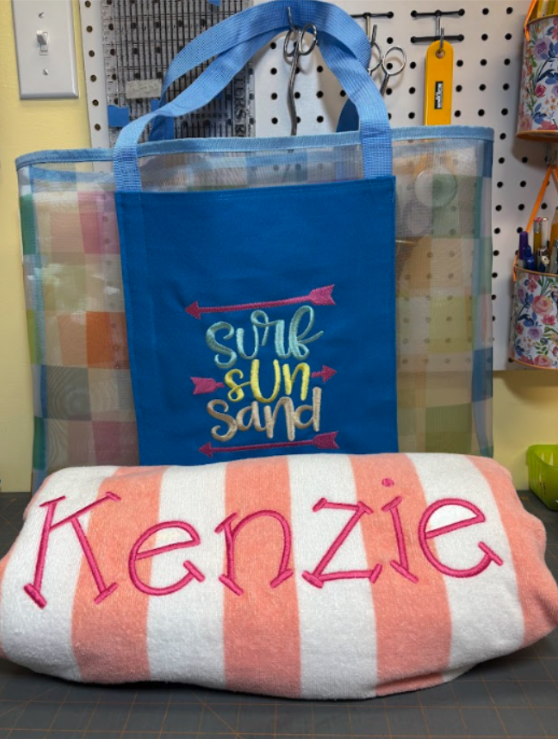
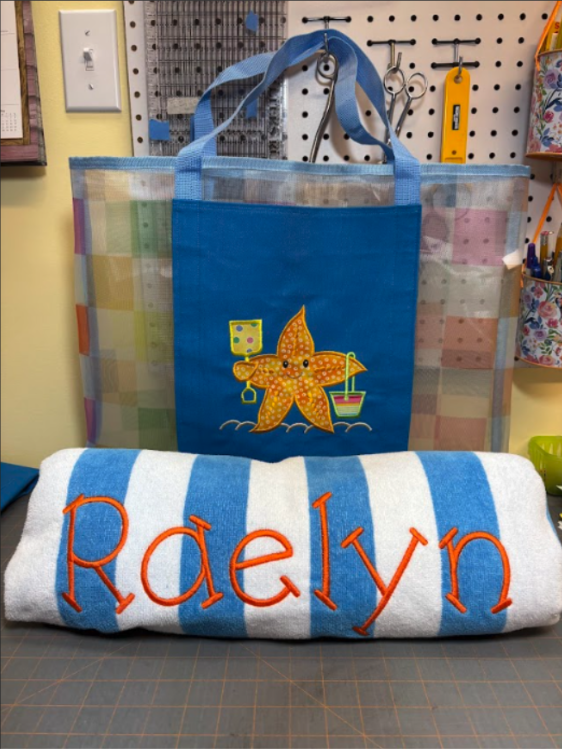
All set for summer trips to the beach!
Please share your projects in the Designs by JuJu Embroidery Blessings Facebook Group or anywhere on social media using the hashtag #designsbyjuju. It’s so much fun seeing what you create!